A mom's journal of the sweet things in her life...

Thursday, September 29, 2011

Milk Chocolate & Bailey's Tiramisu

 
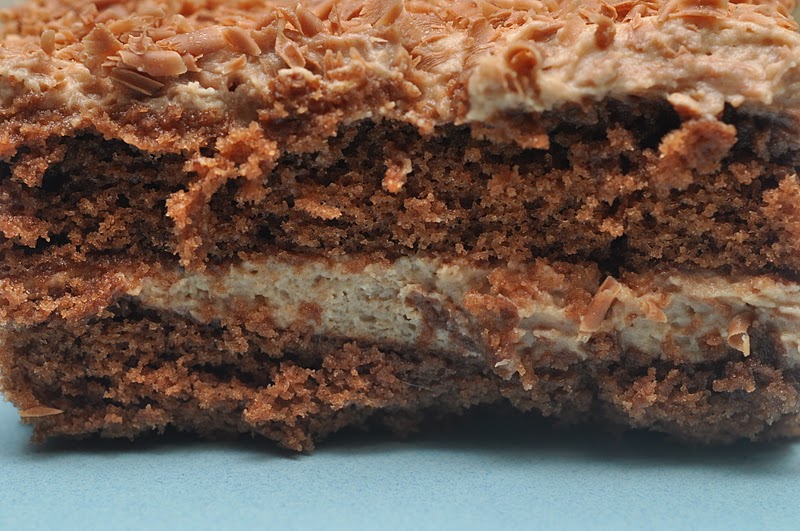
Please do not be deterred by the photos. This dessert was a hit. It turned out even better than I'd hoped and and I had high expectations. The picture was taken the day after I served it - I just couldn't pull out my camera and start shooting pictures in the midst of all the birthday chaos and dessert serving that was going on at the time. I made this for the adults at my son's 4th birthday party because I was pretty sure that, while the guests would have politely choked down a piece of Spiderman cake with copious amounts of icing and food coloring along with the kids, it wouldn't go over as well as this did.

I found this recipe in Better Homes and Gardens and adapted it to my liking. I'm not a tiramisu enthusiast by a long shot. Often times, I find it soggy and over-powered with too much liqueur and espresso. This recipe piqued my interest because not only was it chocolate, but instead of using lady fingers, you bake a chocolate sponge cake.  I changed the liqueur from a coffee-flavored one to Bailey's, and reduced the amount of espresso in the recipe because, like I said, I don't do soggy. The best part is that you can make it ahead of time (anywhere from 6 to 24 hours), put in in your fridge and focus on all the other stuff one must do when hosting a party. This will also save you if you're bringing dessert to someone's house - make it the day before and rest assured that every one will love it. Even the non-tiramisu lovers. And note that, unlike an authentic Tiramisu, this one does not contain raw eggs, so no need to worry about anyone with health issues.

Milk Chocolate & Bailey's Tiramisu
(adapted from Better Homes and Gardens|Ultimate Italian edition|2011)
FOR THE CHOCOLATE SPONGE CAKE:
2 eggs, room temperature
1 cup sugar
3/4 cup flour
1/4 cup unsweetened cocoa
1 tsp. baking powder
1/4 tsp. salt
1/2 cup milk
2 Tbsp. butter
1 tsp. vanilla
Preheat oven to 350 degrees F. Grease a 15 x 10 x 1 inch baking pan. Line bottom with parchment paper. Grease and flour the paper and the sides of pan; tapping out excess. Set aside. In small bowl, stir flour, cocoa powder, baking powder and salt. Set aside. In bowl of a stand mixer, beat the eggs on high speed about 4 minutes or until thick and lemon colored. Gradually add sugar, beating on medium speed for 4 to 5 minutes, or until light and fluffy. Add the flour mixture; beat on low to medium speed until just combined. IN a small saucepan, combine milk and butter. Heat and stir until butter melts. Add to batter along with vanilla, beating until combined. Pour into prepared pan and bake until a wooden toothpick inserted into center comes out clean, about 15 minutes. Cool in pan on wire rack for 10 minutes. Immediately loosen sides of cake from pan and turn cake onto clean kitchen towel sprinkled with cocoa powder. Carefully remove paper; discard. Cool completely. Cake can be wrapped well in plastic and frozen at this point.

FOR THE FILLING:
2 Tbsp. brewed strong espresso, divided
2 Tbsp. Bailey's
3 ounces of milk chocolate, chopped
1- 8 ounce carton mascarpone cheese
1 cup whipping cream
1/4 cup confectioners sugar
1 tsp. vanilla
2 Tbsp. Bailey's or freshly brewed strong espresso
grated chocolate for sprinkling on top (optional)

Place chopped milk chocolate in small microwave-safe bowl. Microwave, uncovered on 50% power about 1 minute, or until chocolate in melted and smooth, stirring every 15 seconds. Set aside to cool. In a large bowl beat the mascarpone cheese, whipping cream, powdered sugar, and vanilla with an electric mixer until soft peaks form (tips curl). Beat in 2 Tbsp. of Bailey's liqueur and cooled melted chocolate until just combined. Set aside.

ASSEMBLY:
Cut cooled cake in half cross-wise. Line a 2 quart baking dish with one of the cake halves. (I used a glass 8 inch square pyrex dish). Drizzle 1 Tbsp. each of espresso and Bailey's over the cake. (I used a pastry brush for more even distribution). Allow to soak in. Spoon half of the filling over the cake, spreading evenly. Top with the remaining cake half, cutting to fit as necessary. Drizzle with the remaining 1 Tbsp. of espresso and Bailey's. Top with remaining filling; spreading evenly. Cover and refrigerate for 6 to 24 hours. If desired, garnish with grated milk chocolate before serving.  Yields: 12 servings. 


Sunday, September 11, 2011

S'mores Cookie Squares

If the words: 'ooey', 'gooey', 'sticky' and 'messy' scare you off when used to describe a dessert, then these bars are not for you. These S'mores Cookie Squares are very sweet and rich, a small piece goes a long way. 

Versions of these are all over the internet these days, particularly over the summer months. They've always appealed to me, but what held me back from trying them was the idea of having to spread cookie batter over top of a marshmallow layer. They sounded like too much trouble. But yesterday, we were going to my sister's for what will likely be the summer's last BBQ, and I decided it was time to tackle this. What dessert is more appropriate for a summer BBQ than S'mores? And while assembling, I figured out a great way to get that second layer of cookie dough over top of the marshmallow layer without squishing it. See pictures below.

The verdict? These were really good. The empty plate at the end of the night is always the best indicator of a dessert's success. So, yes, these definitely get filed under the "make again" category. 

Recipe for S'mores Cookie Sqaures
(adapted from: Let's Dish who adapted it from Paula Deen)

1/2 cup butter, room temperature
3/4 cup sugar
1 large egg
1 teaspoon vanilla 
1 1/3 cups flour
3/4 cup graham cracker crumbs (about 6 sheets of graham crackers)
1 teaspoon baking powder
1/4 teaspoon salt
2 100 gram Hershey’s Milk Chocolate Bars (family size)
1 (7 oz.) jar marshmallow creme

Directions
Preheat oven to 350 degrees F. Lightly grease an 8-inch baking pan. In a small bowl, combine flour, graham cracker crumbs, baking powder, and salt and set aside. In a large bowl, beat butter and sugar with an electric mixer until creamy. Add egg and vanilla and beat until combined.  Add dry ingredients to butter mixture, and beat until combined. Press half of the dough evenly in the pan.  

Now this is where I deviated from the instructions. Cut a piece of parchment paper to fit over top of your base layer of cookie dough.
Press the second half of the cookie dough over top of the parchment paper and base layer of dough, until it evenly covers the paper. You'll now have two layers of dough, separated by one piece of parchment. Peel the first layer off by pulling at the parchment paper.
Set the top layer of cookie dough aside.
Spread marshmallow cream over the dough that's pressed into the pan. I sprayed an off-set metal spatula with cooking spray to prevent it from sticking and to make it easier to spread.
Lay the chocolate bars on top of the marshmallow creme, breaking apart as needed to create an even layer of chocolate. 
Carefully peel your second layer from the parchment paper and lay that on top.
Bake for 30 to 35 minutes, until golden brown and slightly puffed.
Allow to cool to room temperature before cutting into squares. I made mine earlier in the day and so before serving, I let them warm up in the oven (which was turned off but still warm from earlier) and left the door ajar. This allowed the squares to return to their previous state of softened chocolate, gooey marshmallows with a warm cookie crust. Delicious!

Thursday, September 1, 2011

Grilled Pork Tenderloin with Nectarine BBQ Sauce

You know when you make a regular week-night meal and you have really no great expectations other than to feed your family and just get one more meal finished? And then you're pleasantly surprised by how delicious the meal is and your entire family agrees? It's like a gift from the gods. 
My nectarines were ripening away on my counter and I was looking for something to make for dinner. Then I remembered seeing Gwyneth's recipe in Bon Appetie  for Peach BBQ sauce. Nectarines...peaches....really, what's the dif? I don't mean that literally - I do know the difference, but as far as cooking a BBQ sauce, I figured the nectarines would be a good fill-in. I was right! This sauce was delicious - and I'm not usually a fan of BBQ sauce. 
As for the rest of the preparation, I just threw together a random dry rub for the pork tenderloin by looking through my spices. Luckily I always jot down my 'random' concoctions, just in case I want to make it again. We'll definitely be having this meal again - it was loved by all four of us - and I can't tell you how rare that it is.  

Recipe for Grilled Pork Tenderloin with Nectarine BBQ Sauce
1 large pork tenderloin, trimmed and silver skin removed
Dry Rub:
2 tsp. kosher salt
1 1/2 Tbsp. brown sugar
1 tsp. chili powder
1/4 tsp. onion powder
1/4 tsp. garlic powder
Nectarine (or peach) BBQ sauce, recipe below
Clean your tenderloin. Mix all the ingredients for the dry rub. Season the tenderloin by rubbing all of the dry rub into the meat. Allow to sit for 15 - 20 minutes at room temperature. Preheat your BBQ to medium heat. Cook the tenderloin on the BBQ, turning often. Coat it with the BBQ sauce a few times in the last 5 minutes of cooking, allowing the sauce to cook onto the meat. Once the juices run clear and the meat is cooked, allow to rest 10 minutes before cutting.
Nectarine BBQ Sauce
(adapted from Gwyneth Paltrow via Bon Appetit)
1 cup chopped fresh nectarine, peeled (or peaches)
1/2 cup ketchup
1 1/2 tsp. adobo sauce from canned chipotles in adobo sauce
2 Tbsp. freshly squeezed lemon juice
2 garlic cloves, minced
Put all ingredients in a small sauce pan and simmer for about 10 minutes until slightly thickened. Allow to cool slightly. Pour into blender or food processor and process until smooth.

Wednesday, August 31, 2011

Banana Espresso Chocolate Chip Muffins (or Mini Bundt Cakes)

These muffins were adapted from the Baked cookbook. I've been curious about them for a while but I worried that the espresso flavor, as much as I love it, may have been too strong for my kids. So every time I had ripe bananas on my counter, I'd eye this recipe but then end up going back to  my old faithful banana bread recipe. Today I threw caution to the wind (and the incessant rain that has us stuck in the house looking for something to do). I kept the ingredients pretty true to the recipe but, instead of adding the instant coffee to the dry ingredients, I added it to the wet so that it would dissolve and ensure that no bits of the coffee granules made into the final product.
I was very happy with the results. The coffee flavor is very subtle - and unless you know it's in there, you may not even pick it up. These muffins are delicious and so moist and flavorful. Another great recipe to add to the list when looking for something to do with ripe bananas. I still have more bananas to use up so don't be surprised if you see a new Banana Bread recipe soon. But then again, don't be surprised if you don't either, you know what they say about the best of intentions. : )
Happy 'back to school' to all you moms out there. May tomorrow's new-found-freedom bring you much joy. 
Recipe for Banana Espresso Chocolate Chip Muffins
(adapted from Baked - New Frontiers with Baking by Matt Lewis and Renato Poliafito)
1 1/2 cups mashed, very ripe bananas (about 4 medium)
1/2 cup sugar
1/4 cup firmly packed light brown sugar
1/2 cup butter, melted
1/4 cup whole milk
1 large egg
1 1/2 cups all-purpose flour
1 tsp. instant coffee granules
1 1/2 tsp. baking soda
3/4 tsp. salt
2/3 cup mini chocolate chips (recipe calls for 1 cup of regular chips)
Preheat oven to 350 degrees F. Spray a 12-cup muffin pan (or mini bundt pan) with nonstick spray.
In medium bowl whisk stir together bananas, sugars, butter, milk, egg and instant coffee.
In another medium bowl, whisk flour, baking soda and salt together until combined. Make a well in the center and add the banana mixture. Stir until just combined. Fold in the chocolate chips. Fill each muffin cup until 3/4's full. Bake in center of the oven for 20 to 25 minutes until a toothpick inserted into centre comes out clean. (For me this was 23 minutes). Move muffins to cooling rack and allow to cool in the pan for 15 minutes. Remove from pan and finish cooling on cooling rack.
Can be stored in airtight container for up to 2 days. 

Tuesday, August 30, 2011

Dessert Cheese Ball

It's not the most beautiful dessert to offer up at say a bridal shower where everything is expected to be pretty and girly. But I brought it anyway. I tried a version of this at a party once and was very pleasantly surprised. When my sister, girlfriend and I recreated it last summer while on holidays, we nailed it. Except we didn't have the right crackers to accompany this dessert. We pilfered the sparse pantry and settled for the only crackers we could find - vegetable thins or something along those lines. We were desperate. The onion and garlic flavor we were hoping to ignore completely over-powered the sweetness of the chocolate bar. In a nutshell, it was disgusting. Please don't do that. 
But when I saw Renee's pita chips flavored with sugar and cinnamon at the grocery store recently, I grabbed them knowing they were the perfect accompaniment. And it was high time to resurrect this cheese-ball. So I whipped it up, to go alongside a prettier more appropriate dessert that I also took to the bridal shower. More than anything, I was curious to see how people would react. Would they like it? Would it just sit there, untouched? Had I romanticized my memory of how delicious it was when I first encountered it a couple years ago?
It was a hit. So I guess I can rest assured that my sugar-loving-palette isn't completely warped. 
Recipe:
12 ounces of cream cheese, room temperature
1/2 cup confectioners sugar
4 regular sized Crispy Crunch chocolate bars (Skor would be great too)
Chop candy bars into small pieces, set aside. Mix the cream cheese and sugar in a bowl with a spoon until smooth. Add approximately 1/4 of the crushed bars to the cream cheese mixture. Form into a ball, wrap with plastic wrap and refrigerate until slightly firm. Just before serving, remove from fridge and roll into the remaining chopped chocolate bars. Serve with plain or cinnamon-sugar flavored pita chips. (Or some other plain cracker).

Monday, August 29, 2011

Two-Bite Brownies

We just got home a couple of weeks ago from our summer holiday, which consisted of 30 glorious, rain-free days in beautiful San Diego. We rented a house that had a swimming pool, a hot tub, an outdoor jungle gym, a trampoline and a sports court. We visited Disneyland, Seaworld, Legoland, the Wild Animal Safari Park and the beach. Our days were full of sunshine, and the perfect balance of activity and poolside relaxation. And when we got home, I asked my three-year-old son what his favorite part of our holiday was, and do you know what he said? Target! True story.
I'm not sure what that says about him. Moreover, I'm not sure what that says about me, as his mother, and what I've taught him in his 3 short years on this planet.
But I digress. This post is long-overdue. Well, not this post in particular, I just made these brownies like 5 minutes ago - but a post in general. My blog has been collecting dust as I'm just finding my way back to the kitchen after a 2 month hiatus.
These brownies are brought to you courtesy of the mother of my son's first crush. We were invited over for a play date last week and my friend served us these delicious Two-Bite Brownies. Of course I asked for the recipe, they were delicious and adorable. Perfect for portion control - if you can stop yourself from eating more than one - which, unfortunately, was not the case with me. But for those of you who may or may not be sporting a post-summer-holiday-muffin-top (like me) these are relatively harmless, as far as brownies go at 85 calories and 2.3 grams of fat per serving. But that's not the only reason you should make them. They're delicious and so very fast and easy to throw together. (I didn't even bother pulling out my mixer!!)


Two-Bite Brownies
1/4 cup butter, softened
1 1/4 cup sugar
2 large eggs
1 tsp. vanilla
1 tsp. instant espresso
1 cup flour
1/2 cup cocoa
1/4 tsp. baking powder
1/4 tsp. salt


Preheat oven to 350 degrees F. In a large bowl, cream the butter and sugar until well-mixed. Add eggs, vanilla and instant coffee and stir until well-blended. In a separate bowl combine flour, cocoa, baking powder and salt. Add to egg mixture and stir by hand until just combined. Spray mini muffin tin with non-stick cooking spray. Spoon batter into muffin pan. Bake for about 12 minutes or until just puffed but still soft to touch. Do not over-bake! Cool in pan on wire rack for 5 minutes before removing brownies from pan and allowing to cool completely on wire rack. Yield: 24 brownies.

Friday, July 8, 2011

Lemon Poppy Seed Loaf (Starbuck's Copycat)

The other day, while ordering my regular coffee drink at Starbuck's, I buckled. I decided to blow my calorie intake for the day and indulge in a slice of Lemon Poppyseed Loaf. And it was good. It made me want to try replicating it at home. As luck would have it, the very next day I stumbled upon this recipe. And while it was not a lemon loaf, nor did it have a lemon glaze, I knew it would be a good foundation upon which to adapt to my liking. Now I know that most bakers prefer to use butter in their baking for the flavor factor, and most of the time I would agree. But the fact that this recipe uses oil instead of butter caught my attention. There are certain instances in which oil can really help to deliver the moistness that so many loaves lack. And the fact that the recipe yields 2 loaves instead of one? Well, that was the final straw. I knew I had to give it a go.

The verdict?  These lemon loaves are delicious. Moist and tender, similar to a pound cake with just enough of the lemon flavor that I was craving. And easy too. You can't really go wrong here. Perfect for a weeknight dessert, or an afternoon snack. Can you guess what I'll be eating for breakfast tomorrow? And the next day...

Recipe for Starbuck's Copycat Lemon Poppy Seed Loaf
Adapted from: A Farm Girl's Dabbles

For the Lemon Loaf:
3 cups AP flour
2 1/2 cups sugar
1 1/2 tsp. salt
1 1/2 tsp. baking soda
1 1/2 Tbsp. poppy seeds
1 1/2 cups milk
1 cup + 2 Tbsp. canola oil
3 large eggs
3 tsp. lemon extract (or you could use vanilla and add lemon zest if you don't have lemon extract)

For the Glaze:
3/4 cup sugar
1/4 cup freshly squeezed lemon juice
1/4 tsp. vanilla
1 Tbsp. melted butter

Preheat the oven to 350 degrees F. Generously spray two 8 1/2 inch x 4 1/2 inch loaf pans with non-stick cooking spray.

In the bowl of a stand mixer, combine flour, sugar, salt, baking soda, and poppy seeds. Mix on lowest speed until combined.

In a separate medium sized bowl, combine milk, oil eggs and lemon extract (or vanilla and lemon zest, if using). Slowly pour the wet ingredients into the dry with the mixer on lowest setting. Mix until combined. Beat on medium speed for 1 minute. Pour into prepared pans and bake for approximately 1 hour and 5 minutes; or until toothpick inserted into the loaves comes out clean.

While the loaves are baking, make the glaze by combining the sugar, lemon juice, vanilla and melted butter and whisking until smooth. Once loaves are finished baking, remove from oven and brush the glaze on both loaves until all the glaze is gone. Allow the loaves to cool for 20 minutes in the pans. After 20 minutes, loosen the loaves by running a knife along the perimeter. Turn the pans upside down and release the loaves. Turn right side up onto a cooling rack and allow to cool completely, and for the glaze to harden. 

Sunday, July 3, 2011

Bacon Jam

The stars aligned, the weather cooperated, the kids played happily (and quietly enough to dodge bed time several times). Even the dogs got along. And in the midst of all this, a dinner party was enjoyed. Outside. On a deck. Cold beers, plenty of wine, Raspberry Vodka infused girly drinks. Animated conversations amongst friends, lots of laughing, but the best part? Bacon jam, served on crostinis with brie. Yeah. Bacon. In jam form. Enough said.
Recipe for Bacon Jam
Source: adapted from Dinner with Julie
1 lb good-quality bacon
1 small onion, chopped
4-5 garlic cloves, chopped
1/2 cup packed brown sugar
1/2 cup coffee
1/4 cup maple syrup
1 Tbsp. balsamic vinegar 
1 Tbsp. dijon mustard

Chop the bacon and cook it in a heavy pot until nicely browned and crisp (or to your liking). Transfer to a paper towel lined plate and drain, set aside. Pour off all but about one tablespoon of the rendered bacon fat. Saute the onion and garlic in the remaining fat for about 5 minutes, until softened and golden brown. Return the bacon to the pot, add the brown sugar, coffee, maple syrup, vinegar and mustard and cook over medium heat until thickened to the consistency of sticky jam (about 10 to 15 minutes). Refrigerate until ready to use. The jam will stiffen once chilled, and is best served at room temperature.

Friday, June 10, 2011

Cheesecake Brownies

You know how some recipes you see get bookmarked, and you wait for the perfect day to make them, and then others get made within the hour of seeing the recipe? This one was one of the latter. I saw the picture, I read the ingredients, I rejoiced because I knew I already had everything required in my house, and then I got started immediately. 
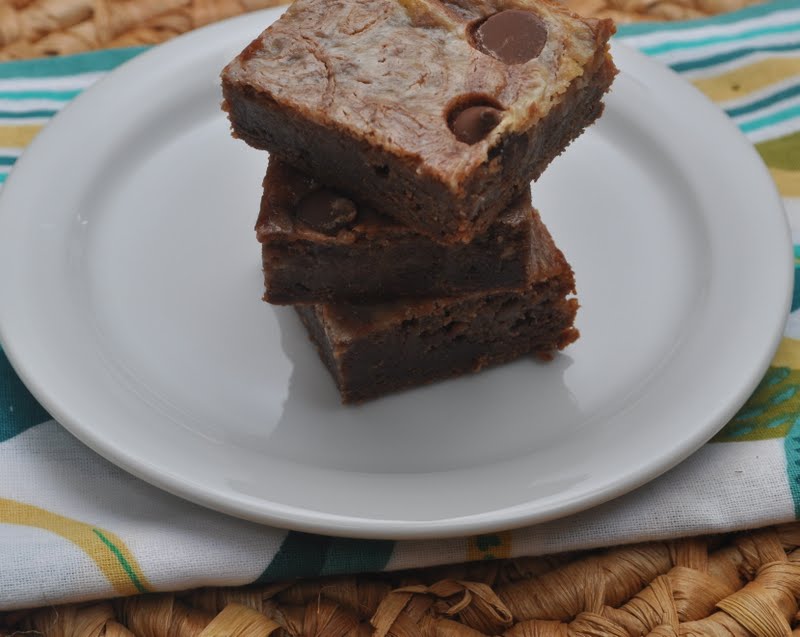
It could be argued that I "over-swirled" the two batters before baking, resulting in a less marbled appearance. I tried to use use a light hand while swirling, but I couldn't help myself. I just kept going and going. Thankfully, the resulting 'less than marbled effect' does not seem to affect the flavor. These brownies are delicious! The perfect balance of rich chocolate brownie and cheesecake. Kind of like a chocolate cheesecake bar. And, they're so easy to make. I found I preferred mine slightly chilled, as opposed to room temperature. For some reason any kind of cheese-cake related baking tastes better cold. 
Recipe for Cheesecake Brownies
(adapted from What's Gaby Cooking)
1/2 cup unsalted butter
3 oz semi-sweet chocolate, chopped
1 cup sugar
2 large eggs
2 tsp. vanilla extract
2/3 cup all-purpose flour
8 oz cream cheese, at room temperature
1/3 cup sugar
1 large egg yolk
1 tsp. pure vanilla extract
1/2 cup milk chocolate chips (optional)
Preheat oven to 350 degrees. Line a 9×9 baking pan with foil, leaving a 2 inch overhang on 2 sides. Spray with non-stick baking spray. Set aside.
Melt the butter and chocolate in a small saucepan over medium low heat, constantly stirring until completely melted. Remove from the heat and whisk in the sugar. Add the eggs and vanilla. Add the flour and gently fold just until  incorporated. Pour into the prepared foil lined baking pan and set aside.
For the Cheesecake layer: In a small bowl, combine the cream cheese, sugar, egg yolk, and vanilla and whisk together until smooth. Drop spoon-fulls of the cheesecake batter on top of the brownie batter. Then using a knife, swirl the two batters together until you have a marbled effect. Top with the milk chocolate chips, if using.
Bake for 30 minutes. Remove from oven and allow to cool. Chill in the refrigerator. Cut into squares.

Thursday, June 9, 2011

Roasted Tomato and Jalapeno Salsa AND Roasted Tomato and Jalapeno Salsa With Baked Goat Cheese


There's something so much more special about a salsa made with roasted tomatoes, jalapenos, onions and garlic. I love the black flecks of the charred skins from the vegetables in this salsa. Just seems so rustic. It also adds another layer of flavor - a smokiness that sets this apart from regular salsa. 
If you're not careful, this salsa could knock your socks off. I de-seed two of the jalapenos and leave the seeds in the third. As you know, the seeds are where the 'venom' from the jalapeno hides, the heat that you either love or hate. If you're a hater, you could either de-seed all of the jalapenos, or leave them out altogether. Substitute a different, milder pepper if you like. But we like it hot, and even with only one of the three jalapenos left with the seeds, this salsa has a good amount of heat. The noticeable kind - but it's not overwhelming. 
This salsa is definitely good enough to stand alone. It doesn't need anything more. Make this for your guests and you're sure to impress. But if you want to take it one step further and 'wow' them, you can bake your salsa with a goat cheese center. It's heaven. And the creaminess of the cheese helps to balance out the heat, so there's that. Whichever way you go, you must try this one. It's not nearly as labour-intensive as it sounds. And it's worth every second of it.  Plus, it holds longer than a regular salsa, you can make it the day before and it's only going to get better.
Recipe for Roasted Salsa 
Adapted from: Chaos in the Kitchen

1 1/2 pounds tomatoes (about 10 medium roma tomatoes, or 6 vine-ripened tomatoes)
1 to 3 fresh jalapeño peppers (1 to 1 1/2 ounces), stemmed
Half of a small white onion, sliced into 1/4 inch thick rings
6 garlic cloves, peeled
juice of 2 limes (or to taste)
1/3 cup chopped fresh cilantro, loosely packed
1 to 1 1/2 generous teaspoons kosher salt (or to taste)


Heat the broiler. Cut your tomatoes in half and core them. Cut your jalapenos in half, leaving the seeds in as many as you like, depending on your tolerance for heat. Place cut tomatoes and jalapeños on a broiler pan or baking sheet, cut side down.

Broil for about 6 to 8 minutes, until skins have blistered and have blackened spots. Allow to cool.
Set the oven to 425 degrees F. On a separate pan or baking sheet, combine the onions and garlic.
Roast in the oven, stirring occasionally, until browned and soft, about 15 to 20 minutes. Allow to cool.
Add jalapeños, onions, and garlic to a food processor and pulse to desired consistency. Scoop out into a bowl. Add tomatoes to the processor and pulse to a rough puree.
Pour tomatoes into the bowl with jalapeño mixture and stir. Add lime juice, cilantro and salt to taste.
Now, are you still with me? Cause it only gets better from here.

Recipe for Roasted Salsa with Baked Goat Cheese
Adapted from: Chaos in the Kitchen
4 oz goat cheese, softened
8 oz cream cheese, softened
salt, to taste
2 cups Roasted Tomato and Jalapeno Salsa (recipe above)
Preheat oven to 350°F.
In the bowl of your food processor, pulse the goat cheese and cream cheese until combined. Add salt to taste. Scrape the cheese out of the bowl and form a disk. Place the disk of cheese into the center of a baking dish. Scoop the salsa around the cheese. Bake until warmed through, 10 to 15 minutes. Serve with tortilla chips.
Related Posts with Thumbnails