Yesterday was the BIG HOCKEY GAME...Canada vs. U.S for the gold medal. We won!! Go Canada! Great game, from what I saw while making pizza. Since we were unable to join the masses at some drinking establishment to enjoy the game (okay, I wasn't that worried about it), I decided to make something fun to eat for dinner. What's better than homemade pizza?
I used the dough recipe from my cooking 'bible', "The Best Recipe" by Cooks Illustrated. A side note: I've gifted this book to the 2 foodies in my life who also love to cook and they love this book almost as much as I do.
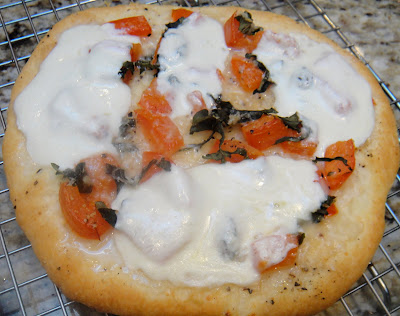
That said, I followed their recipe for the Pizza Margherita, which calls for chopped tomatoes instead of tomato sauce. I won't do that again. I also had 2 chunks of fresh mozzarella in my fridge, which is so much better than the regular mozzarella on pizza. However, the book said not to add it until the last 3 minutes of baking...and so I'm still not sure if I like the way it looks when you have blobs of white cheese melted on top. My pizza requires some more tinkering, simply for esthetic reasons. But it did taste good, and isn't that what matters?
Recipe for Pizza Dough:
The Best Recipe
1/2 c. warm water, about 105 degrees
1 envelope (2 1/4 t.) active dry yeast
1 1/4 c. water, room temperature
2 T. extra virgin olive oil
4 c. bread flour, plus extra for work surface
1 1/2 t. salt
vegetable oil or spray for oiling bowl
Measure warm water into 2-cup measuring cup. Sprinkle in yeast; let stand until yeast dissolves and swells, about 5 minutes. Add room temperature water and oil; stir to combine.
(I'm meticulous about following instructions when it comes to dough because I've had some very bad experiences in the past.)
Pulse flour and salt in the work bowl of large food processor fitted with steel blade to combine.
Continue pulsing while pouring liquid ingredients (holding back a few tablespoons) through feed tube. If dough does not readily form into a ball, add remaining liquid, and continue to pulse until ball forms. (Mine needed all the liquid.) Process until dough is smooth and elastic, about 30 seconds longer.
Dough will be a bit tacky, so use rubber spatula to turn dough onto lightly floured work surface; kneed by hand with a few strokes to form smooth, round ball. Put dough into deep oiled bowl and cover with plastic wrap.
Let rise until doubled in size, about 2 hours.
Punch dough down with your fist and turn out onto lightly floured work surface. Divide and shape as desired. Makes 2 large, 4 medium or 8 individual pizzas. I made 8 so I could play around with the toppings.
Form each piece into a ball and cover with a damp cloth. Let relax 5 minutes but not more than 30 minutes.
Preheat oven to 450 degrees, placing pizza stone on rack in lower third of oven for 30 minutes. (I threw away my pizza stone months ago and had to use a metal baking sheet lined with parchment - not ideal but workable.)
Working with one piece of dough at a time and keeping others covered, flatten ball into a disk using palms of hands. Starting at center and working outward, use fingertips to press dough to about 1/2 inch thick. Use one hand to hold dough in place and the other hand to stretch dough outward; rotate dough a quarter turn and stretch again. Repeat turning and stretching until dough will not stretch further. (I got tired of this and cheated by pulling out my rolling pin even though the recipe specifically says not to do this. My crusts turned out fine.)
Let dough relax 5 minutes then continue stretching until it is about 1/4 inch thick. When all the dough rounds are done, transfer to pizza peel that has been lightly dusted with semolina or cornmeal. (I used a combination of bread flour and cornmeal.)
Brush dough lightly with olive oil and then add toppings, leaving 1/2 inch border around the pizza. Don't add the cheese yet (I'm not sure if I like this idea or not, but I followed the instructions anyway).
I used my homemade marinara sauce for some of the pizzas...
and fresh tomatoes for the Margherita Pizzas. *Note: the tomatoes must be seeded or they will make the crust soggy.
The book said to cook this one with just the tomatoes and basil, and then add the cheese later.
My husband is a true carnivore, so the idea of a pizza without meat holds no appeal for him, plus he likes heat so on the pizzas with tomato sauce, I added spicy Italian sausage and jalapenos.
At this point, they went into the oven cheeseless. I added slices of the fresh mozzarella for the final three minutes of baking. This is what the Margherita looked like after baking...
I was not thrilled with what the high heat did to my fresh basil! I think that perhaps that should be added with the cheese for the final 3 minutes.
The sausage jalapeno pizza looked a little more appealing:
but again, I'm not sure about these cheese blobs. They tasted good, but I after all that work and time, I want them to look good too.
After baking and eating four of the eight pizzas, we were both full. So we decided to grill the rest of the dough on the BBQ, and then refrigerate the crusts so we can make more pizza tonight. I will be tackling this cheese blob problem on round 2, because now I won't be distracted by the fresh dough and the hockey game.
In the end, these pizzas were a success. But I'm always looking for ways to make it better...


No comments:
Post a Comment