A mom's journal of the sweet things in her life...

Monday, May 30, 2011

Fluffy Yellow Cake with Foolproof Chocolate Frosting (Revisited)

If you're looking for a great homemade yellow cake recipe, your search ends here. My first attempt was a recipe I found in Saveur, and it was 'good' but not great. The texture of the cake was a little heavy and had more of a spongy texture. This version, however, is amazing. No surprise the recipe is from Cook's Illustrated.
This cake has a soft, moist and tender crumb. It's a lot like the texture you get from a boxed cake mix, except it's missing that boxed cake taste. Hallelujah! I don't mind a boxed cake from time to time, and until now, I've always preferred it to any homemade versions of yellow cake. So many of the recipes out there just don't manage to get that moist and tender crumb that you get from the box. Why is that? There's hundreds of great chocolate cake recipes out there that beat the boxed chocolate cakes but when it comes to white or yellow cakes, they never seem to measure up.
And let's face it, while chocolate is great, sometimes it's nice to take a break from it. When you tire of chocolate and want something different, try this one. Honest. It's not the quickest recipe in the world and you'll dirty a lot of bowls, but that's the trade-off. This one is worth the sink full of dirty dishes. Trust. 
And the frosting? It's Cook's Illustrated "Fool Proof Chocolate Frosting" and it is a-mazing. Super soft and silky, perfect for swirling on your new favorite yellow cake. 
Fluffy Yellow Layer Cake
(adapted from 'Spring Entertaining' by Cook's Illustrated | 2011)
2 1/2 cups (10 ounces) cake flour, plus extra for dusting pans
1 1/4 tsp. baking powder
1/4 tsp. baking soda
3/4 tsp. table salt
1 3/4 cups (12 1/4 ounces) sugar
10 Tbsp.(1 1/4 sticks) butter, melted and cooled slightly
1 cup buttermilk, room temperature
3 Tbsp. vegetable or canola oil
2 tsp. vanilla
6 large egg yolks, plus 3 large egg whites, room temperature
Adjust oven rack to middle position and heat oven to 350 degrees F. Grease two 9 inch wide by 2 inch deep round cake pans and line bottom with parchment paper. Grease paper rounds, dust pans with flour, knock out excess. Whisk flour, baking soda, baking powder, salt and 1 1/2 cups sugar together in a large bowl. In a 4 cup liquid measuring cup or medium bowl, whisk together melted butter, buttermilk, oil, vanilla and yolks.
In a clean bowl of stand mixer fitted with the whisk attachment, beat egg whites at medium-high speed until foamy, about 30 seconds. With machine running, gradually add remaining 1/4 cup sugar; continue to beat until stiff peaks just form, 30 to 60 seconds (whites should hold peak but mixture should appear moist). Transfer to bowl and set aside.
Add flour mixture to now-empty mixing bowl fitted with whisk attachment. With mixer running at low speed, gradually pour in butter mixture and mix until almost incorporated (a few streaks of dry flour will remain), about 15 seconds. Stop mixer and scrape whisk and sides of the bowl. Return mixer to medium-low speed and beat until smooth and fully incorporated, 10 to 15 seconds. 
Using rubber spatula, stir 1/3 of whites into batter to lighten, then add remaining whites and gently fold into batter until no white streaks remain. Divide batter between prepared cake pans. Lightly tap pans against counter 2 or 3 times to dislodge any large air bubbles.
Bake until cake layers begin to pull away from sides of pans and toothpick inserted into center comes out clean, 20 to 22 minutes.
Cool cake in pans on rack for 10 minutes. Loosen cake from sides of pans with small knife, then invert onto greased wire rack and peel off parchment. Invert cakes again and cool completely on rack, about 90 minutes.
Foolproof Chocolate Frosting
(adapted from: Spring Entertaining' by Cook's Illustrated | 2011)
Yield: 3 cups - enough to frost one 9 inch 2 layer cake)
20 Tbsp. (2 1/2 sticks) butter, softened (60 to 65 degrees)
1 cup (4 ounces) confectioner's sugar
3/4 cup Dutch-processed cocoa powder
pinch of table salt
3/4 cup light corn syrup
1 tsp. vanilla 
8 ounces chocolate, melted and cooled slightly
In food processor, process butter, sugar, cocoa and salt until smooth, about 30 seconds, scraping sides of bowl as needed. Add corn syrup and vanilla and process until just combined, 5 to 10 seconds. Scrape sides of bowl, then add chocolate and pulse until smooth and creamy, 10 to 15 seconds. Frosting can be used immediately or held for up to 3 hours at room temperature. If making further ahead than 3 hours, cover and refrigerate, then let it stand at room temperature for 1 hour before using.

Tuesday, May 24, 2011

Pretzel and Pecan Caramels

It amazes me that, despite the amount of baking I do, I still manage to screw up a lot of stuff in the kitchen. Under-baked cakes, over-cooked candies, you name it, I've done it. And chances are I've done it recently, but I'm too proud to share. I did think, initially, that these caramels fell into the screw-ups category and was hiding them in my fridge until I could re-make them and redeem myself. Then my sister and girlfriend, Kim, tried them and assured me that they were not screw ups, they were delicious. So I tried them and was very pleasantly shocked surprised. (They were also tasted by a number of other people and met with rave reviews.)
I saw this recipe in a Taste of Homes magazine and I just knew right then and there that I'd be making them at my earliest opportunity. These caramels are chewy and decadent - and the crunch of the broken pretzels and toasted pecans put them over the top. I thought about adding a bit of salt on top but talked myself out of it because the pretzels have enough salt on them to flavor them. You could, however, forego the pretzels and sprinkle the tops with a coarse salt and they would be divine. Also, as much as I love pecans, roasted almonds would make an excellent substitute if you were so inclined. I'll be doing that next time.
You will require a thermometer but I promise that this recipe is not as finicky as most caramel recipes are. It takes a little while to get the temperature up to the hard ball stage (245 degrees), but even so, I strongly recommend having your add-ins (in this case broken pretzels and toasted chopped pecans) ready before you start boiling the caramel. Perhaps that last comment was a 'no-brainer' for some of you but I sure could have used a reminder when I tried my second batch. Enough said.
This is the perfect recipe for Christmas time, but it's too good to file away until then. The recipe makes a whole lot of caramels, as you want to cut them small because they are so rich. I cut them into 1 inch squares. It's better to have people go back for seconds or thirds then to have them put down a half-eaten caramel because it's just too much. 
They make a great gift and they store well in the fridge. But, based on my experience with them, they probably don't have a chance. 
Pretzel & Pecan Caramels
(adapted from Taste of Home | 100 Best Recipes | 2011)
1 cup butter
1 1/4 cups granulated sugar
1 1/4 cups brown sugar
1 cup dark corn syrup
2 cups heavy whipping cream, divided
1 lb chopped pecans (toasted)
2 cups of broken pretzel pieces
1 tsp. vanilla extract
Line a 13x9 inch pan with foil, generously spray with non-stick cooking spray (or use butter). In a large heavy saucepan, combine the sugars, corn syrup, 1 cup of the cream and the butter. Cook and stir over medium heat until the sugar is dissolved. Bring to boil. Slowly stir in the remaining cream. Cook, without stirring, until a candy thermometer reads 245 degrees (firm ball stage).
Remove from heat; stir in pecans, pretzels and vanilla. Pour into prepared pan. Let stand until firm. Using foil, lift candy out of pan. Discard foil, cut candy into 1 inch squares.

Thursday, May 19, 2011

Peanut Butter Balls (or Buckeyes)


I might just be the meanest mommy ever. After tucking my kiddos into bed, not only did I pillage their Easter chocolate stash and melt down about 75% of what remained to bake with it, but the thing I was making was something that my son can't even eat because of his peanut allergy. Who does that?!!
Luckily, they haven't asked for any Easter chocolate for a while now, so I'm thinking it's safe to say that they've forgotten about it. You can't miss it if you don't even remember it's there, right? Right??! Well, that's what I'm going with.
As for the peanut allergy, I have no defense. We gave up all nuts in our house when my son was diagnosed with a tree nut allergy 2 years ago. His allergy is not severe, but I didn't see the need to risk it. Until lately. I broke down and bought some peanut butter because I've been missing it something fierce. I eat it when he's not around. And now apparently I bake with it while he sleeps. After smashing up all his Easter eggs. Go me.
This recipe came from Baked Explorations. Peanut butter balls dipped in chocolate. They taste like Reese Peanut Butter Cups, except they're sweeter. Next time, I think I'll toy with the recipe a bit, decreasing the amount of sugar, and use more graham cracker crumbs. Don't get me wrong, they're great the way they are, but I'd like to get it even closer to a Reese's Peanut Butter Cup. But that's just me. Also, the original recipe calls for semi-sweet chocolate, which might have been a better choice - as milk chocolate is much sweeter. Serves me right, huh?
Recipe for Peanut Butter Balls
(adapted from Baked Explorations)
1/4 cup cream cheese
1 1/2 cups peanut butter
1 cup graham cracker crumbs (about 17 graham crackers)
3 cups of confectioner's sugar
10 Tbsp. butter, melted and cooled
12 ounces good quality chocolate, coarsely chopped (either semi-sweet or milk)

In the bowl of a standing mixer fitted with the paddle attachment, beat the cream cheese and peanut butter until combined. Add the graham cracker crumbs and mix to combine. Add the sugar and butter and beat at low speed, then gradually increase the speed as the sugar is absorbed until completely combined. Scrape down sides of bowl and beat again. The mixture will seem slightly dry. Form balls and place on parchment lined baking sheet.
Chill the balls and melt the chopped chocolate in the microwave at 50% power until smooth. 
Dip the balls into the chocolate. The book says to pierce the balls (as above); but I found that you could also place the ball on top of the fork and dunk it into the chocolate, which prevents the ball from having holes from the fork. Set the dipped balls back onto the parchment lined baking sheets and refrigerate until chocolate sets.

Wednesday, May 18, 2011

Mini Buttermilk Pancakes


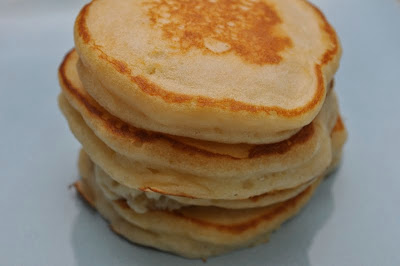
I may have inadvertently stumbled upon a theme here. A miniaturized breakfast foods theme. I've made mini muffins, mini cinnamon pull-apart breads and now mini pancakes, all within a couple of weeks. It was unintentional, honest, but I can't seem to help myself - but they're all so cute.


This morning my son asked for pancakes for breakfast. Instead of making the usual Mickey Mouse ones that are a staple in my house, I decided to try a recipe that I was drooling over earlier in the week. These pancakes are super easy and absolutely delicious. They puff up into the most tender pillows of deliciousness. And don't be alarmed when your kids ask for their fifth pancake, they are minis after all. The picture is a bit deceiving, they look bigger because those are salad plates  they're sitting on - not dinner plates. 

Recipe for Mini Buttermilk Pancakes
(adapted from Lick the Bowl Good)
1 cup flour
2 Tbsp. granulated sugar
3/4 tsp. baking powder
1/2 tsp. baking soda
1/2 tsp. salt
1 egg
1 cup buttermilk
1 Tbsp. melted butter
1 Tbsp. vanilla
Maple syrup for serving
Preheat griddle over medium heat.
Stir together dry ingredients. Beat egg until lighter in color and slightly foamy, then stir into dry mixture, along with buttermilk and butter and vanilla. Mix until just blended, being careful not to over-mix. No one likes tough pancakes.

Spoon 2 Tbsp. of batter onto a griddle sprayed with non-stick cooking spray. Flip when edges are slightly dry and cook underside until golden brown. Serve with extra butter and maple syrup.

Makes 12-15 mini pancakes.

Saturday, May 14, 2011

Mini Cinnamon Sugar Pull Apart Breads

This weekend my husband is in Vegas for a "golf"[insert  heavy sarcasm and an eye roll] trip with the boys. As per usual, my kids are both sick for his absence, rendering me completely at my children's mercy for 4 very long days. How does that happen?  Whenever my husband leaves, they always come down with something, undermining my confidence as a mother that I can run the show solo for a weekend.
To pass the time, I decided to pull out a recipe I've been dying to make for weeks. Only I decided to switch things up a bit. Instead of making one large loaf of pull-apart bread, why not cut the dough into smaller squares, and bake them in a muffin pan.I love the idea of a bread that you get to just pull small pieces off - but I like having my own little parcel to dissect and do with as I please. Besides, I don't feel like having my kids' sticky germ-infested fingers on my bread. They can have theirs, I can have mine, and we're all happy.
I followed the recipe as written until it came to the assembly. I brushed the dough with the butter, but found that I could only use about half, there was just too much butter to spread. So I reserved the excess butter for drizzling later. After sprinkling the sugar and cinnamon onto the dough, instead of cutting the dough into larger strips meant for a loaf pan, I cut them into small squares, approximately 2 inches.
Don't be too particular here. Just cut, you're just going to cram them into a muffin pan anyway, and the messier it is, the more rustic. 
Once my dough was all cut, I just started forming piles. I stacked them into 12 piles, as high as I could without them tumbling over.
Then I placed the piles sideways into a very well-greased muffin pan. 
I squeezed in the extra squares of dough, trying to even out the size of each. Now, I'm not going to lie. This is messy business. The sugar will fall out all over your counter. Don't be discouraged -  once my dough was evenly distributed in the muffin tray, I scraped up the lost sugar from my (otherwise clean) counter, and sprinkled it onto the bread.
I also drizzled the remaining butter that I didn't use earlier. Bake at 350 degrees F. for 20 to 25 minutes (mine were perfect at 23 minutes). Now this is important - PUT A PAN UNDERNEATH TO CATCH ANY DRIPPINGS. Just do it. I, however, did not have the benefit of this wisdom: 
Please learn from my mistake. This was the single time this weekend I was actually glad my husband wasn't home. I could just see the look he'd be giving me as smoke billowed out of the oven and filled our kitchen and dining room. That look is not helpful. Nor is it appreciated. Once the smoke cleared and me and my kids were able to breath without coughing, and our eyes had stopped watering, this is what was waiting for us:
Totally worth the trouble. And the smoke damage. 
Recipe for Mini Cinnamon Sugar Pull Apart Breads
(adapted from Joy the Baker)
For the Dough:
2 3/4 cups plus 2 tablespoons all-purpose flour
1/4 cup granulated sugar
2 1/4 teaspoons (1 envelope) active dry yeast
1/2 teaspoon salt
2 ounces unsalted butter
1/3 cup whole milk
1/4 cup water
2 large eggs, at room temperature
1 teaspoon pure vanilla extract

For the Filling:
1 cup granulated sugar
2 teaspoons ground cinnamon
1/2 teaspoon fresh ground nutmeg
2 ounces unsalted butter, melted until browned

In a large mixing bowl whisk together 2 cups flour, sugar, yeast, and salt. Set aside. Whisk together eggs and set aside.

In a small saucepan, melt together milk and butter until butter has just melted. Remove from the heat and add water and vanilla extract. Let mixture stand for a minute or two, or until the mixture registers 115 to 125 degrees F.

Pour the milk mixture into the dry ingredients and mix with a spatula. Add the eggs and stir the mixture until the eggs are incorporated into the batter. Add the remaining 3/4 cup of flour and stir with the spatula for about 2 minutes. (I got sick of stirring and dumped the whole mess onto my counter and kneaded it until it came together.) The dough will be sticky.

Place the dough is a large, greased bowl. Cover with plastic wrap and place in a warm space until doubled in size, about 1 hour. *The dough can be risen until doubled in size, then refrigerated overnight for use in the morning. If you’re using this method, just let the dough rest on the counter for 30 minutes before following the roll-out directions below.

While the dough rises, whisk together the sugar, cinnamon for the filling. Set aside. Melt 2 ounces of butter. Set aside. Generously spray a muffin pan with non-stick spray. When you think you have enough, spray a little more.

Deflate the risen dough and turn onto a well-floured work surface, cover with a clean kitchen towel and let rest for 5 minutes. Use a rolling pin to roll the dough out to approximately 12-inches tall and about 20-inches long. Use a pastry brush to spread melted butter across all of the dough. Sprinkle with all of the sugar and cinnamon mixture.

Slice the dough vertically and horizontally, making 2 inch squares. Stack the squares on top of one another creating 12 piles. Place the piles sideways into the muffin tins, using up all the dough. Place a kitchen towel over the muffin pan and allow to rise in a warm place for 30 to 45 minutes. (Mine did not double in size - but I went ahead and they were turned out great.)

Place a rack in the center of the oven and preheat to 350 degrees F. Place muffin pan in the oven WITH A PAN UNDERNEATH TO CATCH DRIPPINGS and bake for 20 to 25 minutes, until the tops are golden brown.

Remove from the oven and allow to cool for about 5 minutes. Run a butter knife around the edges of the pan to loosen the bread and carefully take out of the pan and place onto parchment paper. 

Tuesday, May 10, 2011

Green Goddess Pasta Salad


For Mother's Day this year, my sweet hubby supplied the breakfast. And by 'supplied', I mean he drove to A&W and bought me a Bacon 'n Egger. Yup, we're keeping it classy over here. Don't get me wrong, I'm not complaining. It was good and the clean up was fast. Which was also good because I spent the rest of the day in the kitchen cooking for the Mother's Day dinner for 12 that we had at our house.
I made this pasta salad as part of the meal. It wasn't even on the original menu, but I saw a version of it here and became inspired. Pasta salad is the perfect side dish for a BBQ, particularly when you want to ensure that you have enough food and variety for a large group of people. The problem is, most of the pasta salads I've had are dry and bland. The Green Goddess dressing used in this salad is far from bland and can be used to dress a variety of greens. It was perfect for this salad too - creamy and fresh, and packed full of flavor. Although it is mayonnaise-based, trust me when I say it is far from a typical mayonnaise-based pasta salad.
This salad is so versatile, you can add whatever vegetables you want, and I don't know why I didn't think of this earlier, but bacon would have been a welcomed addition too. I like to sautee my vegetables before adding them to the salad, I prefer them to be slightly cooked - but still crunchy - instead of raw. Plus they have more flavor after they've been sauteed in a tiny bit of oil and seasoned with salt and pepper. Even if you're not a fan of pasta salad - you have got to try this Green Goddess Dressing!
Green Goddess Pasta Salad
1 lb of pasta, cooked to your preferred tenderness (unless making ahead, then stop cooking about 1 minute earlier to retain a little bite (I used Scoobi Doo pasta - have no idea why it's called that!)
1 lb of asparagus spears, cut into bite size pieces
1 red pepper, thinly sliced
1 Tbsp. oil
1 - 2 cups of crumbled feta
2 cups (or more) of Green Goddess dressing (recipe below)


Cook the pasta to desired tenderness. Rinse thoroughly under cold water to stop it freom cooking further. Put the cooked pasta in a large mixing bowl and then dress with enough dressing to coat the pasta. 
Chop your vegetables (whatever you have on hand) to bite-sized pieces. 
Sautee vegetables (in this case asparagus and red peppers) in a pan with a Tablespoon of oil, seasoning with salt and pepper to taste. (Don't over cook the vegetables, just cook them till they've softened slightly but still retain their crispness.) Add vegetables to the pasta and dressing. Sprinkle with feta and mix. Taste and add more seasoning if required. (I didn't add anything.) Refrigerate until ready to serve. This can be made a day ahead. Be sure to taste your salad again after it's been chilled, and add a bit more dressing if required. (I added a little more so it was extra creamy.)

Basil Green Goddess Salad Dressing
(adapted from Chaos in the Kitchen, who adapted in from Barefoot Contessa)
1 cup basil leaves 
1 cup mayonnaise 
7 green onions
1 avocado
1/4 cup lemon juice 
2 cloves garlic 
2 tsp salt 
freshly ground black pepper, to taste
1 cup sour cream 
Combine mayo, basil, green onions, avocado, lemon juice, garlic, salt and pepper in a food processor. Blend until smooth and creamy. Add sour cream to the blender and blend just until combined. Chill dressing until serving.

Sunday, May 8, 2011

Cake Pops


Happy Mother's Day!


Today, I don't have a recipe per se for you. I have more of an solution. Have you ever made a batch of cupcakes; taken them out of the oven, gotten excited because they're perfectly risen and gorgeous, only to walk by your kitchen counter and see them completely deflated and sunken in? Well I did, just the other day. I had made yellow cupcakes for my daughter's birthday party and they looked amazing - but by the time I realized that they weren't quite done, it was too late. They fell flat and were heavy, far from the beautiful specimen I had taken out of the oven.

Before, I would have simply thrown them away. However, in this day and age, when Cake Pops are all the rage, failed cupcakes (or cakes for that matter) are no longer destined for the garbage.

Most of the recipes out there for Cake Pops are made with boxed cake mixes and store-bought icing. Imagine how much better these adorable bites are when made with homemade cake and icing. Even if the homemade cake part is a failed batch of cupcakes. Particularly when it's a batch of under-baked cupcakes, there's even more moisture to bind them together. However, if your failed cupcakes or cakes are over-baked, they'd work too. You could even add a bit of melted butter to the mix to moisten them up. I won't tell.

So here's the perfect solution to your baking failures - or when you find some leftover cupcakes in the freezer. Don't pitch them. Grind them up, add some icing, make balls, poke a stick in it and dip it in melted chocolate and Voila! My kids loved these.


I used 12 cupcakes. Broke them up and put the crumbs in the bowl of my stand mixer.
Added 1 1/4 cups of buttercream icing and mixed until thoroughly moistened and the 'crumbs' were able to hold their shapes when rolled into balls.
Refrigerate balls until slightly firm. (Or if you're impatient, like me, put them in the freezer for 10 minutes to speed things up.
Melt your chocolate candy melts and dip the end of the stick into the melted candy before poking halfway through the balls. Back into the fridge (or freezer) until set.
Then you just dip the whole Cake Pop into the melted chocolate, shake off excess, decorate with sprinkles before chocolate sets (it sets quickly because the pops are cold - so work fast), then stick the Cake Pops into a piece of styrofoam until dried. 
Enjoy!

Related Posts with Thumbnails