A mom's journal of the sweet things in her life...
Showing posts with label Chocolate. Show all posts

Saturday, August 18, 2012

Milk Chocolate & Peanut Butter Cheesecake with Pretzel Crust

It's been a very long time since I last posted. I've been a very lazy girl in the blogging department, which is not to say that I've been lazy in the kitchen. I've made some great stuff over the past few months, I just haven't really felt like blogging about it. But I couldn't let this little gem fall between the cracks, because this dessert was one of my favorites. 
This was inspired by a dessert that was served at Earl's for a short time. It was a milk chocolate pudding topped with a peanut butter mousse and then sprinkled with a home made sponge toffee. It was heaven. Instead of pudding, I opted for a milk chocolate cheesecake for my base. I made a thin peanut butter layer for the top. The crust is crushed pretzels instead of graham wafers, and then I melted peanut butter and poured it on the crust to help it to bind and also give the cake that extra hit of peanut butter. 
And, yes, I did make a homemade sponge toffee to sprinkle on top which was great for texture, but I completely forgot to use it when I photographed the dessert. You'll just have to take my word for it.
I'm not going to lie. This cake is a lot of work. There's a lot of different layers of flavors going on here but it really comes together and is a show stopper. Make this for someone you love. Or when you just really need the peanut butter chocolate combo but want a refined version of Reese's peanut butter cups. 
For the Crust:
1 cup of crushed pretzels (you want fine crumbs here but not dust)
1 Tbsp. granulated sugar
1/4 cup butter, melted
1/4 cup smooth peanut butter
Combine crushed pretzels, sugar and melted butter. Press into the base of a greased 9" spring-form pan. Bake at 375 degrees F. for 8 to 10 minutes or until slightly golden.
Microwave peanut butter until pourable consistency, and pour over the baked crust.  *Now that your crust is ready, wrap the outside of the pan with foil if you plan to bake your cheesecake in a water bath (optional). 
For the Cheesecake
(adapted from Fine Cooking)
8 oz milk chocolate, finely chopped
3 x 8 ounce packages of cream cheese, at room temperature
1/2 cup sour cream
2 tsp. vanilla extract
2 Tbsp. unsweetened cocoa powder
1/4 tsp. salt
1 1/4 cups granulated sugar 
3 large eggs, room temperature
Melt the milk chocolate in a glass bowl in the microwave at 50% power for 90 seconds. Stir. Continue to microwave in 30 second bursts, stirring in between each, until chocolate is smooth. Set aside.
Put the cream cheese in the bowl of a food processor and pulse until smooth. Add the rest of the ingredients EXCEPT the eggs, and process until smooth. Add the eggs and pulse a few times only until incorporated. Do not over mix or the cake will expand too much when baked. Scrape the melted chocolate into the mix and pulse until just incorporated. Pour over crust.
Bake at 300 degrees F. for 50 to 60 minutes until the centre barely jiggles when you tap the pan. Remove from oven, allow to come to room temperature on a cooling rack before refrigerating over night.
*I always bake my cheesecakes in a hot water bath - and I did with this one as well, but it's not necessary. If you choose to do the same, place your cheesecake in a large roasting pan before baking, and pour enough boiling water in the roasting pan to come half-way up the cheesecake. 
For the Peanut Butter Layer
(adapted from Willow Bird Baking)
1/2 tsp. powdered gelatin
2 Tbsp. cold water
1 cup heavy cream
2 large egg yolks
3 Tbsp. sugar
4 Tbsp. smooth peanut butter
1/8 tsp. salt
In a small bowl, mix the gelatin and the water in a small bowl. Let dissolve for 5 minutes. Heat the cream over low heat in a small sauce pan until it bubbles form around the edges. In another bowl, whisk together the egg yolks and the sugar. While whisking vigorously, add 1/2 of the hot cream into the egg yolks and sugar. Then slowly pour the egg mixture into the saucepan of cream, whisking constantly. Cook over low heat, stirring constantly, until thickened, about 3 minutes. Remove from heat and whisk in the peanut butter and the gelatin. Chill until it's cooled and thickened slightly, but not set. Pour mixture over top of the chilling cheesecake (still in its spring form pan) and refrigerate for several hours, preferably over night. When completely chilled, remove cake from spring-form pan and serve.


*Like I said, I forgot to photograph the honeycomb, but it was a great addition to this dessert. I used this recipe from Bon Appetit. One could always buy honeycomb instead of making it, it would definitely save you a lot of time. 

Wednesday, June 6, 2012

Chewy Brownies

I saw this recipe for brownies by Cook's Illustrated, which promises a homemade version of the chewy brownie that comes from the boxed mix. This is one of those rare instances where a close approximation to the box mix is a good thing. I altered the recipe slightly by omitting the 6 ounces of bittersweet chocolate chunks that were to be added to the batter before baking. I prefer not having the texture of the chocolate chunks interfering with the chewiness of the brownies. Also, I don't like my brownies too chocolate-y, as strange as that sounds. There really is such a thing as 'too much of a good thing'. These brownies were a definite hit - with kids and adults alike. Definitely worth a try - they'll wind up in the favorites rotation for sure. 
Recipe for Chewy Brownies
(Source: adapted from Spring Entertaining | Cook's Illustrated | 2012)
1/3 cup dutch processed cocoa
1 1/2 tsp. instant coffee
1/2 cup plus 2 Tbsp. boiling water
2 ounces unsweetened chocolate
4 Tbsp. unsalted butter, melted
1/2 cup plus 2 Tbsp. vegetable oil
2 large eggs plus 2 large yolks
2 tsp. vanilla
2 1/2 cups (17.5 ounces) sugar
1 3/4 cups (8.75 ounces) all purpose flour
3/4 tsp. salt
Preheat oven to 350 degrees F.  Line a 13x9 inch baking dish with foil, leaving a 2 inch overhang. Spray with non-stick vegetable spray.
Whisk cocoa powder, instant coffee and boiling water together in a large bowl until smooth. Add the semisweet chocolate and whisk until completely melted. Whisk in the oil and then the melted butter. Add eggs, egg yolks and vanilla, whisking until smooth. Add the sugar and whisk until incorporated. Using a rubber spatula, fold in the flour and salt and mix until just combined.
Pour batter into the prepared pan. Bake until a toothpick inserted halfway between the edge and the center have a few moist crumbs attached, about 30 to 35 minutes. (I baked mine for 30 minutes.) Allow to cool in pan for 90 minutes.
Using the foil overhang, remove the brownies from the pan and allow to cool completely. Cut and serve. 

Friday, April 13, 2012

Chewy Chocolate Caramel Popcorn

When I was tidying my spice cabinet, I came across 3 Mars Bar chocolate bars. Apparently I had done an excellent job hiding them from myself. Many chocolate cravings have been had since those bars were stashed back there, had I remembered them, this chocolate caramel popcorn would have never been born.
I'm not sure what inspired this creation, or why it even occurred to me to melt the chocolate bars and pour them over popcorn. I've made Mars Bar Squares several times in the past, but not once had I thought to replace the rice krispies with popcorn. My bad.
I basically followed the recipe for the Mars Bar Squares, but since I only had three, (the recipe calls for four) I cut the butter back by 2 Tablespoons and held back some of the microwave popcorn. I think four would be perfect to use an entire bag of popcorn and so I've written the recipe accordingly.
For some reason, I decided to bake the popcorn after coating it with the chocolate, even though I really liked the chewiness of the unbaked popcorn. So you can go either way... if you like your caramel corn chewy, skip the baking step. However, if you prefer a little bit of crispiness along with the chew, then proceed to bake it for NO MORE than 5 minutes. The unbaked version is the perfect consistency for forming popcorn balls - should you be so inclined. 
Needless to say, this was deliciously decadent. Sweet, with a hint of salt from the the popcorn. Between me and my kids, it didn't stand a chance.
Chewy Chocolate Caramel Popcorn
(tease-spoonofsugar original)
4 Mars bars (regular sized), chopped
1/2 cup butter
1 bag of microwave popcorn (I used light)
Pop one bag of microwave pop corn and pour into a large mixing bowl. Make sure to remove any unpopped kernels. Melt the butter with the Mars bars over low heat, stirring constantly until the mixture comes together. (It will appear to separate at one point, keep stirring). Pour over the popcorn and mix until thoroughly coated. At this point, you can eat it, if you like your popcorn chewy. If you want it partly crispy, spread over a parchment lined cookie sheet and bake at 350 degrees F. for 4 to 5 minutes. Remove from oven, allow to cool, break into pieces and enjoy.

Monday, April 9, 2012

Baked's Sweet and Salty Cake

Baked's famous Sweet and Salty Cake has been on my baking 'to do' list for over a year. Being a lover of salted caramel is what drew me in, but the fact that the icing/filling for the cake contains a pound of chocolate, a pound of butter as well as caramel is something that both enticed me and scared me at the same time. And that's just one component - there's still salted caramel that is used to soak the cake layers, never mind the cake itself. Even I struggled with the calories and I never say no to dessert.
So, when my sister's 40th birthday rolled around, I knew I couldn't ask for a better excuse to try this recipe out. If turning 40 isn't a good enough reason to abandon reason and good judgment and dive head first into vat of calories and fat grams, well...when?  And, yes, I realize it wasn't 'my' birthday and so the justification didn't apply to me directly, but I figured I could take one for the team.
I googled the recipe to see how other bloggers fared with this cake and the results did nothing but make the task seem all the more daunting. It seems that more people struggled with the assembly of the cake than not, but everyone said it was delicious, despite its less-than perfect appearance. Complaints of the layers slipping and sliding were the most common, and once I made the filling/icing, it was easy to see how this could be a problem. The filling starts by making caramel, pouring the hot caramel over a pound of chocolate, letting that cool, then adding a pound of butter. The end result is the most silky, decadent filling, but it's slick and far from sturdy, the perfect substance to make your cake layers slide. As my mix master was beating this filling, and I was diligently adding the butter, it started to sound like the filling had turned to soup. I became alarmed - and actually held back the remaining butter (about 4 tablespoons). It was already delicious - I didn't think we'd miss the remaining butter.
Also, having gleaned tips from several blogs that tackled this cake, I decided to put the cake in the freezer after icing each layer, to allow the filling to set up a bit before adding the next layer. This made the assembly easier, albeit more time-consuming, but I'm happy to report that I did not experience the same struggle of slipping layers.
I also held back on some of the fleur de sel that was sprinkled between each layer. The recipe calls for a whole teaspoon between each layer, which seemed a bit excessive to me when I measured out a teaspoon.
Instead, I eyeballed it, sprinkling it on until it seemed like enough, which amounted to roughly half a teaspoon. The cake had the perfect balance of rich filling, sweet chocolate and salt.
I can't stress enough how important it is to give the cake a 10 minute rest in the freezer before adding the next layer. 
The end result was worth the time and effort. But let's be clear, this is definitely a special occasion cake.
When making the cake layers, I decided to forego the recipe used in the Baked book. I've already found my fool-proof chocolate cake and saw no need to risk trying a new recipe when there were already so many other components to tackle. So, if you're going to attempt this cake, and I strongly recommend that you find an occasion to justify it, use a chocolate cake recipe that you already love. If you don't have one, use mine. The rest of the recipe is as follows.
RECIPE FOR SWEET AND SALTY CAKE
(adapted from Baked - New Frontiers in Baking by Matt Lewis and Renato Poliafito)
Bake your favorite chocolate cake and use 3 x 8 inch circle pans. My favorite chocolate cake recipe can be found here.
For the Salted Caramel (used between the cake layers):
1/2 cup heavy cream
1 tsp. Fleur de Sel
1/4 cup water
1 cup sugar
2 Tbsp. light corn syrup
1/4 cup sour cream
For the  Whipped Caramel Ganache Frosting:
1 pound good quality chocolate (the recipe calls for dark, I used half dark, half milk chocolate)
1 1/2 cups heavy cream
1/4 cup water
1 cup sugar
2 Tbsp. light corn syrup
2 cups (4 sticks) unsalted butter, soft but cool, cut into 1/2 inch pieces
To assemble the cake:
1 to 2 tsp. fleur de sel (or to taste)
Directions for the Salted Caramel:
In a small saucepan, combine the cream and fleur de sel. Bring to simmer over very low heat until the salt is dissolved. Keep warm. Meanwhile in a medium saucepan, combine water, sugar and corn syrup. Stir gently so as not to splash the mixture onto the sides of the pan. (Keep a wet pasty brush on hand to brush the sides of the pan should any of the mixture splash up, to keep from burning.) Cook until mixture reaches 350 degrees F. or until mixture is dark amber in color. Remove from heat and let cool for 1 minute. Add cream and mix until incorporated, taking care because the mixture will bubble up when the cream is added. Whisk in sour cream. Allow to come to room temperature, then place in fridge until you are ready to assemble the cake.
Directions for the Whipped Caramel Ganache Frosting:
Chop the chocolate and put into the bowl of a stand mixer. Set aside. In small saucepan, bring cream to simmer over low heat. Keep warm. In a medium saucepan combine water, sugar and corn syrup. Stir gently so as not to splash the mixture onto the sides of the pan. (Keep a wet pasty brush on hand to brush the sides of the pan should any of the mixture splash up, to keep from burning.) Cook until mixture reaches 350 degrees F. or until mixture is dark amber in color. Remove from heat and let cool for 1 minute. Add cream and stir slowly for 2 minutes, taking care because the mixture will bubble up when the cream is added. Pour the hot caramel over the chocolate, allow to sit for about 1 minute and then stir until the chocolate is completely melted and smooth. Allow to cool (for about 20 minutes or more) then transfer the bowl to the mixer and mix on low speed with the paddle attachment until the bowl feels cool to the touch. Increase the speed to medium high and gradually add the butter, beating until thoroughly incorporated. Scrape down the bowl and beat on high until the mixture is fluffy. (If you find the mixture is too loose, place in the fridge for a few minutes and then beat again, which is what I did.)
Directions for Assembly:
Place one cake layer on serving platter. Spread about 1/4 cup of the salted caramel over the top. If you've refrigerated it, allow to come back to room temperature, or heat it slightly in the microwave until it's easily spreadable. Then spread about 3/4 cup of the ganache frosting over the caramel. Sprinkle 1 tsp. of fleur de sel over the frosting (I only used 1/2 tsp.). Place into the freezer for 10 minutes to set before proceeding. Once the filling has set, place second cake layer on top and spread with 1/4 cup of salted caramel. Add another 3/4 cup of frosting and sprinkle with salt. Place in freezer again until set. Add third layer, spread with caramel. Crumb coat entire cake with the frosting (a thin layer of frosting). Allow to set in the freezer. Frost the entire cake again with the frosting and garnish with a sprinkle of fleur de sel. Refrigerate the cake  until set but allow to sit at room temperature at least 2 hours before serving.

Friday, March 2, 2012

Two Tone Chocolate Chip Cookies

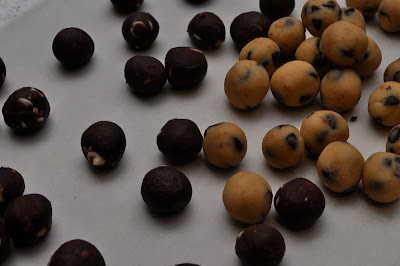
Two tone cookies are kind of fun if you're looking for something different and don't mind a little extra work. I'd seen these on Nosh with Me a long time ago and have been meaning to try them out for a while. Basically, you make a regular chocolate chip cookie dough, divide it in half, add more flour and chocolate chips to the first half the dough, and cocoa powder and white chocolate chips to the second half. Then you roll each type of dough into small balls, and combine one of each of the dough balls to make one cookie. Time consuming? Yes, but you literally get two cookies in one.
My only critique would be that the recipe calls for them to be baked at 375 degrees F., which I did. Next time, I'll bake them at 350 degrees, for a chewier cookie. But overall, these cookies were delicious and a fun alternative to a simple CCC.
Recipe for Two-Tone Chocolate Chip Cookies
(Source: Nosh with Me)
2 cups plus 3 Tbsp. AP flour, divided
1 tsp. baking soda
1 tsp. salt
1 cup unsalted butter, softened
3/4 cup granulated sugar
3/4 cup light brown sugar, firmly packed
1 tsp. vanilla
2 large eggs
1 cup semi sweet chocolate chips
3 Tbsp. dutch processed unsweetened cocoa powder, sifted
1 cup white chocolate chips
In a medium bowl, whisk 2 cups of flour, baking soda and salt. Set aside.
In the bowl of a stand mixer, beat the butter on medium high speed until creamy. Add both sugars gradually, beating until light and fluffy, about 2 minutes, scraping down the sides of the bowl as needed. Add the eggs and vanilla and beat until combined. Add one third of the flour mixture on low speed, until incorporated. Gradually add remaining flour mixture, mixing until just blended. 
If you have a kitchen scale, weigh the dough and then divide into 2 equal portions (otherwise just eyeball it). To the first portion, add remaining 3 Tbsp. of flour and mix until incorporated. Then add the semisweet chocolate chips. Set aside. To the remaining portion of dough, add the sifted 3 Tbsp. of cocoa powder and the white chocolate chips. Mix until thoroughly incorporated. Chill the doughs in separate bowls for 2 hours (or overnight). 
Preheat oven to 375 degrees F. (I would try it at 350 degrees next time.) Line two cookie sheets with parchment paper.
Roll each type of dough by the rounded teaspoon into small balls. (Much smaller than you would for regular sized cookies.)
 Once all the dough has been rolled, take one dough ball from each type of dough and press together.
Roll the combined dough with your hands until one solid round is formed.
Place the ball on the cookie sheet so that dough ball has both colors side by side. Press gently to flatten slightly.
Bake for 10 to 12 minutes, or until the sides begin to turn golden brown. (Closer to 10 minutes for me.) Remove from oven and allow to cool on cookie sheets for 5 minutes before transferring to a cooling rack.

Sunday, January 29, 2012

Black Bottom Pie from Bon Appetit

 
Today was an extraordinarily lazy day. The laundry that is normally washed, folded and put away on Sunday remains in heaps on my laundry room floor. The Sunday night dinner that I had planned and even shopped for earlier in the week was never made. The family I had intended on asking over for said Sunday night dinner never got the call. Instead, I read and finished a book in my pajamas.
The one thing I did do, however, was make a pie. Which is kind of ironic, because we are not pie people. But I had seen the recipe in the latest Bon Appetit magazine, and it was the dessert I planned to make for our Sunday night family dinner that never was.
This pie, however, was a simple one. Had it required pastry, I'm certain it too would have fallen to the wayside. But because it required very little time at all - I decided to go ahead and make it. I had (almost) all the ingredients anyway, why let them sit in my fridge for another week? I realized quickly that I had forgotten to buy the gingersnap cookies for the crust but a quick search in my pantry and the discovery of the chocolate cookie crumbs saved this pie from slipping to my 'to try another time' list, which is dangerously close to "looks great but will probably never find the time" list.
Black Bottom Pie. A simple crumb crust topped first with a chocolate custard, then a vanilla custard, and smothered in whipped cream. Not hard at all. And, with a few tweaks, pedestrian enough to please my children's picky palates. If you're a fan of cream pies, you should definitely try this one. The custard is rich and silky and the chocolate and vanilla flavors are perfectly balanced. The chocolate custard has a distinguished coffee flavor from the addition of espresso, but that didn't seem to bother my kids one bit. If you're not a fan of coffee, however, I would omit it entirely. The recipe below is exactly as written in Bon Appetit with my changes noted in parenthesis.
Despite being non-pie-people, I must say that this dessert was the perfect ending to our very lazy Sunday. If only every Sunday was like that.

Black Bottom Pie
(Source: Bon Appetit)
Gingersnap Crust
6 ounces gingersnap cookies, about 24 (I used 1 1/4 cups of chocolate cookie crumbs+ 2 T. sugar)
3 tablespoons unsalted butter, melted (I used 1/4 cup melted butter)
1 tablespoon heavy cream (I omitted)

Custard
1 envelope unflavored gelatin powder
1 1/2 cups whole milk
1/2 cup heavy cream
4 large egg yolks
1/2 cup sugar
2 tablespoons dark rum (I only used 1 T.)
1 tablespoon cornstarch
1 teaspoon vanilla extract
1/4 teaspoon kosher salt
1/4 cup mascarpone
5 ounces semisweet or bittersweet chocolate, finely chopped
1/4 cup hot espresso or strong coffee

Assembly
1 cup chilled heavy cream
3 tablespoons powdered sugar
1 tablespoon dark rum (I omitted - for the kids)
1/2 teaspoon vanilla extract
Natural unsweetened cocoa powder
Grated semisweet or bittersweet chocolate
Toasted sliced almonds (I omitted but wished I hadn't)

special equipment
A 9"-diameter glass or ceramic pie dish

Preheat oven to 350°. Pulse cookies in a food processor until finely ground. Drizzle in butter and cream; pulse until well blended. (If you're using crumbs instead of cookies, simply pour the melted butter over the crumbs and sugar and mix until it resembles wet sand.) Pour into prepared dish. Use the bottom and sides of a measuring cup to pack crumbs onto bottom and up sides of dish. Bake until crust is set, 12–15 minutes (I only baked for 10 minutes). Let cool completely on a wire rack; set aside.

Pour 2 Tbsp. water into a small bowl; sprinkle gelatin over. Let stand until gelatin softens, about 10 minutes. Heat milk and cream in a large saucepan over medium heat until mixture just comes to a simmer.

Whisk egg yolks and next 5 ingredients in a medium bowl. Gradually whisk egg mixture into milk mixture; whisk in gelatin. Whisk constantly over medium-low heat until thick, about 5 minutes.

Remove vanilla custard from heat and stir in mascarpone. Place 1 cup custard in a medium bowl; add chocolate and stir until melted and smooth. Stir in espresso. Pour chocolate custard into crust; smooth top. Chill pie until set, about 30 minutes. Let vanilla custard stand at room temperature.

Gently pour remaining vanilla custard over chilled chocolate layer (pour slowly so as not to disturb chocolate layer). Smooth top; chill until set, about 1 hour, or keep covered up to 1 day.

Assembly

Using an electric mixer at medium-low speed, beat cream and sugar in a medium bowl until cream begins to thicken. Add rum and vanilla; increase speed to high and beat until stiff peaks form. Spread whipped cream over custard. Dust with cocoa powder and garnish with grated chocolate and almonds. DO AHEAD: Can be made 4 hours ahead. Chill uncovered.

Sunday, January 22, 2012

Super Easy and Delicious Chocolate Sheet Cake


I was craving chocolate cake. But not the fancy kind. I just wanted a good old fashioned cake that was chocolate-y, moist, delicious, but super easy to throw together. No layers, no decorating, no frills whatsoever. Having posted several chocolate cakes that I love, you'd think I'd just use one of those recipes, right? Wrong. As all food bloggers can attest to, as successful as a recipe may have been in the past, and despite loving it, it is very, very hard to repeat a recipe. We like to try new stuff. It's a curse.
Despite the plainness of the cake that I was searching for, you'd be surprised how difficult it was to find a recipe that suited my mood. I didn't want it to come from a box with add-ins, and I didn't want to melt chocolate or dirty any more bowls than absolutely necessary. I eventually stumbled on a recipe that looked promising, albeit with a few tweaks. For instance, I added more cocoa powder, because I didn't want a weak tasting chocolate cake. I used coffee instead of water and doubled the vanilla for the same reason. I subbed brown sugar for half the white sugar to ensure moisture. I used sour cream instead of buttermilk because I didn't have any of the latter. I increased the salt for flavor, and I baked it in a 13 x 9 inch pan instead of the sheet pan called for in the recipe. Finally, I decided to go for a plain old butter cream frosting, instead of chocolate. Other than those small adjustments the recipe was exactly what I was looking for. For those who don't know me, that last sentence was dripping with sarcasm.

So how did my cake turn out? In a word...awesome. It was better than I'd hoped for. The mixing instructions are not typical - so I wasn't sure if it would be heavy and dense since I didn't use a mixer. But it came out perfect. Super moist, very chocolate (but not offensively so), with a nice, soft crumb. Plus, you only dirty one bowl and a saucepan. This will now be my go-to recipe for plain chocolate cake. Despite what I said earlier about never wanting to repeat a recipe. 

Recipe for Super Easy and Delicious Chocolate Sheet Cake
(loosely based on recipe from: Willow Bird Baking)
2 cups flour
1 teaspoon baking soda
1 cup sugar
1 cup brown sugar
1/4 tsp. salt
1/2 cup butter
1/2 cup vegetable oil
6 tablespoons cocoa, sifted
1 cup brewed coffee (or water)
1/2 cup sour cream
2 eggs
2 teaspoons vanilla

Preheat oven to 350 degrees F. Whisk flour, baking soda, sugars, and salt together in a large bowl and set aside. In a medium sauce pan, melt butter with vegetable oil, cocoa powder, and coffee and bring to boil. Pour over mixture of dry ingredients. Stir well, then add sour cream, eggs, and vanilla. Mix to combine. Pour into a 13 x 9 inch metal baking pan sprayed generously with cooking spray.

Bake at 350 degrees F for about 35 minutes or until a toothpick comes out clean. Cool on a wire rack.

Buttercream Frosting
1/2 cup butter, room temperature
3 cups of icing sugar, divided
1/4 cup milk
2 tsp. vanilla extract.

Cream butter with 2 cups of icing sugar until fully incorporated. Add 2 Tbsp. of milk and the vanilla. Mix well. Add remaining cup of icing sugar and mix well. Add remaining milk, 1 Tablespoon at a time, until you reach desired consistency.

Friday, December 23, 2011

Milk Chocolate Nutella Sea Salt Fudge

This fudge is super easy and really, really delicious. It's silky and creamy, and while it is definitely sweet, as all fudges are, I've definitely had much sweeter fudge than this. And it doesn't have that dry, grainy texture that a lot of fudges have. Think truffles...that's the best way to describe the texture. Plus, there's no need for a candy thermometer. You could totally whip up a batch of this in 10 minutes flat.

Recipe for Milk Chocolate Nutella Sea Salt Fudge
(Adapted from: Tasty Kitchen)

14 ounces of sweetened condensed milk
1 teaspoon vanilla extract
8 ounces, good quality milk chocolate, chopped
1 cup Nutella
3 Tablespoons unsalted butter, cut into small cubes
1/4 teaspoon (approximately) sea salt

Prepare and 8x8 inch pan by spraying generously with non-stick cooking spray and then lining with parchment paper, leaving a 2 inch overhang on all sides. In a medium-large glass bowl combine all the ingredients except the salt. Place bowl over a saucepan of simmering water and stir until the mixture is smooth and the chocolate has melted. Pour mixture into prepared pan and sprinkle with sea salt. Chill until set, at least 2 hours. Remove fudge from pan by pulling on the overhang, and cut into small squares.

Tuesday, December 20, 2011

Almond Roca

This is my second attempt at Almond Roca this week. My first attempt was with a recipe that looked simple. There was no candy thermometer involved. It said to boil the sugar mixture for 12 minutes exactly. Skeptical, I decided to give it a go, I like easy recipes, and felt like taking the easy way out. BIG mistake. My sugar was burnt at 10 minutes and the whole batch was tossed. 
Undeterred, I searched for another recipe, resigned to the fact that a candy thermometer would be key in getting the sugar to the correct doneness. It's true what they say, the temperature of the sugar rises very slowly in the beginning, and then when it's close to being done, it goes up fast. It's critical to watch it diligently once you get to about 280 degrees F. Keep stirring, and don't take your eyes off that thermometer. Candy making tips...from me...now that's rich.
If I can do this, anyone can. Don't attempt this without a thermometer. Unless, of course, you've been doing this for a long time and are psychic and just know that precise magical time when the sugar is ready. But for the rest of regular folks, a candy thermometer is an excellent investment.
Recipe for Almond Roca
(adapted from All Recipes)

1 cup whole natural almonds
1 cup butter
1 cup sugar
3 tablespoons boiling water
2 tablespoons light corn syrup
1 1/2 cups (or thereabouts) chopped milk chocolate

Toast your almonds on a baking sheet at 350 degrees F. for approximately 15 minutes. Check them at 10 minutes, by cutting an almond in half, it should be slightly golden inside. Remove from oven, let cool, and then coarsely chop. Grease a 9x13 baking pan. Sprinkle chopped almonds evenly in pan. In a saucepan over low heat, melt butter. Add sugar and stir constantly until gently boiling. Add water and corn syrup. Allow to a boil over medium heat; stirring often, until a candy thermometer reads 300 degrees F (hard-crack stage). (I pulled mine off at 295 degrees). Quickly pour over almonds. Spread the sugar mixture as best you can to cover all the almonds. 
Don't worry if you can't get it into all the corners. It will start to harden immediately. Sprinkle chocolate on top; let stand for 1-2 minutes or until melted. 
Spread chocolate over candy.
 Cool completely; break into pieces.

Related Posts with Thumbnails