A mom's journal of the sweet things in her life...
Showing posts with label Dinner. Show all posts

Saturday, October 8, 2011

Pumpkin Risotto

My fellow Modern Baker, Phyl, who happens to be the founder/organizer of the Modern Baker group, decided to do a Pumpkin Round-up over at his blog Of Cabbages and King Cakes. I volunteered to make a Pumpkin Risotto, and as has become the case with me on many occasions lately, I left it until the eleventh hour to whip it up. We had an unusually chaotic couple of weeks, making it impossible to experiment in the kitchen until tonight.
I've never actually had Pumpkin Risotto but I've heard about it on several occasions and figured it would be relatively easy to incorporate some pumpkin puree into my basic go-to risotto recipe. I also decided to add some fresh nutmeg and finish it with a dash of truffle oil, but if you don't have truffle oil, it's definitely not necessary. (Although it really added a great element of flavour!)
When I did my 'research', via google, for recipes, I couldn't find one that used canned pumpkin. I did have some leftover pumpkin puree in my fridge though, and was eager to use it up. I was a little skeptical about taking this shortcut, but, given my time constraints, there was simply no way I could roast fresh pumpkin and make a puree so it was going to have to do.
I was pleasantly surprised at how amazing this risotto turned out. The pumpkin, while noticeable, was pleasantly subtle but it added a gorgeous hue of orange. I loved how the nutmeg complemented this dish. Even my husband, who is not a fan of risotto, really liked this. This is a wonderful fall side dish, when you want to try something new.
So, without further ado, here's the recipe.
Pumpkin Risotto
(Source: A Tease-spoon of Sugar creation)
1 small onion, diced
2 Tbsp. butter
1 cup arborio rice
1 cup of white wine
4 cups of warmed chicken stock
3/4 cup canned pumpkin puree (NOT pumpkin pie filling)
1 cup finely grated parmesan cheese
1 tsp. kosher salt
freshly grated pepper to taste
freshly grated nutmeg to taste
1 tsp. truffle oil (optional)
2 Tbsp. toasted pine nuts for garnish (optional)
Melt 2 Tbsp. of butter in large skillet. Add onion and sautee until soft. Add arborio rice and allow to absorb some of the butter (about 1 to 2 minutes). Add wine and cook until evaporated. Add 1/2 cup of the warmed chicken stock. (I simply pour all the stock into a large pyrex measuring cup and heat it in the microwave, and add it by using a soup ladle.) Allow to cook slowly, and continue to add more stock 1/2 cup at a time, as it is absorbed by the rice. Once you have about 1 cup of stock remaining, add the pumpkin, salt and parmesan cheese. Mix until incorporated on the heat. Add the remaining stock, and seasonings, along with the truffle oil (if using). Cook until the rice has the right consistency (should spread on your plate like thick lava); and until the rice is tender to your liking. 
Ladle onto your plates and finish with the pine nuts and a final sprinkling of parmesan cheese. Enjoy!

Tuesday, May 10, 2011

Green Goddess Pasta Salad


For Mother's Day this year, my sweet hubby supplied the breakfast. And by 'supplied', I mean he drove to A&W and bought me a Bacon 'n Egger. Yup, we're keeping it classy over here. Don't get me wrong, I'm not complaining. It was good and the clean up was fast. Which was also good because I spent the rest of the day in the kitchen cooking for the Mother's Day dinner for 12 that we had at our house.
I made this pasta salad as part of the meal. It wasn't even on the original menu, but I saw a version of it here and became inspired. Pasta salad is the perfect side dish for a BBQ, particularly when you want to ensure that you have enough food and variety for a large group of people. The problem is, most of the pasta salads I've had are dry and bland. The Green Goddess dressing used in this salad is far from bland and can be used to dress a variety of greens. It was perfect for this salad too - creamy and fresh, and packed full of flavor. Although it is mayonnaise-based, trust me when I say it is far from a typical mayonnaise-based pasta salad.
This salad is so versatile, you can add whatever vegetables you want, and I don't know why I didn't think of this earlier, but bacon would have been a welcomed addition too. I like to sautee my vegetables before adding them to the salad, I prefer them to be slightly cooked - but still crunchy - instead of raw. Plus they have more flavor after they've been sauteed in a tiny bit of oil and seasoned with salt and pepper. Even if you're not a fan of pasta salad - you have got to try this Green Goddess Dressing!
Green Goddess Pasta Salad
1 lb of pasta, cooked to your preferred tenderness (unless making ahead, then stop cooking about 1 minute earlier to retain a little bite (I used Scoobi Doo pasta - have no idea why it's called that!)
1 lb of asparagus spears, cut into bite size pieces
1 red pepper, thinly sliced
1 Tbsp. oil
1 - 2 cups of crumbled feta
2 cups (or more) of Green Goddess dressing (recipe below)


Cook the pasta to desired tenderness. Rinse thoroughly under cold water to stop it freom cooking further. Put the cooked pasta in a large mixing bowl and then dress with enough dressing to coat the pasta. 
Chop your vegetables (whatever you have on hand) to bite-sized pieces. 
Sautee vegetables (in this case asparagus and red peppers) in a pan with a Tablespoon of oil, seasoning with salt and pepper to taste. (Don't over cook the vegetables, just cook them till they've softened slightly but still retain their crispness.) Add vegetables to the pasta and dressing. Sprinkle with feta and mix. Taste and add more seasoning if required. (I didn't add anything.) Refrigerate until ready to serve. This can be made a day ahead. Be sure to taste your salad again after it's been chilled, and add a bit more dressing if required. (I added a little more so it was extra creamy.)

Basil Green Goddess Salad Dressing
(adapted from Chaos in the Kitchen, who adapted in from Barefoot Contessa)
1 cup basil leaves 
1 cup mayonnaise 
7 green onions
1 avocado
1/4 cup lemon juice 
2 cloves garlic 
2 tsp salt 
freshly ground black pepper, to taste
1 cup sour cream 
Combine mayo, basil, green onions, avocado, lemon juice, garlic, salt and pepper in a food processor. Blend until smooth and creamy. Add sour cream to the blender and blend just until combined. Chill dressing until serving.

Sunday, July 11, 2010

Grilled Shrimp Tacos


I had an idea in my head for weeks. Maybe it was more of a craving. It involved grilled shrimp, fresh tomatoes, avocado, corn, black beans.  A nice sauce would be necessary too. And heck, why not wrap the whole thing in a flour tortilla?


I had the pleasure of experiencing a real fish taco in San Diego years ago. It was sublime. I loved it. And I've been thinking about it ever since. The crispy, deep fried fish with fresh salsa, cabbage and that sauce. What is that sauce? All I know for sure is that it's good. Real good. Eventually I will tackle the feat of trying to replicate it but, truthfully, it's a bit daunting. Having had the real deal I'm know that anything I come up with won't compare. So, instead of disappointing myself, I figured I'd do an entirely different version. Besides, I wasn't in the mood to pull out my deep fryer. So messy, and the smell it leaves behind...no, I'm not ready for that just yet.

If you google fish tacos or shrimp tacos on the internet, you will find a plethora or recipes and ideas that inspire, so narrowing it down is the hard part. 

I started with the 'salsa'. I used two Roma tomatoes, an avocado, fresh corn, the juice of 2 limes, 1/2 cup of black beans, minced garlic and jalapeno, and generous handful of fresh cilantro. Seasoned with salt and pepper to taste and then, on a whim, I threw in a dash of sugar. Happy with my salsa, I moved on to the shrimp.
Using more of what I already had chopped, I tossed the shrimp with some oil, lime juice, garlic, jalapeno, salt and pepper. I left it to sit for about an hour to marinate.
Next up, the sauce. I found a recipe on the Our Best Bites blog that intrigued me. It was called "Creamy Lime Cilantro Dressing" - it used a package of Ranch seasoning, 1 cup of mayo, 1/2 cup of milk, 1/4 cup of green salsa, a clove of garlic, cilantro and a dash of hot sauce. You throw all this in your blender and then chill it. This sounded like the perfect sauce to accompany my shrimp because it needed something to balance out the heat of the jalapenos that I used to flavor both the shrimp and the salsa. 


The final component to this taco: fresh chopped cabbage. While it might not offer much in the way of flavor, its crisp texture complimented the rest of the ingredients.
Since my husband was out for the night, I invited my 'BFF' over for dinner. We brought the circus of kids and dogs out onto the deck while we grilled the shrimp on the BBQ and assembled our dinner.
Never one to shy away from a culinary adventure, she was the perfect guest. There she is, opening the wine. Yes, it's red wine. No, I'm quite certain that it probably isn't the right wine to 'pair' with our dinner. But we didn't care - we don't know our wines. We don't pretend to. Sometimes ignorance is bliss.
Once the shrimp were grilled - to perfection I might add - we began assembling. Warmed flour tortilla, handful of shredded cabbage, salsa, shrimp and then sauce. 
It was nothing like the San Diego fish taco, but that was okay. This was an entirely different type of fish taco. Probably much healthier too. It was delicious and perfect for the summer. I will definitely be making these again. And you should too. 


Monday, March 1, 2010

Pizza - Round 2!

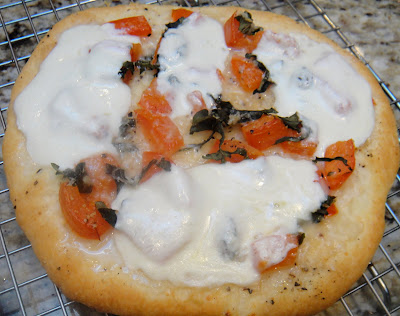
Yesterday I spent the day in the kitchen making homemade pizza.  (See previous blog.)  They were delicious, but I was unhappy with the appearance of the "white blobs" from the fresh mozzarella being added at the end of the baking.  
Because I chose to make 8 individual pizzas, and we had lost interest after we ate 4, my husband suggested we grill the remaining 4 crusts, put them in the fridge over night, and make a second batch of pizza for dinner tonight. Twist my rubber arm!  (It's like a gift from God when I have a day off from having to come up with something to make for dinner!) Besides, I had all those leftover toppings and it would be a shame to waste them.  So that's exactly what we did.  I piled the grilled crusts with toppings straight from the fridge and threw them in the oven to warm them up.
To address the issue of the white blobs of cheese, I grated the fresh mozzarella this time around.  It's not exactly easy to grate, it kind of falls apart, but it definitely improved the appearance of the pizza.
I love a grilled crust, the charred bits add so much flavor. And the crusts were almost as good the second day as they were when they were fresh.  
I don't think I would have thought to make pizza two days in a row if weren't for my husband's suggestion but it gave me the perfect opportunity to experiment with the cheese as I was determined to improve the appearance of my first batch.

Okay, so this has all been lovely and educational but I'm really looking forward to making something sweet for my next post...

Pizza!

Yesterday was the BIG HOCKEY GAME...Canada vs. U.S for the gold medal.  We won!!  Go Canada!  Great game, from what I saw while making pizza.  Since we were unable to join the masses at some drinking establishment to enjoy the game (okay, I wasn't that worried about it), I decided to make something fun to eat for dinner.  What's better than homemade pizza?
I used the dough recipe from my cooking 'bible', "The Best Recipe" by Cooks Illustrated.  A side note:  I've gifted this book to the 2 foodies in my life who also love to cook and they love this book almost as much as I do.
That said, I followed their recipe for the Pizza Margherita, which calls for chopped tomatoes instead of tomato sauce.  I won't do that again.  I also had 2 chunks of fresh mozzarella in my fridge, which is so much better than the regular mozzarella on pizza.  However, the book said not to add it until the last 3 minutes of baking...and so I'm still not sure if I like the way it looks when you have blobs of white cheese melted on top.  My pizza requires some more tinkering, simply for esthetic reasons.  But it did taste good, and isn't that what matters?
Recipe for Pizza Dough:
The Best Recipe
1/2 c. warm water, about 105 degrees
1 envelope (2 1/4 t.) active dry yeast
1 1/4 c. water, room temperature
2 T. extra virgin olive oil
4 c. bread flour, plus extra for work surface
1 1/2 t. salt
vegetable oil or spray for oiling bowl
Measure warm water into 2-cup measuring cup.  Sprinkle in yeast; let stand until yeast dissolves and swells, about 5 minutes.  Add room temperature water and oil; stir to combine.
(I'm meticulous about following instructions when it comes to dough because I've had some very bad experiences in the past.)
Pulse flour and salt in the work bowl of large food processor fitted with steel blade to combine.
Continue pulsing while pouring liquid ingredients (holding back a few tablespoons) through feed tube. If dough does not readily form into a ball, add remaining liquid, and continue to pulse until ball forms.  (Mine needed all the liquid.)  Process until dough is smooth and elastic, about 30 seconds longer.
Dough will be a bit tacky, so use rubber spatula to turn dough onto lightly floured work surface; kneed by hand with a few strokes to form smooth, round ball.  Put dough into deep oiled bowl and cover with plastic wrap.
Let rise until doubled in size, about 2 hours.
Punch dough down with your fist and turn out onto lightly floured work surface. Divide and shape as desired. Makes 2 large, 4 medium or 8 individual pizzas.  I made 8 so I could play around with the toppings.
Form each piece into a ball and cover with a damp cloth.  Let relax 5 minutes but not more than 30 minutes.
Preheat oven to 450 degrees, placing pizza stone on rack in lower third of oven for 30 minutes.  (I threw away my pizza stone months ago and had to use a metal baking sheet lined with parchment - not ideal but workable.)
Working with one piece of dough at a time and keeping others covered, flatten ball into a disk using palms of hands. Starting at center and working outward, use fingertips to press dough to about 1/2 inch thick.  Use one hand to hold dough in place and the other hand to stretch dough outward; rotate dough a quarter turn and stretch again.  Repeat turning and stretching until dough will not stretch further.  (I got tired of this and cheated by pulling out my rolling pin even though the recipe specifically says not to do this. My crusts turned out fine.)
Let dough relax 5 minutes then continue stretching until it is about 1/4 inch thick.  When all the dough rounds are done, transfer to pizza peel that has been lightly dusted with semolina or cornmeal.  (I used a combination of bread flour and cornmeal.)
Brush dough lightly with olive oil and then add toppings, leaving 1/2 inch border around the pizza.  Don't add the cheese yet (I'm not sure if I like this idea or not, but I followed the instructions anyway).
I used my homemade marinara sauce for some of the pizzas...
and fresh tomatoes for the Margherita Pizzas. *Note:  the tomatoes must be seeded or they will make the crust soggy.
The book said to cook this one with just the tomatoes and basil, and then add the cheese later.
My husband is a true carnivore, so the idea of a pizza without meat holds no appeal for him, plus he likes heat so on the pizzas with tomato sauce, I added spicy Italian sausage and jalapenos.
At this point, they went into the oven cheeseless.  I added slices of the fresh mozzarella for the final three minutes of baking.  This is what the Margherita looked like after baking...
I was not thrilled with what the high heat did to my fresh basil!  I think that perhaps that should be added with the cheese for the final 3 minutes.
The sausage jalapeno pizza looked a little more appealing:
but again, I'm not sure about these cheese blobs.  They tasted good, but I after all that work and time, I want them to look good too.
After baking and eating four of the eight pizzas, we were both full.  So we decided to grill the rest of the dough on the BBQ, and then refrigerate the crusts so we can make more pizza tonight.   I will be tackling this cheese blob problem on round 2, because now I won't be distracted by the fresh dough and the hockey game.  
In the end, these pizzas were a success. But I'm always looking for ways to make it better...
Related Posts with Thumbnails