A mom's journal of the sweet things in her life...

Friday, June 10, 2011

Cheesecake Brownies

You know how some recipes you see get bookmarked, and you wait for the perfect day to make them, and then others get made within the hour of seeing the recipe? This one was one of the latter. I saw the picture, I read the ingredients, I rejoiced because I knew I already had everything required in my house, and then I got started immediately. 
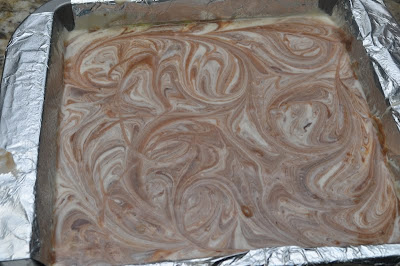
It could be argued that I "over-swirled" the two batters before baking, resulting in a less marbled appearance. I tried to use use a light hand while swirling, but I couldn't help myself. I just kept going and going. Thankfully, the resulting 'less than marbled effect' does not seem to affect the flavor. These brownies are delicious! The perfect balance of rich chocolate brownie and cheesecake. Kind of like a chocolate cheesecake bar. And, they're so easy to make. I found I preferred mine slightly chilled, as opposed to room temperature. For some reason any kind of cheese-cake related baking tastes better cold. 
Recipe for Cheesecake Brownies
(adapted from What's Gaby Cooking)
1/2 cup unsalted butter
3 oz semi-sweet chocolate, chopped
1 cup sugar
2 large eggs
2 tsp. vanilla extract
2/3 cup all-purpose flour
8 oz cream cheese, at room temperature
1/3 cup sugar
1 large egg yolk
1 tsp. pure vanilla extract
1/2 cup milk chocolate chips (optional)
Preheat oven to 350 degrees. Line a 9×9 baking pan with foil, leaving a 2 inch overhang on 2 sides. Spray with non-stick baking spray. Set aside.
Melt the butter and chocolate in a small saucepan over medium low heat, constantly stirring until completely melted. Remove from the heat and whisk in the sugar. Add the eggs and vanilla. Add the flour and gently fold just until  incorporated. Pour into the prepared foil lined baking pan and set aside.
For the Cheesecake layer: In a small bowl, combine the cream cheese, sugar, egg yolk, and vanilla and whisk together until smooth. Drop spoon-fulls of the cheesecake batter on top of the brownie batter. Then using a knife, swirl the two batters together until you have a marbled effect. Top with the milk chocolate chips, if using.
Bake for 30 minutes. Remove from oven and allow to cool. Chill in the refrigerator. Cut into squares.

Thursday, June 9, 2011

Roasted Tomato and Jalapeno Salsa AND Roasted Tomato and Jalapeno Salsa With Baked Goat Cheese


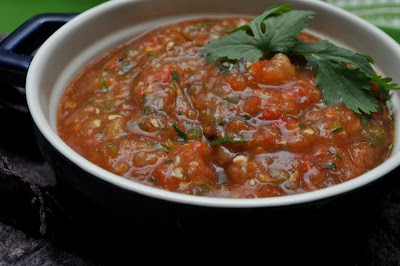
There's something so much more special about a salsa made with roasted tomatoes, jalapenos, onions and garlic. I love the black flecks of the charred skins from the vegetables in this salsa. Just seems so rustic. It also adds another layer of flavor - a smokiness that sets this apart from regular salsa. 
If you're not careful, this salsa could knock your socks off. I de-seed two of the jalapenos and leave the seeds in the third. As you know, the seeds are where the 'venom' from the jalapeno hides, the heat that you either love or hate. If you're a hater, you could either de-seed all of the jalapenos, or leave them out altogether. Substitute a different, milder pepper if you like. But we like it hot, and even with only one of the three jalapenos left with the seeds, this salsa has a good amount of heat. The noticeable kind - but it's not overwhelming. 
This salsa is definitely good enough to stand alone. It doesn't need anything more. Make this for your guests and you're sure to impress. But if you want to take it one step further and 'wow' them, you can bake your salsa with a goat cheese center. It's heaven. And the creaminess of the cheese helps to balance out the heat, so there's that. Whichever way you go, you must try this one. It's not nearly as labour-intensive as it sounds. And it's worth every second of it.  Plus, it holds longer than a regular salsa, you can make it the day before and it's only going to get better.
Recipe for Roasted Salsa 
Adapted from: Chaos in the Kitchen

1 1/2 pounds tomatoes (about 10 medium roma tomatoes, or 6 vine-ripened tomatoes)
1 to 3 fresh jalapeño peppers (1 to 1 1/2 ounces), stemmed
Half of a small white onion, sliced into 1/4 inch thick rings
6 garlic cloves, peeled
juice of 2 limes (or to taste)
1/3 cup chopped fresh cilantro, loosely packed
1 to 1 1/2 generous teaspoons kosher salt (or to taste)


Heat the broiler. Cut your tomatoes in half and core them. Cut your jalapenos in half, leaving the seeds in as many as you like, depending on your tolerance for heat. Place cut tomatoes and jalapeños on a broiler pan or baking sheet, cut side down.

Broil for about 6 to 8 minutes, until skins have blistered and have blackened spots. Allow to cool.
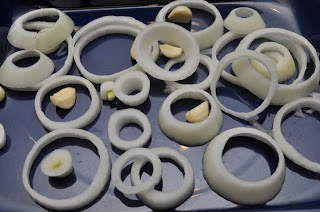
Set the oven to 425 degrees F. On a separate pan or baking sheet, combine the onions and garlic.
Roast in the oven, stirring occasionally, until browned and soft, about 15 to 20 minutes. Allow to cool.
Add jalapeños, onions, and garlic to a food processor and pulse to desired consistency. Scoop out into a bowl. Add tomatoes to the processor and pulse to a rough puree.
Pour tomatoes into the bowl with jalapeño mixture and stir. Add lime juice, cilantro and salt to taste.
Now, are you still with me? Cause it only gets better from here.

Recipe for Roasted Salsa with Baked Goat Cheese
Adapted from: Chaos in the Kitchen
4 oz goat cheese, softened
8 oz cream cheese, softened
salt, to taste
2 cups Roasted Tomato and Jalapeno Salsa (recipe above)
Preheat oven to 350°F.
In the bowl of your food processor, pulse the goat cheese and cream cheese until combined. Add salt to taste. Scrape the cheese out of the bowl and form a disk. Place the disk of cheese into the center of a baking dish. Scoop the salsa around the cheese. Bake until warmed through, 10 to 15 minutes. Serve with tortilla chips.

Thursday, June 2, 2011

Lion House Dinner Rolls


To simply call these rolls "good" would be a gross understatement. They are so good. They're soft and tender and ridiculously delicious. They're made with white flour so you won't be getting any points from the fiber fairy but who cares? These are the rolls you make when you just want something indulgent. Eat them on their own, or serve them with dinner. They won't last, that I can promise. I made them earlier this week and will be making them again tomorrow. 
The instant yeast speeds things up, which means making them is not an all day project. In fact, I made them mid morning and they were ready for lunch. These here are a new favorite in my house. They're the kind of thing that will save you when you make soup for dinner. Your husband won't be able to give you dirty looks if these are served along-side. Honest.
Recipe for Lion House Dinner Rolls
(Recipe Source: Mel's Kitchen Cafe)


1 1/2 Tbsp. Instant Yeast
2 cups warm (not hot) water
1/3 cup sugar
1/3 cup butter, softened
1 egg
2 1/2 tsp. salt
2/3 cup nonfat dry milk
5-6 cups flour
In the bowl of your stand-mixer, combine the yeast, water, sugar, butter, salt, dry milk, 2 cups flour and egg. Beat together with the paddle attachment until very smooth. Add remaining flour gradually (about 1/2 cup at a time) until a soft but not sticky dough is formed. At this point, if you haven't already done so, switch to your dough hook. (I switched to mine when I had about a cup of flour left to add. Knead the dough for at least five minutes, adding additional flour if the dough is too sticky about 1 Tbsp. at a time. When the dough is smooth, supple and elastic, place it in a lightly greased large bowl, flip the dough over so the top side is greased, and cover with plastic wrap until doubled in size, about 45 minutes. 
Punch the dough down and then separate into two equal portions. Roll the first dough mass out to an 11x14-inch rectangle. Brush the top with melted butter. Using a pizza cutter, cut the dough into two pieces lengthwise. Then slice the dough into five or six strips across so you end up with 10 to 12 small rectangles. 
Roll each small rectangle up and place on a silpat or parchment lined baking sheet with the roll resting on its seam. Repeat with the second portion of dough.


Cover the rolls with lightly greased plastic wrap and let them rise until doubled, approximately 1 hour. 
Bake at 350 degrees F. for about 12-14 minutes or until they are nicely browned, rotating your pan halfway through the baking time.

These freeze nicely.

Wednesday, June 1, 2011

Oatmeal Butterscotch Bars

Browned butter, dark brown sugar, oatmeal, butterscotch chips...that's what these bars are made of. Pure yumminess. And the best part? They're different. Something new to throw into your repertoire. And? No peanut butter. Not that I don't love the stuff, but when do you find a recipe that has all that good stuff and no peanut butter? Never, at least I haven't. And with my son's nut allergy, I find it torture to see all the great recipes out there for squares that unfailingly contain peanut butter.
And don't even get me started on peanut butter substitutes. I've tried them all. They smell good, they look just like peanut butter, but then you taste it. Gross. Bitter with a weird aftertaste that it's impossible to describe.
Anyways. I digress. These bars are a great nut free solution for a different kind of bar that isn't chocolate. And while chocolate will always reign supreme in my view, these are a nice alternative. Delicate and buttery, and speaking of butter, the browning of it adds a hint of nuttiness sans nuts. Win-win.

Recipe for Oatmeal Butterscotch Bars
(Adapted slightly from:  Mel's Kitchen Cafe)
For the bars:
1 1/4 cups all-purpose flour
2 cups oatmeal
1/2 tsp. baking soda
1/2 tsp. salt
3/4 cup butterscotch chips
1 cup (227 grams) butter
1 cup packed dark brown sugar
1 large egg
2 tsp. vanilla
For the glaze:
1/4 cup butterscotch chips
2 Tbsp. dark brown sugar
1 Tbsp. butter
1 Tbsp. water
1/4 tsp. kosher salt (if using regular table salt, decrease to 1/8 tsp.)

Preheat the oven to 350 degrees F. and adjust an oven rack to the middle position. Line a 9x13-inch baking pan with foil, leaving an overhang for handles on the shorter sides of the pan. Spray with non-stick cooking spray. 

In a medium bowl, whisk together the flour, oats, baking soda, and salt, set aside. Place the 3/4 cup butterscotch chips in a large bowl, set aside. In a small saucepan, melt the butter over medium heat and allow butter to brown to a medium golden color. Watch it closely so it doesn't burn. Pour the hot butter over the butterscotch chips and whisk together until melted and smooth. Whisk in the brown sugar until incorporated. Then whisk in the egg and vanilla. Stir in the flour mixture, just until completely moistened - don't over-mix.

Pour the batter into the prepared pan and spread until evenly distributed. I used my hands and patted it down. Bake the bars about 16-18 minutes, until golden brown.

For the glaze, place the 1/4 cup butterscotch chips, brown sugar, butter, water and salt in a small microwave-safe bowl. (Don't even think about omitting the salt - it makes the glaze!) Microwave the mixture until melted and smooth, about 2 minutes on 50% power. Whisk to combine well. The glaze is a bit stiff. If needed, microwave it for a further 10 seconds to loose it. Drizzle the glaze over the bars while they're still warm. Let the bars cool completely in the pan. Remove the bars from the pan using the foil overhang and cut into squares. 
Related Posts with Thumbnails