A mom's journal of the sweet things in her life...

Tuesday, March 30, 2010

Snickerdoodles

You know how you can go several years without ever hearing about or encountering something (or someone) that you know and then all of a sudden it (or they) come up in conversation several times over the course of a few days?  That's what happened with Snickerdoodles.  I know what they are, but hadn't given them much consideration until recently when I'd heard a lot of talk about them from several random sources. My sister's declaration of her love for them was the final straw.  Hence, today's baking adventure: Snickerdoodles!
Once I decided to try them, the next question was what recipe to use.  There are hundreds.  I searched the internet and noticed that almost all of them were baked at 400 degrees and most of them were made with a combination of butter and shortening.  No thanks. I kept looking.  I could have used my Martha Stewart Cookie Book, but I've been hearing a lot of negative things about her recipes since I started reading food blogs.  Even though I've had great luck with her 'baking recipes', not so much with her 'cooking recipes', my opinion of her has been slightly tainted. Clearly I am easily influenced.
I found this recipe on the Brown Eyed Baker blog, it uses all butter, but it bakes them at 350 degrees, not 400 degrees like most of the recipes I found. I got 3 cookie trays out of it, allowing me to play around to find the optimal method.
Tray 1: I followed recipe to a T, except I found the 10 minutes was not enough and I baked them for 12.  I found them too soft for my taste.  Perhaps they were slightly underdone.


Tray 2:  I flattened them slightly before putting in the oven and baked them for 13 minutes.  Surprisingly, they were still too soft for me. (The pic below is the dough before baking, flattened slightly).
Tray 3:  I cranked the heat to 400 degrees and baked them for 13 minutes without flattening them.  Perfection!


I love a cookie with a soft, chewy centre and crispy edges.  Small confession:  I misread the recipe and only added 1 teaspoon of cinnamon to my sugar for rolling (asks for 1 Tablespoon), which is why you might think these look a little pale compared to others.  I'm actually quite happy with the results nonetheless and would consider making that change in the recipe for future use.  Enjoy!

Recipe for Snickerdoodles
(Source: Adapted from Brown Eyed Baker Blog)
2 3/4 c. flour
2 t. cream of tartar
1 t. baking soda
1/4 t. salt
1 c. butter
1 1/2 c. sugar
2 eggs
1 t. vanilla
3 T. sugar
1 T. cinnamon (I used a teaspoon)
Preheat oven to 350 degrees. (I think 400 is better).
Line baking sheet with parchment and chill in the fridge. (I skipped this step for my batch that went in at 400 degrees and found it unnecessary.)
Whisk together flour, cream of tartar, baking soda and salt in small bowl and set aside.
Cream butter and sugar until light and fluffy.  Add eggs one at a time, beating well after each addition.  Add vanilla.
Slowly add the dry ingredients, mixing only until fully incorporated.  Chill dough for 30 minutes.
Combine your sugar and cinnamon in a small bowl and set aside.
Once dough is chilled, roll into 1 inch balls and then roll each ball in sugar and cinnamon.  Place on cookie sheets 2 inches apart as they spread significantly.
Bake for 10 minutes. (I baked for 13 minutes.)  Allow to cool for a couple minutes then transfer to cooling rack.

Monday, March 29, 2010

White Chocolate Truffle filled Chocolate Layer Cake

I'm really behind in my blogging.  I have a few recipes that I promised to post and this is one of them.  This is the chocolate cake I made for my dad's birthday party.  It's actually a compilation of 3 different recipes.  The chocolate cake layers is the same recipe I used for the cupcakes and previous chocolate cake (see older posts).  Now that I've found a recipe that works every time and is moist and delish, I just don't see the point of playing around with other chocolate cake recipes.  I have simply run out of patience with dry cakes and wasn't willing to run the risk of making yet another one.  
The truffle filling is an old recipe I had printed from Epicurious several years back.  I've tinkered with it enough now that I'm quite comfortable stating that it's simply "inspired by the magazine Bon Appetit". 
And finally, I ended up making a White Chocolate Buttercream from a third source, "Sky High Irresistible Triple-Layer Cakes". This, after curdling a cream-based recipe late at night on the eve of the party, thus requiring me to go to the store yet again for more ingredients. As far as Buttercream Frostings go, this one was very good.  Not overly sweet, very buttery and smooth. My pictures leave a lot to be desired.  Keep in mind, by the time I was done, it was well past midnight, I had a horrible cold, and I had lost the will to live. Here they are.
White Chocolate Truffle Filling
1/2 c. chilled whipping cream
2 T. unsalted butter
1/2 lb. good quality white chocolate, finely chopped
1 t. vanilla
Bring cream and butter to simmer in heavy saucepan, stirring until butter melts. Remove from heat.  Add chocolate and stir till smooth.  Add vanilla.  Cover and refrigerate until cold and consistency is spreadable.  (Or, you can make it a day ahead and let it sit out at room temperature to soften slightly and stir it until it's spreadable.


It's makes a thick layer and is perfect for a 2 layer cake.  If you want more layers, double the recipe.

White Chocolate Buttercream
(Source: Sky High Irresistible Triple Layer Cakes)
3 egg whites
4 ounces good quality white chocolate
1 cup sugar
1/4 cup water
3 sticks (12 ounces) unsalted butter, room temperature
Put egg whites in bowl of an electric mixer and set the mixer up for use. Melt the white chocolate about half way in a double boiler over simmering water.  Remove from heat, stir until smooth and set aside to cool.
Combine the sugar and water in a small heavy saucepan.  Set over medium heat and stir to dissolve the sugar.  Bring to boil and cook, without stirring, until the syrup reaches the soft ball stage, 238 degrees F.  Immediately start beating the egg whites on medium low speed.  Slowly add the syrup  in a thin stream, taking care not to hit the beaters. Continue to whip until the mixture is body temperature and stiff meringue has formed.
Reduce the speed to low and add the butter 2 to 3 tablespoons at a time. When all the butter is incorporated, beat on medium speed until the frosting appears to curdle.  Continue to whip and it will suddenly come together.  At this point, add the melted chocolate and mix well.

Tuesday, March 23, 2010

Chocolate Cupcakes


I made these cupcakes to "supplement" my dad's birthday cake for his party. Both my sister and I made one cake, but you never know how far they will go and so it's nice to have a back up plan. The kids always tend to favor cupcakes too so it was well worth the effort. I used the same chocolate cake recipe that was in a previous post, (and in fact used it for the birthday cake too) because it is fool proof and incredibly moist. The chocolate ganache icing is also very easy, and is a nice change from the typical sweet icing that usually accompanies cupcakes. Even though the sweetness factor is more subtle, the kids loved them too.

Perfect Chocolate Chocolate Cake Recipe:
2 c. sugar
1 3/4 c. flour
3/4 c. cocoa (sifted)
1 1/2 t. baking powder
1 1/2 t. baking soda
1 t. salt
2 eggs
1 c. milk
1/2 c. vegetable oil
2 t. vanilla
1 c. freshly brewed espresso or coffee

Preheat oven to 350 degrees. Line muffin tin with medium or large paper or foil liners.

Whisk together sugar, flour, cocoa, baking powder, baking soda and salt in large bowl. Add eggs, milk, oil and vanilla. Beat on medium speed of mixer for 2 minutes. Stir in boiling water (or coffee of espresso). Fill muffin tins 2/3 full. (I only got 22 cupcakes.)

Bake for 22 to 25 minutes or until toothpick comes out clean. Cool completely. Frost.


Chocolate Ganache Frosting:
8 ounces of good chocolate chopped (I used milk chocolate)
1 cup cream


Place chopped chocolate into medium bowl. Heat cream in pot until it just starts to boil. Pour over chocolate. Let sit 2 minutes then stir until smooth. Put in fridge until cold. Whip until light. You can pipe it on the cupcakes or simply spread it with a knife.


Sunday, March 21, 2010

Great Food, Great Friends, Great Fun!


I just spent the weekend in Victoria, visiting one of my favorite people, my dear friend, Kim.   There was food, wine, shopping, more food, plenty of laughs and some really great friends.   Oh yes, and more wine.  Sigh. As always, the time goes by so fast.  I took a picture of a random tree because back home in Calgary, we still have snow.  This hardly seems fair.

Friday night Kim and I went for dinner at Camille's.  A wonderfully quaint restaurant in down town Victoria, which prides itself for using all local ingredients.  We decided to really indulge, which incidentally became somewhat of a theme for us for the duration of the weekend, and partook in the Chef's tasting, a five course meal with wine pairings. I must give credit where credit is due, this was Kim's choice of restaurant and her suggestion that we forego the menu altogether and just put our trust in the chef.  This from the girl who I've never seen order anything more adventurous than a beef dip or a chicken club sandwich.  What has happened to my predictable friend? I was quite happy to oblige.  The meal went something like this:

Halibut Ceviche with Carrot Ginger Salad...
  
Lemon Ginger and Spot Prawn Bisque...
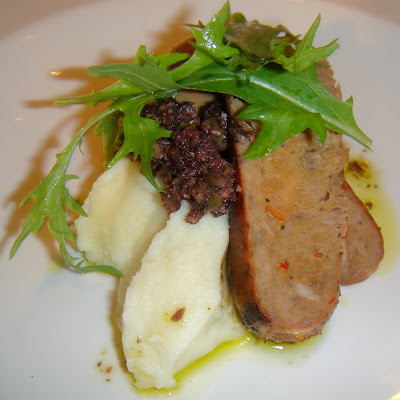
Lamb Merguez Sausage with Rosemary Mashed Potato and Olive Tapenade...
Veal Striploin, Wild Mushroom Forestiere, 
Stinging Nettle Pest, Herb & Parmesan Choux Pastry...

Vanilla Bean Panna Cotta, 
Local Rhubarb & Tawny Port CompoteSable Cookies...

I'm not too proud to admit that I ate everything on all my plates.  I really did.  It was a wonderful meal and I will definitely be back.  Just in the interest of keeping it real though, and at the risk of sounding like I'm tooting my own horn (did I really say that?), I have made a better Panna Cotta than that one.  Sorry.  It's true.  That one was still good, lovely in fact, but mine's better.  I'm just sayin...

So Saturday we decided to stay in and have a few of Kim's closest friends (none of whom I'd ever had the pleasure of meeting) come over. Everyone brought something to eat and we pigged out.  I mean really pigged out. I will post the details and recipes of our little private food festival that was Saturday night, but I am absolutely exhausted right now and must get the kids to bed.  But before I sign off, I just have to say that I had the best weekend ever.  As trying as it can be at times to have one of your favorite people and best friends move away, I'm truly fortunate and grateful that she moved to a place I love to visit.  For a stay-at-home mom who sometimes gets bogged down by the monotony of daily routines, a change of scenery is good for the soul.  And, as of Saturday, I am even more excited to return and hopefully see more of Kim's amazing friends.  So fun.  More soon...

Tuesday, March 9, 2010

Happy Birthday Dad!


Today you're 65!  Hard to believe, but it's true.

You're big "Par-tay" isn't until Saturday, but given that today is your actual birthday, I couldn't let it go by without making a small tribute to you!  But first I want you to know that no one, and I do mean NO ONE is more excited about your party than your granddaughter, Ryann.  She has told everyone about it, she talks about it incessantly...and she's been making presents for you every day.  (Averaging about 3 per day for the past 3 weeks...no, I'm not kidding.)  I promise, I will help her 'edit' before we come bearing gifts. : )

I remember when I used to think of 65 as really old...but not anymore. It's like the new 50, or at least it is for you.  Still so active and relevant...watching Reality TV and downloading decent music on your IPod!  Impressive, dad, really impressive.

You are more important to our family than you'll ever know.  You are the "silent pillar", your support is more often implied than expressed, but we always know it's there, just like you are.   Never one to impose your views, but always offering sound advice when asked.

Do you remember the time I was about 17 or 18, it was a Sunday morning and I was getting ready to go out.  You came to me and asked me to spend the day with you instead.  This was such an 'unusual' request from you, as you were never one to 'interfere' with our plans.  I was intrigued by the invitation and did not need any convincing.  We drove out to the country and rode on your quad into the woods.  You packed a lunch and we ate it by a waterfall.  You told me that this was as close to God as you could get, and that this was your "church". You may not even remember this day, and there was no way you could have known the impact your words would have on me.  But, in my books, that day goes down as one of my all-time-favorite memories with you.

Happy Birthday Dad!  I love you!


Mango Bread


I bought  a case of mangoes the other day because they were such a good price but, as it turns out, I'm the only one in the house who will eat them.  So, determined not to waste them, I decided to try making Mango Bread.  I looked at several recipes on the internet, as well as Dorie Greenspan's version, however I wanted a more basic recipe, and because no one appears to be crazy about mangoes in my house (besides me, that is) I didn't want large chunks of the fruit in my bread.  I wanted a texture similar to banana bread, moist and dense.

There are a lot of recipes out there for Hawaiian Mango Bread containing coconut and pineapple, but I wanted none of that.  I found a few very basic recipes and decided to try it work from them, making my own adjustments.

When I asked my husband what he thought (and you have to understand that he really is a man of few words, particularly if he's watching hockey) he said "good" "light" and "moist".  When I pushed him on "good" to see if he would elevate it to "great", he said "no". He was right though, it wasn't great.  I'm not sure what he meant by "light" because I thought it was on the dense side, unless he was referring to flavor, in which case I would have to agree.

I am going to tackle this recipe again at the end of the week. I want the mangoes to play a more prominent role and I want it to be "great". 

Mango Bread - a work in progress

2 1/2 cups of finely chopped mango
2 T. freshly squeezed lemon juice
1 c. all purpose flour
1 c. whole wheat flour
1/2 t. cinnamon
1/2 t. salt
1 1/4 c. sugar
3 eggs
3/4 c. canola oil
1 1/2 t. baking powder

I really was happy with the texture of this bread, it was very moist.  It was just lacking a bit of flavor.  I deliberately used a small amount of cinnamon because I find that it overwhelms things quickly, and unless I'm eating apple pie or crumble, I don't want a lot of cinnamon.

As much as I hate to admit it, I think the whole wheat flour may have masked the flavor of the mango.  Next time I'll just use 2 cups of all purpose. (So much for my attempt to be health conscious!)

I will try using brown sugar instead of white and maybe even using butter instead of oil, but that may compromise the moistness. Have to think about that.

I think a touch more salt would help elevate the flavors and I completely forgot my vanilla, so I will be adding a generous tablespoon next time.

Also, because the bread didn't raise much, might add more baking powder.  


That's a lot of changes!  It almost sounds like it didn't turn out at all.  It's actually not bad at all, I won't be throwing it away... but I think it will be so much better when I'm done with it.  Will keep you posted (ha ha!)


Thursday, March 4, 2010

No Bake Chocolate Oatmeal Peanut Butter Cookies


Tonight's cooking 'experiment' is a recipe I found on another food blog called "Brown Eyed Baker".  When I saw this recipe, I had to try it.  They look amazing. But here's the thing... my son is allergic to nuts and this is problematic for so many reasons.   The obvious one being his health, of course.  I worry all the time about him accidentally eating something that contains nuts.  That's a given.  But from a purely selfish perspective, it really kills me that I can't make a lot of the things I love anymore.  Christmas baking was not as fun this year, I never realized how many of the cookie recipes I love contain nuts!  I love nuts in my cookies, cakes, salads and I like to garnish with them too.  But all that aside, I figured it was time to start looking for a good peanut butter substitute.  I found this:


The clerk at the organic supermarket assured me it was one of the best peanut butter substitutes.  It's made from sunflower seeds.  It comes from a factory that contains NO nuts, it's pricey but what the heck, you gotta start somewhere...


Looks promising, right?  It tastes...okay.  It has a mildly bitter aftertaste, but if you're cooking with it, it's not something you'd notice.  It's a lot looser than peanut butter.  I wouldn't try spreading this on a piece of toast or anything.  What I didn't like was how it looked when it was melted into the batter.


It just looked a little curdled.  But I had come this far, so I kept going. 
In the end, I wouldn't say that I "love" these cookies.  They're "good", but they're not "great".  See, now that I've actually told a few people about this blog, and I know that some of these people are actually reading it (even if they aren't 'followers'), and that they may even try certain recipes, I feel like I have to be even more careful about giving anything my endorsement.  I'd hate to mislead anyone.  
But I will say that I am my own worst critic.  Everyone tells me this and I know it's true.  As much as I love to cook and bake, when I serve my food, I hold my breath, my heart rate goes up and I feel uncomfortable.  And then when the taster says "This is really good", I don't believe them. I figure they're just being polite.  When they insist that it really is good, I think "Wow, so and so is a total liar".  Then I watch them closely as they continue to eat it.  Is that a fake smile?  Are they trying to suppress their gagging reflex? I watch to see how many times they take a drink, and if they finish everything I've given them.  And even when they do, the next question is, how long did it take for them to choke it down? It's not until they ask for seconds (or thirds) that I relax and allow myself to believe that maybe, just maybe, it didn't totally suck.  
Oh right, I'm supposed to be talking about these cookies.  Sorry. What was I saying?  They're good, not great.  They may be familiar to some people, I have a vague recollection of eating something similar when I was a kid.  I loved them then, like them now.  Maybe it was the peanut butter substitute.  But it was a super easy, super quick recipe so if they look like something you really want to try, you've got very little to lose.  Here's the recipe:

No Bake Chocolate Oatmeal Peanut Butter Cookies:
(found on Brown Eyed Baker blog)
1/2 c. butter
2 c. sugar
1/2 c. milk
1/4 c. cocoa


Bring to rolling boil in 4 quart pot. Let boil for 1 minute. Remove from heat. Add:
1/2 c. peanut butter
2 t. vanilla
3 c. quick oats (must be quick oats or will be too hard to chew)

Mix together. Drop from teaspoon onto wax paper lined baking sheet. Gently shape into cookies (if desired) Let set.


Until next time...

Monday, March 1, 2010

Pizza - Round 2!

Yesterday I spent the day in the kitchen making homemade pizza.  (See previous blog.)  They were delicious, but I was unhappy with the appearance of the "white blobs" from the fresh mozzarella being added at the end of the baking.  
Because I chose to make 8 individual pizzas, and we had lost interest after we ate 4, my husband suggested we grill the remaining 4 crusts, put them in the fridge over night, and make a second batch of pizza for dinner tonight. Twist my rubber arm!  (It's like a gift from God when I have a day off from having to come up with something to make for dinner!) Besides, I had all those leftover toppings and it would be a shame to waste them.  So that's exactly what we did.  I piled the grilled crusts with toppings straight from the fridge and threw them in the oven to warm them up.
To address the issue of the white blobs of cheese, I grated the fresh mozzarella this time around.  It's not exactly easy to grate, it kind of falls apart, but it definitely improved the appearance of the pizza.
I love a grilled crust, the charred bits add so much flavor. And the crusts were almost as good the second day as they were when they were fresh.  
I don't think I would have thought to make pizza two days in a row if weren't for my husband's suggestion but it gave me the perfect opportunity to experiment with the cheese as I was determined to improve the appearance of my first batch.

Okay, so this has all been lovely and educational but I'm really looking forward to making something sweet for my next post...

Tomato Sauce (Kim, this one's just for you!)

My homemade tomato sauce isn't something I would have typically chosen to blog about, however, I have decided to do this for my very, very good friend.  Kim, you asked for my recipe some time ago, and because I don't actually work from a recipe, I thought it would be harder to put it on paper.  Turns out it was actually very easy.  I'm not including all these details and pictures because I think you need them (necessarily ha ha!), but because it makes the post more interesting.  As usual, I went WAY over board with my camera, but practice makes perfect and taking pictures is the funnest part for me.  So, here you go.
Ingredients for Tomato Sauce:
1 T. olive oil
One medium sized onion (finely chopped)
2 stalks of celery (finely chopped)
3 medium carrots (super finely chopped)
2 cups of chicken stock
4 cloves of garlic (pressed)
4 x 28 ounce cans of Italian tomatoes 
kosher salt and pepper to taste
fresh basil, coarsely chopped (optional)
I STRONGLY recommend using a food processor for this.  Do you have a regular sized one or are you still using that little mini one I gave you?  If you're still using that one...this will take some time, as you will have to chop everything in little batches, but that's okay. 
Directions:
Coarsely chop your onion and then spin it through your food processor a few times until you get a fine chop.  Be careful not to over process, or you will wind up with onion slime and that's just yucky.
Heat the olive oil in a large stock pot, over medium heat.  Add onion.  While onion is cooking, process the carrots and celery in the processor, you want these slightly finer than the onion.
Add the carrots and celery to the onion.  Season lightly with kosher salt and pepper and cook until vegetables are softened.  Be careful not to carmelize the onions (if they are cooking too fast while you're chopping the carrots and onion, lower your heat).
Once the vegetables look soft, (it won't take long when they're diced so small), add the chicken stock and garlic to the pot.
Mixture will look very soupy at this point, boil it softly until the liquid reduces by about 2/3's.  While cooking, start processing the whole tomatoes and their liquid into a sauce. You can leave them slightly chunky if you prefer a chunkier sauce. When the vegetables have reduced enough, add the tomato sauce.
 
Simmer on low for 2 to 3 hours.  Taste a couple of times to adjust your seasonings.  Once you've got the consistency you like, (personally, I don't like a really thick sauce, I prefer it to be slightly 'loose'), you can add the chopped basil, if using.  Turn off burner and cool.


As you may have noticed, I completely forgot to add my fresh basil, but the tomatoes that I use have whole basil leaves in the can so I wasn't too upset about it.  Because I pureed the tomatoes, you can't see the flecks of green basil, so I really urge you to add fresh basil when you do it. 
I special order my tomatoes through my good friend, Rob, who has "connections". These tomatoes are amazing, but since not everyone has a friend like Rob, I've notice large cans similar to this at Costco.  I use just the one can, but if you can't get a hold of a large can, the 4 28 ounce cans are fine.
Final words of advice:  invest in a dozen mason jars from your local grocery store.  It makes it so much easier to freeze your sauce in small portions.  Don't fill the jars too high, the sauce expands slightly when frozen and you will either warp the lid or crack the jar.  (I've done both.)
Once you have your sauce in jars, just leave it on the counter until it's reached room temperature before freezing.  The jars will crack if put in freezer when warm.  Yes, this is also from experience. 
My cooking tutorial is complete.  Let me know how this works out for you.  
Enjoy!

Pizza!

Yesterday was the BIG HOCKEY GAME...Canada vs. U.S for the gold medal.  We won!!  Go Canada!  Great game, from what I saw while making pizza.  Since we were unable to join the masses at some drinking establishment to enjoy the game (okay, I wasn't that worried about it), I decided to make something fun to eat for dinner.  What's better than homemade pizza?
I used the dough recipe from my cooking 'bible', "The Best Recipe" by Cooks Illustrated.  A side note:  I've gifted this book to the 2 foodies in my life who also love to cook and they love this book almost as much as I do.
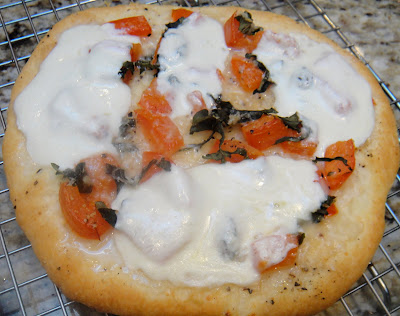
That said, I followed their recipe for the Pizza Margherita, which calls for chopped tomatoes instead of tomato sauce.  I won't do that again.  I also had 2 chunks of fresh mozzarella in my fridge, which is so much better than the regular mozzarella on pizza.  However, the book said not to add it until the last 3 minutes of baking...and so I'm still not sure if I like the way it looks when you have blobs of white cheese melted on top.  My pizza requires some more tinkering, simply for esthetic reasons.  But it did taste good, and isn't that what matters?
Recipe for Pizza Dough:
The Best Recipe
1/2 c. warm water, about 105 degrees
1 envelope (2 1/4 t.) active dry yeast
1 1/4 c. water, room temperature
2 T. extra virgin olive oil
4 c. bread flour, plus extra for work surface
1 1/2 t. salt
vegetable oil or spray for oiling bowl
Measure warm water into 2-cup measuring cup.  Sprinkle in yeast; let stand until yeast dissolves and swells, about 5 minutes.  Add room temperature water and oil; stir to combine.
(I'm meticulous about following instructions when it comes to dough because I've had some very bad experiences in the past.)
Pulse flour and salt in the work bowl of large food processor fitted with steel blade to combine.
Continue pulsing while pouring liquid ingredients (holding back a few tablespoons) through feed tube. If dough does not readily form into a ball, add remaining liquid, and continue to pulse until ball forms.  (Mine needed all the liquid.)  Process until dough is smooth and elastic, about 30 seconds longer.
Dough will be a bit tacky, so use rubber spatula to turn dough onto lightly floured work surface; kneed by hand with a few strokes to form smooth, round ball.  Put dough into deep oiled bowl and cover with plastic wrap.
Let rise until doubled in size, about 2 hours.
Punch dough down with your fist and turn out onto lightly floured work surface. Divide and shape as desired. Makes 2 large, 4 medium or 8 individual pizzas.  I made 8 so I could play around with the toppings.
Form each piece into a ball and cover with a damp cloth.  Let relax 5 minutes but not more than 30 minutes.
Preheat oven to 450 degrees, placing pizza stone on rack in lower third of oven for 30 minutes.  (I threw away my pizza stone months ago and had to use a metal baking sheet lined with parchment - not ideal but workable.)
Working with one piece of dough at a time and keeping others covered, flatten ball into a disk using palms of hands. Starting at center and working outward, use fingertips to press dough to about 1/2 inch thick.  Use one hand to hold dough in place and the other hand to stretch dough outward; rotate dough a quarter turn and stretch again.  Repeat turning and stretching until dough will not stretch further.  (I got tired of this and cheated by pulling out my rolling pin even though the recipe specifically says not to do this. My crusts turned out fine.)
Let dough relax 5 minutes then continue stretching until it is about 1/4 inch thick.  When all the dough rounds are done, transfer to pizza peel that has been lightly dusted with semolina or cornmeal.  (I used a combination of bread flour and cornmeal.)
Brush dough lightly with olive oil and then add toppings, leaving 1/2 inch border around the pizza.  Don't add the cheese yet (I'm not sure if I like this idea or not, but I followed the instructions anyway).
I used my homemade marinara sauce for some of the pizzas...
and fresh tomatoes for the Margherita Pizzas. *Note:  the tomatoes must be seeded or they will make the crust soggy.
The book said to cook this one with just the tomatoes and basil, and then add the cheese later.
My husband is a true carnivore, so the idea of a pizza without meat holds no appeal for him, plus he likes heat so on the pizzas with tomato sauce, I added spicy Italian sausage and jalapenos.
At this point, they went into the oven cheeseless.  I added slices of the fresh mozzarella for the final three minutes of baking.  This is what the Margherita looked like after baking...
I was not thrilled with what the high heat did to my fresh basil!  I think that perhaps that should be added with the cheese for the final 3 minutes.
The sausage jalapeno pizza looked a little more appealing:
but again, I'm not sure about these cheese blobs.  They tasted good, but I after all that work and time, I want them to look good too.
After baking and eating four of the eight pizzas, we were both full.  So we decided to grill the rest of the dough on the BBQ, and then refrigerate the crusts so we can make more pizza tonight.   I will be tackling this cheese blob problem on round 2, because now I won't be distracted by the fresh dough and the hockey game.  
In the end, these pizzas were a success. But I'm always looking for ways to make it better...
Related Posts with Thumbnails