A mom's journal of the sweet things in her life...
Showing posts with label Brownies. Show all posts

Wednesday, June 6, 2012

Chewy Brownies

I saw this recipe for brownies by Cook's Illustrated, which promises a homemade version of the chewy brownie that comes from the boxed mix. This is one of those rare instances where a close approximation to the box mix is a good thing. I altered the recipe slightly by omitting the 6 ounces of bittersweet chocolate chunks that were to be added to the batter before baking. I prefer not having the texture of the chocolate chunks interfering with the chewiness of the brownies. Also, I don't like my brownies too chocolate-y, as strange as that sounds. There really is such a thing as 'too much of a good thing'. These brownies were a definite hit - with kids and adults alike. Definitely worth a try - they'll wind up in the favorites rotation for sure. 
Recipe for Chewy Brownies
(Source: adapted from Spring Entertaining | Cook's Illustrated | 2012)
1/3 cup dutch processed cocoa
1 1/2 tsp. instant coffee
1/2 cup plus 2 Tbsp. boiling water
2 ounces unsweetened chocolate
4 Tbsp. unsalted butter, melted
1/2 cup plus 2 Tbsp. vegetable oil
2 large eggs plus 2 large yolks
2 tsp. vanilla
2 1/2 cups (17.5 ounces) sugar
1 3/4 cups (8.75 ounces) all purpose flour
3/4 tsp. salt
Preheat oven to 350 degrees F.  Line a 13x9 inch baking dish with foil, leaving a 2 inch overhang. Spray with non-stick vegetable spray.
Whisk cocoa powder, instant coffee and boiling water together in a large bowl until smooth. Add the semisweet chocolate and whisk until completely melted. Whisk in the oil and then the melted butter. Add eggs, egg yolks and vanilla, whisking until smooth. Add the sugar and whisk until incorporated. Using a rubber spatula, fold in the flour and salt and mix until just combined.
Pour batter into the prepared pan. Bake until a toothpick inserted halfway between the edge and the center have a few moist crumbs attached, about 30 to 35 minutes. (I baked mine for 30 minutes.) Allow to cool in pan for 90 minutes.
Using the foil overhang, remove the brownies from the pan and allow to cool completely. Cut and serve. 

Monday, August 29, 2011

Two-Bite Brownies

We just got home a couple of weeks ago from our summer holiday, which consisted of 30 glorious, rain-free days in beautiful San Diego. We rented a house that had a swimming pool, a hot tub, an outdoor jungle gym, a trampoline and a sports court. We visited Disneyland, Seaworld, Legoland, the Wild Animal Safari Park and the beach. Our days were full of sunshine, and the perfect balance of activity and poolside relaxation. And when we got home, I asked my three-year-old son what his favorite part of our holiday was, and do you know what he said? Target! True story.
I'm not sure what that says about him. Moreover, I'm not sure what that says about me, as his mother, and what I've taught him in his 3 short years on this planet.
But I digress. This post is long-overdue. Well, not this post in particular, I just made these brownies like 5 minutes ago - but a post in general. My blog has been collecting dust as I'm just finding my way back to the kitchen after a 2 month hiatus.
These brownies are brought to you courtesy of the mother of my son's first crush. We were invited over for a play date last week and my friend served us these delicious Two-Bite Brownies. Of course I asked for the recipe, they were delicious and adorable. Perfect for portion control - if you can stop yourself from eating more than one - which, unfortunately, was not the case with me. But for those of you who may or may not be sporting a post-summer-holiday-muffin-top (like me) these are relatively harmless, as far as brownies go at 85 calories and 2.3 grams of fat per serving. But that's not the only reason you should make them. They're delicious and so very fast and easy to throw together. (I didn't even bother pulling out my mixer!!)


Two-Bite Brownies
1/4 cup butter, softened
1 1/4 cup sugar
2 large eggs
1 tsp. vanilla
1 tsp. instant espresso
1 cup flour
1/2 cup cocoa
1/4 tsp. baking powder
1/4 tsp. salt


Preheat oven to 350 degrees F. In a large bowl, cream the butter and sugar until well-mixed. Add eggs, vanilla and instant coffee and stir until well-blended. In a separate bowl combine flour, cocoa, baking powder and salt. Add to egg mixture and stir by hand until just combined. Spray mini muffin tin with non-stick cooking spray. Spoon batter into muffin pan. Bake for about 12 minutes or until just puffed but still soft to touch. Do not over-bake! Cool in pan on wire rack for 5 minutes before removing brownies from pan and allowing to cool completely on wire rack. Yield: 24 brownies.

Friday, June 10, 2011

Cheesecake Brownies

You know how some recipes you see get bookmarked, and you wait for the perfect day to make them, and then others get made within the hour of seeing the recipe? This one was one of the latter. I saw the picture, I read the ingredients, I rejoiced because I knew I already had everything required in my house, and then I got started immediately. 
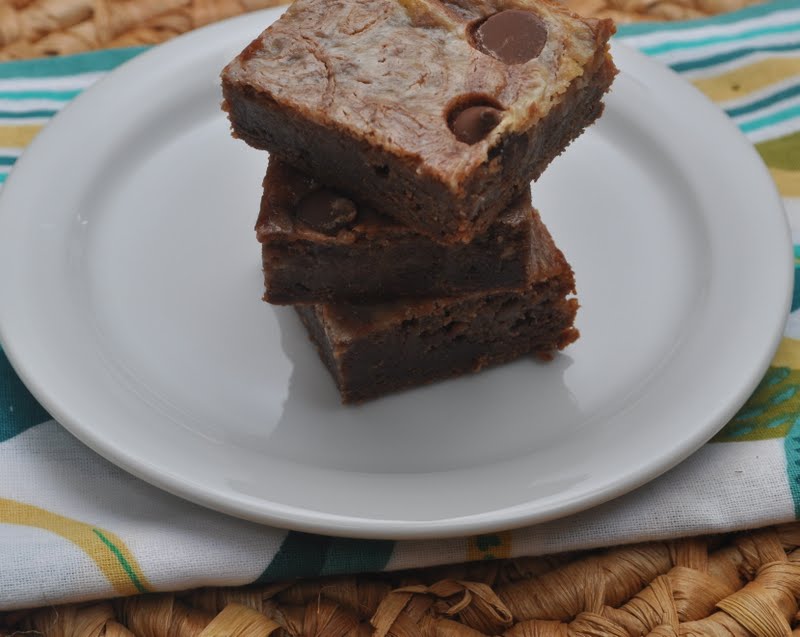
It could be argued that I "over-swirled" the two batters before baking, resulting in a less marbled appearance. I tried to use use a light hand while swirling, but I couldn't help myself. I just kept going and going. Thankfully, the resulting 'less than marbled effect' does not seem to affect the flavor. These brownies are delicious! The perfect balance of rich chocolate brownie and cheesecake. Kind of like a chocolate cheesecake bar. And, they're so easy to make. I found I preferred mine slightly chilled, as opposed to room temperature. For some reason any kind of cheese-cake related baking tastes better cold. 
Recipe for Cheesecake Brownies
(adapted from What's Gaby Cooking)
1/2 cup unsalted butter
3 oz semi-sweet chocolate, chopped
1 cup sugar
2 large eggs
2 tsp. vanilla extract
2/3 cup all-purpose flour
8 oz cream cheese, at room temperature
1/3 cup sugar
1 large egg yolk
1 tsp. pure vanilla extract
1/2 cup milk chocolate chips (optional)
Preheat oven to 350 degrees. Line a 9×9 baking pan with foil, leaving a 2 inch overhang on 2 sides. Spray with non-stick baking spray. Set aside.
Melt the butter and chocolate in a small saucepan over medium low heat, constantly stirring until completely melted. Remove from the heat and whisk in the sugar. Add the eggs and vanilla. Add the flour and gently fold just until  incorporated. Pour into the prepared foil lined baking pan and set aside.
For the Cheesecake layer: In a small bowl, combine the cream cheese, sugar, egg yolk, and vanilla and whisk together until smooth. Drop spoon-fulls of the cheesecake batter on top of the brownie batter. Then using a knife, swirl the two batters together until you have a marbled effect. Top with the milk chocolate chips, if using.
Bake for 30 minutes. Remove from oven and allow to cool. Chill in the refrigerator. Cut into squares.

Wednesday, April 20, 2011

Caramel Filled Brownies

Yeah, sorry about these. As if any of us needed another vice. Especially in the brownie department. The thing is, I've been having a bit of a love affair with caramels lately. And I don't mean those lovely homemade Fleur de Sel ones that are elegant and perfect and all the rage. I love those too but they're just too much damn work. No. I'm talking about those Kraft caramels that we used to get for Halloween when we were kids. 
I loved them as a kid but then I forgot about them for the past 20 something years. Needless to say, we've become reacquainted. The "Brown Butter Salted Caramel Rice Krispie Treats" were a product of this aforementioned love affair. They're a sort of 'love child', if you will. And the Homemade Twix Bars. Those were super yummy too.
Now there's these. I saw them on Fake Ginger, intrigued I mosied on over to get the recipe from Powdered Plum. I made a number of changes to the original recipe and I've posted the recipe as I made it.
These brownies are killer. Dense, moist and extra chewy (because of the layer of caramel baked inside). What more can you ask for from a brownie? 


Caramel-Filled Brownies

(Adapted from The Pastry Queen by Rebecca Rather)
1 cup (2 sticks) butter
12 oz. semisweet chocolate, coarsely chopped
1 1/2 cup sugar
4 large eggs
1 Tbsp. vanilla extract
1 1/4 cup flour
1/4 tsp. salt
19 oz. caramel candies, unwrapped
1/3 cup plus 2 Tbsp. heavy whipping cream
Preheat the oven to 350°F.
Line a 9" x 13" baking pan with foil, leaving several inches hanging over the short ends of the pan. Spray the foil with cooking spray generously.
Melt the butter and chocolate in a large measuring cup at 50% power in the microwave for 2 minutes. Stir, then continue in 30 second intervals, stirring after each time until melted and smooth. Transfer the chocolate mixture to the bowl of your stand mixer. Add the sugar, eggs, and vanilla mixing on medium speed with paddle attachment for 1 minute until thick and glossy. Stop the mixer, add the flour and salt, mix on lowest speed just until combined. 
Pour half the batter (about 2 1/2 cups) to the baking pan and spread evenly. Bake for 20 minutes. Let the brownies cool about 20 minutes.

The edges of my brownies rose quite a bit, making it slightly uneven:
I trimmed the higher edges off to level it, otherwise the caramel would pool in the centre and the edges would dry out or burn.
 
Melt the caramels and cream in a large measuring cup or a small glass bowl. (Start in 1 minute intervals, checking each minute and stirring. Once caramels start to melt, check after 30 second intervals, making sure not to overcook.) Pour hot caramel mixture over the brownies.
Spread the remaining brownie batter evenly over the caramel mixture
and spread gently, swirling the chocolate with the caramel. (But don't over mix or the caramel will become too incorporated with the brownie mix, and you won't have a thick caramel layer in the centre.)
Bake for additional 20 minutes. Cool the brownies completely in the pan, chill in fridge to speed up process if desired. Lift the brownies out of the pan by pulling out the foil. Cut into squares. (I found them easier to cut once chilled in the fridge.)

Friday, November 12, 2010

THE Baked Brownie

I've never been above jumping on a bandwagon, whether it's misguided fashion trends, reading a book that's generated a lot of "buzz" or trying out the latest recipe that's got everyone talking. 


For those of you who don't waste copious amounts of time reading food blogs, I'm talking about the new cook book out there: "Baked New Frontiers in Baking". Their brownies have gotten a lot of attention, they were featured in Oprah's magazine "O" as a 'favorite thing' and awarded 'best brownie' by America's Test Kitchen. 


Being a very loyal fan of "America's Test Kitchen", I ran out and bought the book. There are a lot of recipes in there I'm dying to try, but I knew the first one had to be the "Baked Brownies". This recipe is killer. It calls for 11 ounces of chocolate, a whole cup of butter, 5 eggs. Yikes. These better be good.


I broke out the good stuff - threw 11 ounces of my highest quality chocolate, butter and instant espresso powder in a bowl over simmering water and waited...
Once everything is melted and smooth, you add your sugars and stir, leaving the bowl over the simmering water with the heat turned off.
Then you remove the bowl from the water and add the eggs. First 3 then the remaining 2, being careful not to over-mix.
Sprinkle your dry ingredients over the mixture, and gently 'fold' with a large rubber spatula.
Again, you want to be careful not to over-mix it - in fact, the recipe says to stop when you still have streaks of flour remaining in your batter otherwise your brownies will be cakey. 
Pour into a greased 13x9 inch pan (I foiled mine to make it easier to remove them),
and bake for approximately 30 minutes, checking frequently. If your toothpick comes out clean, you've over-baked them. You want there to be a few moist crumbs sticking to it. (I started checking mine at 25 minutes, and then every 2 minutes thereafter...)
Then you allow to cool before cutting. *Note: If you have a large dog who loves brownies and does not hesitate to sample anything and everything left on your counters, block your dog's access with a large cutting board. It works.
Nice glossy crust on top of the brownies? Check. Fudgey, moist and dense texture? Check.
I like to take pictures from 'above' standing on my dining room chair with the brownies on the table. Here's the view from up there. Damn, she's relentless.

The verdict? These brownies are a-m-a-z-i-n-g! Worth every ounce of chocolate and every fat gram. Their chocolate flavor is intense, but not overly-so, they are delicious. Dress them up and serve them for dessert with ice cream at your next dinner party. They're decadent enough.

Recipe for The Baked Brownie
(Source: Baked New Frontiers in Baking)
1 1/4 cup all-purpose flour
1 tsp. salt
2 Tbsp. dark unsweetened cocoa powder
11 ounces dark chocolate (60% to 72% cacao), coarsely chopped
1 cup butter, cut into 1 inch pieces
1 tsp. instant espresso powder
1 1/2 cups granulated sugar
1/2 cup packed light brown sugar
5 large eggs, at room temperature
2 tsp. pure vanilla extract

Preheat oven to 350 degrees F. Butter a 9x13 inch glass or light colored metal baking pan.

In a medium bowl, whisk the flour, cocoa and salt together.

Put the chocolate, butter and instant espresso powder in a large bowl and set it over saucepan of simmering water, stirring occasionally, until the chocolate and butter are completely melted and smooth. Burn off the heat, but keep the bowl over the water and add the sugars. Whisk until completely combined, then remove the bowl from the pan. The mixture should be room temperature.

Add 3 eggs to the chocolate mixture and whisk until combined. Add the remaining 2 eggs and whisk until combined. Add the vanilla and stir until combined. Do not overbeat at this stage or the brownies will be cakey.

Sprinkle the flour mixture over the chocolate mixture. Using a large rubber spatula (not a whisk), fold the flour into the chocolate until just a bit of flour mixture is visible.

Pour the batter into the prepared pan and smooth the top. Bake in the centre of the oven for about 30 minutes, rotating the pan halfway through baking time, until a toothpick inserted in the centre comes out with a few moist crumbs. Let brownies cool completely, then cut into squares. 

Tuesday, October 5, 2010

Hershey's Best Fudgey Brownies

I have a problem. Her name is Daisy. She has four legs and she's a bloodhound. I've given this is a great deal of consideration and I can say with a reasonable degree of certainty that 70% of my stress and frustration can be attributed to her. My kids are responsible for a large portion of the other 30%, but there's two of them. 


Daisy is a very, very bad dog. She's also very, very cute, and therein lies the dilemma. How do you stay mad at face like that?
I made brownies the other day from my newly acquired Hershey's cookbook. I love the Hershey's recipe for chocolate cake so it stands to reason that they might know a thing or two about brownies. Typically, I prefer a brownie naked. If it is as decadent and fudgey as my taste demands, then it shouldn't need a frosting. However, this particular recipe had a chocolate glaze that is poured onto the brownies while they are still hot from the oven. Knowing that it would take some time for the brownies to cool enough to be sliced, and that I could not be trusted to wait the alloted time, I made the brownies right before I had to leave the house to drive my kids to school. 


I'm not a complete idiot, I do know that Daisy is not to be trusted. I don't let her run free in the house while I'm out, there's simply no telling what she'd get into. However, after I got home, I let her out of her kennel and then left the kitchen for about 30 seconds. When I returned, I found Daisy standing on her two hind legs, eating my brownies off the counter. This is what was left of them.
I managed to salvage the last row. All that work and I'm left with four lousy pieces from the entire batch. But all four of them were good. Very, very good.  I know this because I ate them all. It was my consolation prize. Besides, it was the prudent thing to do, not knowing how much of her saliva had contaminated the batch. Right? Well, that's what I told myself anyways. I did have some explaining to do  when my kids came home from school and there were no brownies for them. I told them that Daisy ate them all. They totally believed me. Foolish kids. 
"Best Fudgey Brownies"
(Source: Adapted from Hershey's Chocolate Cookbook)
1/2 cup butter, melted
1 cup sugar
1 tsp. vanilla
2 eggs
1/2 cup flour
1/3 cup Hershey's cocoa
1/4 tsp. baking powder
1/4 tsp. salt
Heat oven to 350 degrees. Lightly grease 8 or 9 inch square baking pan. Beat butter, sugar and vanilla with spoon in large bowl. Add eggs, beat well. Stir together flour, cocoa, baking powder and salt; gradually add to egg mixture, beating until well-blended. Spread in prepared pan.
Bake 20 to 25 minutes or until brownies begin to pull away from the sides of pan. Meanwhile, prepare the frosting. Spread the warm frosting over the warm brownies. Cool completely, cut into squares.
Chocolate Frosting
1 1/3 cups powdered sugar
2 Tbsp. Hershey's cocoa
3 Tbsp. butter
2 Tbsp. milk
1/4 tsp. vanilla
Place the powdered sugar and cocoa in a medium bowl. Heat butter and milk in small saucepan over low heat until butter is melted. Gradually beat in cocoa mixture, beating until smooth. Stir in vanilla.

Friday, July 23, 2010

Kit Kat White Chocolate Blondies


Hello. Remember me? 

I'm the girl who told you that  you should melt chocolate bars with butter and make squares with them. I also pretty much told Weight Watchers to take a flying leap. Yuh. Sure did. All this just earlier today.

As soon as I hit "publish post", I started browsing other food blogs. I still had Mars Bars stuck in my teeth when I stumbled upon yet another recipe that uses chocolate bars.  Kit Kat chocolate bars on top of a white chocolate Blondie. I liked this concept. Definitely worth exploring. Non?


What are the chances I would have Kit Kat bars in my cupboard? They were left over from Halloween. Surely it was a sign that this was meant to be. It appeared that my chocolate bender was not over. Not by a long shot. It had only just begun.


No sooner had I finished washing the cutting board and knife that I used to chop up Mars Bars and I was pulling them out again. I needed them to chop up Kit Kat bars this time. Say goodbye to the skinny jeans.

I found this recipe on Picky Palate. She used a muffin top pan instead of the 8" square pan that I used, you can use either. She commented that they weren't anything pretty to look at. She wasn't lying. They weren't. They were ugly as hell. Hers looked pretty good - mine sunk in the middle leaving an abnormally high crust. I'm thinking the muffin top pan might be the way to go.


As much as I love the idea of baking with chocolate bars, I think the Blondie aspect of this recipe could be tweaked. Perhaps baking it in a slightly larger pan (9x9), perhaps mixing half the Kit Kat bits into the batter and then sprinkling the rest on top. Perhaps a tad more salt. Perhaps.

After I cut off the crust part, and granted some people really like that part of a brownie but I'm not one of them, I was left with no more than nine flat pieces from the centre, which were somewhat more appealing. 


At first I thought they seemed a little greasy and I was disappointed. But I left them on the counter,  took the kids to the park and forgot about them. Then later, I walked past them on the counter and I tried one. It was good. Not outstanding, but good. I think it's important to let them cool to room temperature before you try them. 

The final verdict? Make these if you have Kit Kat bars lying around, but I wouldn't run out and buy them specifically for this. Unless you must. Then do so. It's up to you. Really. Who am I to tell you not to? I just made Mars Bar Squares and Kit Kat White Chocolate Blondies in the same afternoon.

Recipe:
1/4 cup butter
3/4 cup white chocolate chips
1/2 cup sugar
1/4 cup packed brown sugar
1 cup flour
1/2 teaspoon baking powder
1/2 teaspoon salt
1/2 cup white chocolate chips
2 eggs
2 Tablespoons heavy cream
10 individual Kit Kat sticks


Preheat oven to 350 degrees F. Place butter into a microwave safe bowl and melt. Stir in white chips until melted and smooth.

Place sugar, brown sugar, flour, baking powder, salt and white chips into a mixing bowl, stir in melted butter/white chocolate  

then stir in eggs and cream.
Pour batter into a 8×8 inch baking dish lined with foil and sprayed with cooking spray and top with cut up pieces of kit kat bars. 
Bake for 30-35 minutes or until cooked through, let cool then cut into squares.

P.S. - If you happen to be a member of Weight Watchers, please don't tell them what I've been up to. I will be banned for life. Thanks.

Related Posts with Thumbnails