A mom's journal of the sweet things in her life...
Showing posts with label Cheesecake. Show all posts

Saturday, August 18, 2012

Milk Chocolate & Peanut Butter Cheesecake with Pretzel Crust

It's been a very long time since I last posted. I've been a very lazy girl in the blogging department, which is not to say that I've been lazy in the kitchen. I've made some great stuff over the past few months, I just haven't really felt like blogging about it. But I couldn't let this little gem fall between the cracks, because this dessert was one of my favorites. 
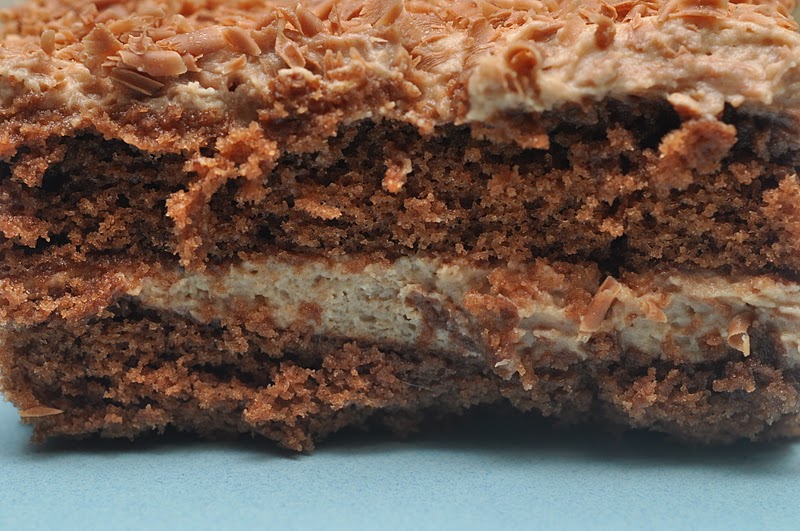
This was inspired by a dessert that was served at Earl's for a short time. It was a milk chocolate pudding topped with a peanut butter mousse and then sprinkled with a home made sponge toffee. It was heaven. Instead of pudding, I opted for a milk chocolate cheesecake for my base. I made a thin peanut butter layer for the top. The crust is crushed pretzels instead of graham wafers, and then I melted peanut butter and poured it on the crust to help it to bind and also give the cake that extra hit of peanut butter. 
And, yes, I did make a homemade sponge toffee to sprinkle on top which was great for texture, but I completely forgot to use it when I photographed the dessert. You'll just have to take my word for it.
I'm not going to lie. This cake is a lot of work. There's a lot of different layers of flavors going on here but it really comes together and is a show stopper. Make this for someone you love. Or when you just really need the peanut butter chocolate combo but want a refined version of Reese's peanut butter cups. 
For the Crust:
1 cup of crushed pretzels (you want fine crumbs here but not dust)
1 Tbsp. granulated sugar
1/4 cup butter, melted
1/4 cup smooth peanut butter
Combine crushed pretzels, sugar and melted butter. Press into the base of a greased 9" spring-form pan. Bake at 375 degrees F. for 8 to 10 minutes or until slightly golden.
Microwave peanut butter until pourable consistency, and pour over the baked crust.  *Now that your crust is ready, wrap the outside of the pan with foil if you plan to bake your cheesecake in a water bath (optional). 
For the Cheesecake
(adapted from Fine Cooking)
8 oz milk chocolate, finely chopped
3 x 8 ounce packages of cream cheese, at room temperature
1/2 cup sour cream
2 tsp. vanilla extract
2 Tbsp. unsweetened cocoa powder
1/4 tsp. salt
1 1/4 cups granulated sugar 
3 large eggs, room temperature
Melt the milk chocolate in a glass bowl in the microwave at 50% power for 90 seconds. Stir. Continue to microwave in 30 second bursts, stirring in between each, until chocolate is smooth. Set aside.
Put the cream cheese in the bowl of a food processor and pulse until smooth. Add the rest of the ingredients EXCEPT the eggs, and process until smooth. Add the eggs and pulse a few times only until incorporated. Do not over mix or the cake will expand too much when baked. Scrape the melted chocolate into the mix and pulse until just incorporated. Pour over crust.
Bake at 300 degrees F. for 50 to 60 minutes until the centre barely jiggles when you tap the pan. Remove from oven, allow to come to room temperature on a cooling rack before refrigerating over night.
*I always bake my cheesecakes in a hot water bath - and I did with this one as well, but it's not necessary. If you choose to do the same, place your cheesecake in a large roasting pan before baking, and pour enough boiling water in the roasting pan to come half-way up the cheesecake. 
For the Peanut Butter Layer
(adapted from Willow Bird Baking)
1/2 tsp. powdered gelatin
2 Tbsp. cold water
1 cup heavy cream
2 large egg yolks
3 Tbsp. sugar
4 Tbsp. smooth peanut butter
1/8 tsp. salt
In a small bowl, mix the gelatin and the water in a small bowl. Let dissolve for 5 minutes. Heat the cream over low heat in a small sauce pan until it bubbles form around the edges. In another bowl, whisk together the egg yolks and the sugar. While whisking vigorously, add 1/2 of the hot cream into the egg yolks and sugar. Then slowly pour the egg mixture into the saucepan of cream, whisking constantly. Cook over low heat, stirring constantly, until thickened, about 3 minutes. Remove from heat and whisk in the peanut butter and the gelatin. Chill until it's cooled and thickened slightly, but not set. Pour mixture over top of the chilling cheesecake (still in its spring form pan) and refrigerate for several hours, preferably over night. When completely chilled, remove cake from spring-form pan and serve.


*Like I said, I forgot to photograph the honeycomb, but it was a great addition to this dessert. I used this recipe from Bon Appetit. One could always buy honeycomb instead of making it, it would definitely save you a lot of time. 

Thursday, September 29, 2011

Milk Chocolate & Bailey's Tiramisu

 
Please do not be deterred by the photos. This dessert was a hit. It turned out even better than I'd hoped and and I had high expectations. The picture was taken the day after I served it - I just couldn't pull out my camera and start shooting pictures in the midst of all the birthday chaos and dessert serving that was going on at the time. I made this for the adults at my son's 4th birthday party because I was pretty sure that, while the guests would have politely choked down a piece of Spiderman cake with copious amounts of icing and food coloring along with the kids, it wouldn't go over as well as this did.

I found this recipe in Better Homes and Gardens and adapted it to my liking. I'm not a tiramisu enthusiast by a long shot. Often times, I find it soggy and over-powered with too much liqueur and espresso. This recipe piqued my interest because not only was it chocolate, but instead of using lady fingers, you bake a chocolate sponge cake.  I changed the liqueur from a coffee-flavored one to Bailey's, and reduced the amount of espresso in the recipe because, like I said, I don't do soggy. The best part is that you can make it ahead of time (anywhere from 6 to 24 hours), put in in your fridge and focus on all the other stuff one must do when hosting a party. This will also save you if you're bringing dessert to someone's house - make it the day before and rest assured that every one will love it. Even the non-tiramisu lovers. And note that, unlike an authentic Tiramisu, this one does not contain raw eggs, so no need to worry about anyone with health issues.

Milk Chocolate & Bailey's Tiramisu
(adapted from Better Homes and Gardens|Ultimate Italian edition|2011)
FOR THE CHOCOLATE SPONGE CAKE:
2 eggs, room temperature
1 cup sugar
3/4 cup flour
1/4 cup unsweetened cocoa
1 tsp. baking powder
1/4 tsp. salt
1/2 cup milk
2 Tbsp. butter
1 tsp. vanilla
Preheat oven to 350 degrees F. Grease a 15 x 10 x 1 inch baking pan. Line bottom with parchment paper. Grease and flour the paper and the sides of pan; tapping out excess. Set aside. In small bowl, stir flour, cocoa powder, baking powder and salt. Set aside. In bowl of a stand mixer, beat the eggs on high speed about 4 minutes or until thick and lemon colored. Gradually add sugar, beating on medium speed for 4 to 5 minutes, or until light and fluffy. Add the flour mixture; beat on low to medium speed until just combined. IN a small saucepan, combine milk and butter. Heat and stir until butter melts. Add to batter along with vanilla, beating until combined. Pour into prepared pan and bake until a wooden toothpick inserted into center comes out clean, about 15 minutes. Cool in pan on wire rack for 10 minutes. Immediately loosen sides of cake from pan and turn cake onto clean kitchen towel sprinkled with cocoa powder. Carefully remove paper; discard. Cool completely. Cake can be wrapped well in plastic and frozen at this point.

FOR THE FILLING:
2 Tbsp. brewed strong espresso, divided
2 Tbsp. Bailey's
3 ounces of milk chocolate, chopped
1- 8 ounce carton mascarpone cheese
1 cup whipping cream
1/4 cup confectioners sugar
1 tsp. vanilla
2 Tbsp. Bailey's or freshly brewed strong espresso
grated chocolate for sprinkling on top (optional)

Place chopped milk chocolate in small microwave-safe bowl. Microwave, uncovered on 50% power about 1 minute, or until chocolate in melted and smooth, stirring every 15 seconds. Set aside to cool. In a large bowl beat the mascarpone cheese, whipping cream, powdered sugar, and vanilla with an electric mixer until soft peaks form (tips curl). Beat in 2 Tbsp. of Bailey's liqueur and cooled melted chocolate until just combined. Set aside.

ASSEMBLY:
Cut cooled cake in half cross-wise. Line a 2 quart baking dish with one of the cake halves. (I used a glass 8 inch square pyrex dish). Drizzle 1 Tbsp. each of espresso and Bailey's over the cake. (I used a pastry brush for more even distribution). Allow to soak in. Spoon half of the filling over the cake, spreading evenly. Top with the remaining cake half, cutting to fit as necessary. Drizzle with the remaining 1 Tbsp. of espresso and Bailey's. Top with remaining filling; spreading evenly. Cover and refrigerate for 6 to 24 hours. If desired, garnish with grated milk chocolate before serving.  Yields: 12 servings. 


Tuesday, August 30, 2011

Dessert Cheese Ball

It's not the most beautiful dessert to offer up at say a bridal shower where everything is expected to be pretty and girly. But I brought it anyway. I tried a version of this at a party once and was very pleasantly surprised. When my sister, girlfriend and I recreated it last summer while on holidays, we nailed it. Except we didn't have the right crackers to accompany this dessert. We pilfered the sparse pantry and settled for the only crackers we could find - vegetable thins or something along those lines. We were desperate. The onion and garlic flavor we were hoping to ignore completely over-powered the sweetness of the chocolate bar. In a nutshell, it was disgusting. Please don't do that. 
But when I saw Renee's pita chips flavored with sugar and cinnamon at the grocery store recently, I grabbed them knowing they were the perfect accompaniment. And it was high time to resurrect this cheese-ball. So I whipped it up, to go alongside a prettier more appropriate dessert that I also took to the bridal shower. More than anything, I was curious to see how people would react. Would they like it? Would it just sit there, untouched? Had I romanticized my memory of how delicious it was when I first encountered it a couple years ago?
It was a hit. So I guess I can rest assured that my sugar-loving-palette isn't completely warped. 
Recipe:
12 ounces of cream cheese, room temperature
1/2 cup confectioners sugar
4 regular sized Crispy Crunch chocolate bars (Skor would be great too)
Chop candy bars into small pieces, set aside. Mix the cream cheese and sugar in a bowl with a spoon until smooth. Add approximately 1/4 of the crushed bars to the cream cheese mixture. Form into a ball, wrap with plastic wrap and refrigerate until slightly firm. Just before serving, remove from fridge and roll into the remaining chopped chocolate bars. Serve with plain or cinnamon-sugar flavored pita chips. (Or some other plain cracker).

Friday, June 10, 2011

Cheesecake Brownies

You know how some recipes you see get bookmarked, and you wait for the perfect day to make them, and then others get made within the hour of seeing the recipe? This one was one of the latter. I saw the picture, I read the ingredients, I rejoiced because I knew I already had everything required in my house, and then I got started immediately. 
It could be argued that I "over-swirled" the two batters before baking, resulting in a less marbled appearance. I tried to use use a light hand while swirling, but I couldn't help myself. I just kept going and going. Thankfully, the resulting 'less than marbled effect' does not seem to affect the flavor. These brownies are delicious! The perfect balance of rich chocolate brownie and cheesecake. Kind of like a chocolate cheesecake bar. And, they're so easy to make. I found I preferred mine slightly chilled, as opposed to room temperature. For some reason any kind of cheese-cake related baking tastes better cold. 
Recipe for Cheesecake Brownies
(adapted from What's Gaby Cooking)
1/2 cup unsalted butter
3 oz semi-sweet chocolate, chopped
1 cup sugar
2 large eggs
2 tsp. vanilla extract
2/3 cup all-purpose flour
8 oz cream cheese, at room temperature
1/3 cup sugar
1 large egg yolk
1 tsp. pure vanilla extract
1/2 cup milk chocolate chips (optional)
Preheat oven to 350 degrees. Line a 9×9 baking pan with foil, leaving a 2 inch overhang on 2 sides. Spray with non-stick baking spray. Set aside.
Melt the butter and chocolate in a small saucepan over medium low heat, constantly stirring until completely melted. Remove from the heat and whisk in the sugar. Add the eggs and vanilla. Add the flour and gently fold just until  incorporated. Pour into the prepared foil lined baking pan and set aside.
For the Cheesecake layer: In a small bowl, combine the cream cheese, sugar, egg yolk, and vanilla and whisk together until smooth. Drop spoon-fulls of the cheesecake batter on top of the brownie batter. Then using a knife, swirl the two batters together until you have a marbled effect. Top with the milk chocolate chips, if using.
Bake for 30 minutes. Remove from oven and allow to cool. Chill in the refrigerator. Cut into squares.

Friday, January 14, 2011

Ferrero Rocher Cheesecake

Fact: As I type this, I am lying in my king-sized bed on a Friday night with two very large sleeping dogs who both refuse to give me enough space to stretch out my legs. Who's running this show?!

Fact: My legs are cramping but I can't do anything about it because I don't want to disturb the peace. The. Much. Needed. Peace.

Fact: I am currently suffering through the obligatory New Year's diet and I'm hungry. So very hungry.

Fact: I am also a cliche.

I made this cheesecake during the holiday free-for-all-food-fest and I think it may have a little something to do with extra 4 pounds I gained in 2 weeks. I've managed to shed 3 of those 4 pounds - but this last one is a killer. It's hanging on for dear life. It's mocking me right now.

I was looking for something new to do with cheesecake when I stumbled upon the idea of adding Ferrero Rocher chocolates. Why the heck not? It was Christmas after all, the season of indulgence. Ferrero Rocher is the most delectable chocolate available at a supermarket, and they aren't that pricey, relatively speaking. And since I had already doctored my vanilla cheesecake recipe to perfection, if I do say so myself, there was really no point in reinventing the wheel. I decided to simply fold chopped Ferrero Rocher chocolates into the cake batter and cross my fingers. 
 For the topping, I cheated. I had purchased a jar of chocolate hazelnut spread from Bernard Callebaut and simply warmed it until it was spreadable and then smeared it all over the cheesecake. Heaven! If, however, you don't have a Bernard Callebaut store in your neck of the woods, the same could be done with Nutella. Add some chopped hazelnuts if you want texture, but either way, it would be delicious.
Finally, I cut the remaining chocolates in half and added them as 'garnish'. They cut in half surprisingly well and really finished the cake. This was a big hit, everyone really liked it and it will definitely be making another appearance as soon as I can find an excuse. And when I'm done dieting. Or after I abort my mission to shed this final pound. Whichever comes first.

If you're looking for a special occasion cheesecake and you love chocolate and hazelnuts, look no further, I promise you won't be disappointed. 

Recipe for Ferrero Rocher Cheesecake:
Base:
3 cups of Cinnamon Toast Crunch cereal
5 Tbsp. butter, melted
Process the cereal in food processor until they form fine crumbs. Add your melted butter and pulse until combined. Press into your cake pan(s). Set aside. (You could also use the more traditional graham wafer crumb crust.)

Pre-heat oven to 325 degrees.

Cheesecake:
1 kg. container of Victorian Style cream cheese (found at Costco); or 4 eight ounce packages of full fat cream cheese
1 1/4 cup sugar
1 1/3 cup of full fat sour cream
1 T. vanilla extract
seeds from 1 vanilla bean
3 eggs
10 Ferrero Rocher chocolates cut into quarters (plus extra if you want to use them for decorating)
1 cup of Chocolate Hazelnut spread, such as Nutella (for frosting)

Put all the ingredients (except the eggs) into the bowl of your food processor. Pulse several times until the mixture is well blended and smooth, scraping the sides as necessary. Add the eggs, one at a time, pulsing after each addition until fully incorporated. Be careful not to over process. Once smooth, gently fold in the chopped chocolates, pour over your crust.

Place cake into shallow baking pan and add enough boiling water to reach half way up cake pan. Bake for one hour. Cake should still be jiggly after the hour. Carefully from the oven, and remove the cake from the water bath. Allow to cool on your counter top until room temperature. (About 2 hours). Refrigerate at least 4 hours, but overnight is best.

When the cheesecake has been chilled and has set, warm the chocolate hazelnut spread in the microwave briefly, just long enough to loosen it and make it a spreadable consistency. Spread over the surface of the cheesecake and decorate with the remaining Ferrero Rocher chocolates, cut in half. Chill until ready to serve.

Sunday, September 5, 2010

Mini Vanilla Ice Cream Cheese Cakes

Cinnamon Toast Crunch:  the bain of my existence this summer.  I bought a huge box of it at Costco. Why? Because my son asked for it and I was feeling tired and defeated and the idea of him consuming sugar for breakfast for the next 3 months was slightly more appealing than dealing with a 2 year old's temper tantrum. My bad.


We took the giant box of cereal on our holidays where there would be 4 kids around to help tackle its contents. And tackle it they did. They had it for breakfast and would continuously fill containers with it for snacks throughout the day. I don't know how many I stepped on, as they were transported (and spilled) throughout the house. In fact, it got so bad that a policy was implemented that no one was to consume any sugary cereals after breakfast. The kids were devastated for a mere minute or two and then they focussed their attention on the fruit roll-ups.  So fickle.

Despite my best efforts, we still managed to come home with some of this cereal and for some reason, I couldn't bring myself to just throw it away.  It's a good thing too, because I took the last remaining 3 cups, threw it in the food processor, and added some melted butter.  Alas, I had a delicious base for cheesecake!  Much tastier than the run of the mill Graham Wafer crumb variety. Is it worth going out and purchasing a box in lieu of graham wafers?  Hell yeah.  Just hide the box from your kids.  Trust me on that.


I decided to make 'ice cream' cheesecake. I remember my mom making something like that when I was a kid and I loved it. I didn't have a recipe, but hard could it be? I also dug through my cupboards and pulled out my mini cheesecake pan.  I love that thing and feel guilty that it sits in the back of my cupboard, collecting dust.  It was definitely time to liberate one of my favorite baking gadgets.


I started by whipping 8 ounces of cream cheese with a dash of vanilla, adding icing sugar until it was lightly sweetened, and then started adding vanilla ice cream until it tasted right. I used my stand mixer for the whole procedure and wound up with a decadent and creamy soft ice cream with just the right amount of tanginess from the cream cheese. I topped my Cinnamon Toast Crunch crust with this luscious mixture and popped it back in the freezer to harden slightly.  Couldn't have been easier.
The variety of toppings is limited only by your imagination. Mine was confined to chocolate shavings. But that's just me. I trust that you can do better than that.

This is a great recipe for when you're in the mood for cheesecake but don't feel like waiting the hours required for a cheesecake to bake, cool and set. Super versatile - it can be made into a larger 13 x 9 inch cake, and could easily be flavored with any add-ins your pantry has to offer. There were slim pickings in my house - so I kept mine simple this round. But I see Skor bits in this recipe's near future.

Definitely give this one a try.

Recipe for Mini Vanilla Ice Cream Cheesecakes
(makes either 24 mini cakes or one 13x9 inch cake)
Base:
3 cups of Cinnamon Toast Crunch cereal
5 Tbsp. butter, melted
Process the cereal in food processor until they form fine crumbs.  Add your melted butter and pulse until combined. Press into your cake pan(s).
Cheesecake:
8 ounces of cream cheese
4 Tbsp. icing sugar
1 tsp. vanilla
4 cups vanilla ice cream
Whip cream cheese, sugar and vanilla extract in a stand mixer until smooth.  Add half the ice cream. Mix until smooth. Add other half of ice cream, stirring until smooth.  Pour onto your prepared crust and freeze until firm.


Monday, June 28, 2010

Oatmeal Lace Cookies with Mascarpone Cream & Berries


Oh, Freedom!  School's out for my daughter and I could not be happier. I stayed in bed until almost 9:00 this morning. Don't judge me. You know you'd do the same if you could. I didn't realize how limited my days were with all the driving around I typically do in a day until I woke up this morning and realized we had no where to go and all day to get there. So what did I do with my first day off?  Well, let me tell you. Since the Daring Bakers' challenge left me with an over-abundance of mascarpone cream and fresh berries in my fridge, (yes, I know, poor me, right?) I decided to make something new with it. I couldn't let that delicious sauce go to waste. The obvious choice would be to simply pour the cream over the berries and dive in, but that's too easy. I wanted something different.
I'm a real sucker for different textures and I wanted to add something crispy to the mix. I'd stumbled upon a recipe for Lace Cookies over the weekend and I knew I had to try them. This was the perfect time.
Paper thin, buttery and very crisp, they are more like candy than a cookie. These cookies are ridiculously easy to make - but there is a trick. You really must let them brown to a dark golden color. I tried pulling mine out earlier, when they were just a nice hue of gold but they were under down and impossible to peel off the foil.  So be patient...let them darken slightly beyond your comfort zone and do not attempt to peel them off the foil until they are cooled. They spread a lot during baking so you spoon a scant teaspoon per cookie on the baking sheet, and you only bake six at a time. The batter takes a mere 5 minutes to make, it's baking them off that gets a little tedious. But they're worth it. Trust me. Make these. You won't regret it.
Oatmeal Lace Cookies Recipe
(Source: A Year of the Best Cook Book)
1 cup sugar
3 Tbsp. flour
1/4 tsp. baking powder
1/2 tsp. salt
1 egg
1 cup rolled oats
1/2 cup butter, melted
1 tsp. vanilla
Mix sugar, flour, baking powder and salt in a small bowl. In a medium bowl, whisk egg. Add rolled oats, melted butter and vanilla. Blend together. Add sugar mixture and stir.
Preheat oven to 350 degrees. Line cookie sheets with foil, shiny side up. Drop only 6 tsp. of batter (1 tsp. per cookie) onto sheet. (They spread a lot during baking giving them the 'lacy' appearance.) Bake 8 to 10 minutes (I did closer to 12) until they are a golden brown. Cool for 5 minutes. Peel off foil.
Yes, I did get a grape out of my fridge to show you an approximation of size. No need to thank me.
Fresh from the oven, cooling down before peeling.
Now the fun began. I scattered strawberries on a cookie...
drizzled some mascarpone cream...
added another cookie and raspberries this time.  I know, it's hard to keep up.
Are you still with me? More cream on the raspberries and yes, you guessed it, another cookie. Then I sprinkled some confectioner's sugar on top, garnished with a strawberry and a sprig of mint and Voila!
Summer heaven on a plate. Okay, maybe that's an exaggeration. But it was good, real good. It is a little tricky to eat, I'll admit, but if you are one of those people who's afraid of using your fingers to pick up a piece of broken cookie well then, we can't be friends. There were a few casualties in the batch, the ones I didn't bake long enough and the ones I tried to peel before they were completely cooled. So...I broke them up and sprinkled them on top of a parfait version.
Nothing wrong with that. Enjoy!
Recipe for Mascarpone Cream:
(Source: Chocolate Epiphany by Francois Payard)
The first step is to make the base, a creme anglaise. Here's how:
Creme Anglaise:
1 cup whole milk
1 cup heavy cream
1 vanilla bean split
6 large egg yolks
6 Tbsp. sugar
Fill a large bowl with cold water and ice cubes to make an ice water bath. Combine the milk and cream in a saucepan over medium high heat. Scrape the seeds of the vanilla bean into the pot, and add the pod as well. Bring to boil.
In a medium bowl, whisk the egg yolks and sugar until the mixture is a pale yellow. Pour about 1/2 cup of the hot milk/cream mixture into the yolks, whisking constantly to keep the yolks from curdling. Return the yolk mixture to the pan with the remaining milk/cream over medium heat, and stir with a wooden spoon, scraping the bottom and sides of the pan until the mixture thickens enough to lightly coat the back of a spoon, about 3 minutes. (If you drag your finger through the mixture when it coats the spoon, the trace should remain.)
Remove mixture from heat and immediately strain through a fine mesh sieve into a bowl. Place the bowl in the ice bath to cool rapidly.

---You could stop here and just use the creme anglaise. But if you want to make it even more special, proceed with the following instructions to transform your creme anglaise to mascarpone cream.

Mascarpone Cream
1 recipe of creme anglaise (above)
1/2 cup mascarpone cheese
2 T. Bailey's  (optional - recipe actually calls for Sambuca, but that's just gross)
1/2 cup heavy cream

Prepare the creme anglaise as directed above. Slowly whisk in the mascarpone and booze (if you're using it), and let mixture cool. Beat the cream until it holds soft peaks. Gently fold into mascarpone mixture. Chill.

Monday, June 14, 2010

Vanilla Cheesecake


Wow, if blogging was my 'job', I would most definitely be out of work. My ex boss would undoubtedly tell me that I wasn't taking it seriously enough and that I needed to be more dedicated. Sigh. Sadly, life has gotten in the way of my little hobby. Since my last post, there's been a wedding, a funeral, a birthday party, a disgusting eye infection for both kids, my very own sinus infection and all four of us have been playing host to some unidentified virus that has lingered for weeks. Throw in obedience classes for our foolish puppy who still prefers to pee in the house than outside and that pretty much sums up our lives for the past month. Between the snotty noses and the puddles on the floor, we've gone through more kleenex and paper towels than I care to admit.
So when my aunt invited all the lovely ladies of our family over for an afternoon of doing what we do best: gabbing and eating, I jumped at the opportunity to get back in the kitchen and bake something yummy... cheesecake.
If you've been reading my blog, you know how big a hater I am of dry cakes. My intense hate notwithstanding, I've become quite proficient at baking them, unfortunately, and I shudder to think of all the cakes that have been slaved over in my kitchen, only to find themselves in my garbage. The same applies to cheesecake. I love a good cheesecake, but the texture must be creamy and decadent or else I'm liable to pout. I started my search for the perfect cheesecake by looking at dozens upon dozens of recipes and then settling on a very basic recipe found on the Kraft website, and then 'tweaking' it. Extensively. 
I lowered the oven temperature, shortened the cooking time, used a water bath (even though surprisingly the recipe did not call for one), then I added more sour cream, more sugar, more vanilla extract and threw in a vanilla bean for good measure. I also took the liberty of using a different brand of cream cheese, and more of it. Then, as if I hadn't thumbed my nose at Kraft's version enough, I pulled out my food processor to mix it instead of using the stand mixer.  By the time I was done, my version was nothing like the recipe I started with but the end result was a smooth, creamy, velvety rich, vanilla cheesecake that I am happy to share with you. The options for 'toppings' are endless. In the Kraft version, they use canned cherry pie filling but there was NO way anything from a can would make it's way on top of this cake. Since the sun had finally decided to make an appearance this weekend ('had' being the operative word) I opted for fresh berries. It just seemed fitting. We all enjoyed our afternoon of summer on my aunt's deck and it's a good thing too, because the sun is nowhere to be found today.
Recipe for Vanilla Cheesecake:
Crust:
1 1/2 cups Graham Wafer crumbs
1/4 cup sugar
1/3 cup butter
Melt butter, mix with Graham Wafer crumbs and sugar and press firmly into bottom of a greased 9 inch springform pan. Wrap the outside of the cake pan with foil to prevent water from seeping in. Set aside. Pre-heat oven to 325 degrees.
Cake:
1 kg. container of Victorian Style cream cheese (found at Costco); or 4 eight ounce packages of full fat cream cheese
1 1/4 cup sugar
1 1/3 cup of full fat sour cream
1 T. vanilla extract
seeds from 1 vanilla bean
3 eggs
Put all the ingredients (except the eggs) into the bowl of your food processor. Pulse several times until the mixture is well blended and smooth, scraping the sides as necessary. Add the eggs, one at a time, pulsing after each addition until fully incorporated.  Be careful not to over process. Once the batter is smooth, pour over your crust.
Place cake into shallow baking pan and add enough boiling water to reach half way up cake pan. Bake for one hour.  Cake should still be jiggly after the hour.  Carefully from the oven, and remove the cake from the water bath. Allow to cool on your counter top until room temperature. (About 2 hours). Refrigerate at least 4 hours, but overnight is best.
This cake was silky and rich, but not overwhelmingly sweet. It's the perfect canvass for any sweet topping your heart desires. I'm thinking caramel might be next...

Wednesday, May 12, 2010

Triple Chocolate Cheesecake

I decided that for Mother's Day, I wanted to bake a cheesecake after I saw this recipe on another food blog What the Fruitcake?! Mandy made an incredibly beautiful "zebra patterned" triple chocolate cheesecake by dividing the batter into 3 equal portions, flavoring each portion with melted dark, milk and white chocolates, then alternately pouring the batters into the centre of the pan. The result was stunning and I was inspired. I went to Bernard Callebaut, bought the chocolate, prepared the pan and the crust the night before so I could just get down to business the next morning, and then promptly pulled a muscle in my right shoulder that radiated pain up my neck and all the way down my right arm.  Awesome!  What are the chances?  You really need your arm to mix the batter to the right "pouring" consistency because once the chocolate was added, it set, making the batter too stiff to pour freely which is necessary in order to achieve the 'zebra' pattern.  Despite the pain, I persevered. I put the batter over a pan of simmering water and I stirred and stirred and stirred, and then when the pain was intolerable and I was ready to toss the entire project into the garbage, I admitted defeat, and settled for a marbled effect.  It's not that I think my cheesecake isn't somewhat pretty, but it's no show-stopper.  You really must check out Mandy's version, then you will understand my disappointment.
Luckily, this minor mishap did not compromise the flavor of the cheesecake.  It was deliciously rich and creamy and, of course, very chocolatey. I'm still a fan of the plain old vanilla cheesecake with a fresh fruit topping, but this was a nice change. Mandy's version is decorated with chocolate shavings on top, but like I said, I was in a bad place. I'm just happy this cake made it into the oven, to be perfectly honest.  And being that the marbled effect is best seen on the top of the cake, I didn't see any reason to cover it up with more chocolate. One day I may re-visit this recipe and make another attempt at the zebra pattern. But for now, here's the instructions for my "Plan B" marbled cheesecake.
Recipe for Triple Chocolate Cheesecake
(source: What the Fruitcake?! blog) 
Crust:
200 grams Disgestive Cookies
1/4 c. brown sugar
115 grams butter
2 T. cocoa
Blend cookies to a fine crumb.  Melt butter, add to cookie crumbs along with the sugar and cocoa. Mix until well-blended. Press into the bottom of prepared pan. (See below)
Cheesecake:
4 x 225 grams packages of cream cheese (room temp.)
4 eggs (room temp.)
1 1/4 c. sugar
1 c. cream (room temp.)
1 T. lemon juice (I omitted)
1 t. vanilla (I used 1 T.)
100 grams of dark chocolate
100 grams of milk chocolate
100 grams of white chocolate
1/2 t. salt


Preheat oven to 330 degrees (no, that's not a typo). Carefully butter a 9 inch springform pan all the way to top. Wrap bottom with 2 layers of foil so no water seeps in. The foil should come 2 inches up the side of the pan. Prepare crust.
With mixer, cream the cheese till smooth. Add sugar, mix till combined. With mixer on low, add eggs one at a time, mixing thoroughly and scraping the sides of the bowl after each addition. Add cream, vanilla, lemon and salt. Mix till smooth. Divide into 3 bowls.
Melt each chocolate separately, allowing to cool slightly. Thoroughly mix dark chocolate into first bowl. Thoroughly mix milk chocolate into 2nd bowl. Thoroughly mix white chocolate into 3rd bowl.
Add one cup of batter at a time to the pan, alternating between the different chocolates.


Using a knife, swirl the batter until you achieve a marbled effect. Don't over-mix, or you'll lose the effect altogether. Place cake pan into larger roasting pan and place into preheated oven. Pour enough hot water into larger roasting pan to come up about 1 1/2 inches of the cheesecake pan. Bake for an hour and 15 minutes. The cake should be firm around the outside but still jiggly in the centre. Turn off the oven and leave the cheesecake in the oven for an additional hour. The cake will continue to bake but it also gently cools in the oven, preventing cracking.
After the hour, remove cake from the oven, and remove pan from the water bath.  Allow to cool on the counter top until it reaches room temperature. Chill in fridge for several hours, or preferably over night to allow the flavors to develop and the cake to set.
Related Posts with Thumbnails