A mom's journal of the sweet things in her life...
Showing posts with label Squares. Show all posts

Tuesday, December 6, 2011

Brown Butter Toffee Shortbread Squares with Caramel and Chocolate


If you're totally "over" the sweet and salty combo - then you should just leave now. This recipe is not for you, unless of course you adapt it, which, come to think of it, wouldn't be hard at all (i.e. leave out the salt - or use unsalted butter - but don't do both). So I take that back, you can totally stay. 
Last year, I made a homemade version of twix bars. They were insanely good and quickly made the short list for this year's Christmas baking. However, while browsing recipes I stumbled on Toffee Squares by Joy of Cooking. They are a simple bar composed of a base of toffee-like shortbread, and then topped with chocolate and almonds. They're probably good as is, but I wouldn't know cause I went ahead and tweaked it beyond recognition.
What I ended up with was these, a buttery toffee-like shortbread base, (intensified with browned butter no less), with a chewy caramel layer, and a silky milk chocolate topping. With these squares on a plate of Christmas baking, no one is going to bother with the plain jane shortbread cookies sitting next to them. That's a fact. 
You do have to get over your type A personality though when it comes to cutting them. The base will crumble a bit, rendering it impossible to get a picture perfect square. But once you taste them, you'll get over that. I sure did.
Recipe for Brown Butter Toffee Shortbread Squares with Caramel and Chocolate
(adapted from Joy of Baking)
For the Base:
1/2 cup butter
1/2 cup light brown sugar
1 tsp. vanilla
1 cup flour
1/2 tsp. kosher salt (again, if you don't want them salty, you could omit - but don't omit if you're also using unsalted butter)
For the caramel layer:
1 package of craft caramels (340 gram bag), unwrapped
2 Tbsp. cream
For the chocolate layer:
6 ounces of good quality milk chocolate (or semi-sweet if you prefer, but I wouldn't recommend using chocolate chips - splurge on the good stuff here)

Heat your oven to 350 degrees F. Melt the butter in a small sauce pan. Continue to cook until it is golden brown in color. Remove from heat. Add brown sugar and vanilla, mix well. Add flour and salt and mix until completely incorporated. Press the mixture into a foil-lined 9 inch square pan. Bake for 12 to 15 minutes, until golden brown on the edges. Let cool.
Put unwrapped caramels and cream into a microwave safe bowl. Heat on high for about 2 to 3 minutes, checking often and stirring in between. Only cook until you are able to get a smooth consistency. Pour over cooled crust. 
Allow to harden in the fridge for about 10 minutes. Melt chocolate. Pour over caramel and chill until set. Cut into small squares.

Friday, June 10, 2011

Cheesecake Brownies

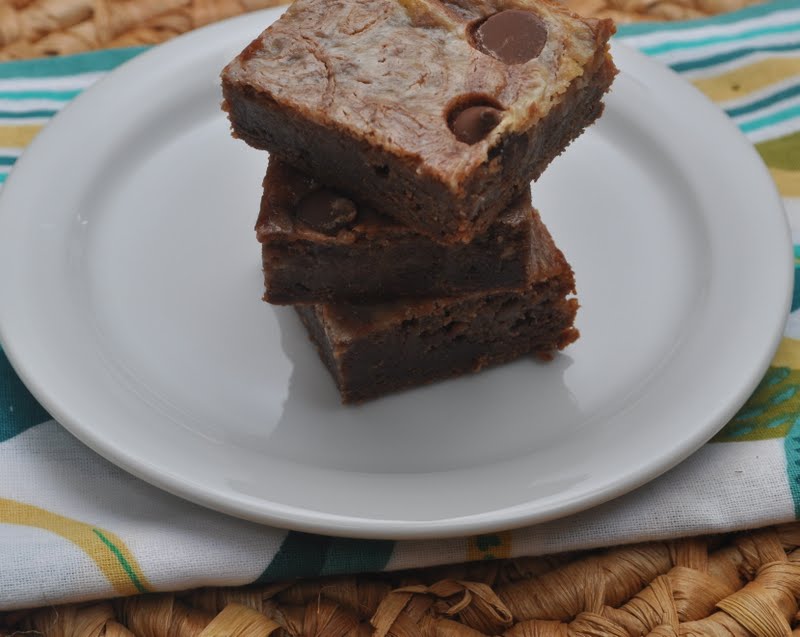
You know how some recipes you see get bookmarked, and you wait for the perfect day to make them, and then others get made within the hour of seeing the recipe? This one was one of the latter. I saw the picture, I read the ingredients, I rejoiced because I knew I already had everything required in my house, and then I got started immediately. 
It could be argued that I "over-swirled" the two batters before baking, resulting in a less marbled appearance. I tried to use use a light hand while swirling, but I couldn't help myself. I just kept going and going. Thankfully, the resulting 'less than marbled effect' does not seem to affect the flavor. These brownies are delicious! The perfect balance of rich chocolate brownie and cheesecake. Kind of like a chocolate cheesecake bar. And, they're so easy to make. I found I preferred mine slightly chilled, as opposed to room temperature. For some reason any kind of cheese-cake related baking tastes better cold. 
Recipe for Cheesecake Brownies
(adapted from What's Gaby Cooking)
1/2 cup unsalted butter
3 oz semi-sweet chocolate, chopped
1 cup sugar
2 large eggs
2 tsp. vanilla extract
2/3 cup all-purpose flour
8 oz cream cheese, at room temperature
1/3 cup sugar
1 large egg yolk
1 tsp. pure vanilla extract
1/2 cup milk chocolate chips (optional)
Preheat oven to 350 degrees. Line a 9×9 baking pan with foil, leaving a 2 inch overhang on 2 sides. Spray with non-stick baking spray. Set aside.
Melt the butter and chocolate in a small saucepan over medium low heat, constantly stirring until completely melted. Remove from the heat and whisk in the sugar. Add the eggs and vanilla. Add the flour and gently fold just until  incorporated. Pour into the prepared foil lined baking pan and set aside.
For the Cheesecake layer: In a small bowl, combine the cream cheese, sugar, egg yolk, and vanilla and whisk together until smooth. Drop spoon-fulls of the cheesecake batter on top of the brownie batter. Then using a knife, swirl the two batters together until you have a marbled effect. Top with the milk chocolate chips, if using.
Bake for 30 minutes. Remove from oven and allow to cool. Chill in the refrigerator. Cut into squares.

Wednesday, June 1, 2011

Oatmeal Butterscotch Bars

Browned butter, dark brown sugar, oatmeal, butterscotch chips...that's what these bars are made of. Pure yumminess. And the best part? They're different. Something new to throw into your repertoire. And? No peanut butter. Not that I don't love the stuff, but when do you find a recipe that has all that good stuff and no peanut butter? Never, at least I haven't. And with my son's nut allergy, I find it torture to see all the great recipes out there for squares that unfailingly contain peanut butter.
And don't even get me started on peanut butter substitutes. I've tried them all. They smell good, they look just like peanut butter, but then you taste it. Gross. Bitter with a weird aftertaste that it's impossible to describe.
Anyways. I digress. These bars are a great nut free solution for a different kind of bar that isn't chocolate. And while chocolate will always reign supreme in my view, these are a nice alternative. Delicate and buttery, and speaking of butter, the browning of it adds a hint of nuttiness sans nuts. Win-win.

Recipe for Oatmeal Butterscotch Bars
(Adapted slightly from:  Mel's Kitchen Cafe)
For the bars:
1 1/4 cups all-purpose flour
2 cups oatmeal
1/2 tsp. baking soda
1/2 tsp. salt
3/4 cup butterscotch chips
1 cup (227 grams) butter
1 cup packed dark brown sugar
1 large egg
2 tsp. vanilla
For the glaze:
1/4 cup butterscotch chips
2 Tbsp. dark brown sugar
1 Tbsp. butter
1 Tbsp. water
1/4 tsp. kosher salt (if using regular table salt, decrease to 1/8 tsp.)

Preheat the oven to 350 degrees F. and adjust an oven rack to the middle position. Line a 9x13-inch baking pan with foil, leaving an overhang for handles on the shorter sides of the pan. Spray with non-stick cooking spray. 

In a medium bowl, whisk together the flour, oats, baking soda, and salt, set aside. Place the 3/4 cup butterscotch chips in a large bowl, set aside. In a small saucepan, melt the butter over medium heat and allow butter to brown to a medium golden color. Watch it closely so it doesn't burn. Pour the hot butter over the butterscotch chips and whisk together until melted and smooth. Whisk in the brown sugar until incorporated. Then whisk in the egg and vanilla. Stir in the flour mixture, just until completely moistened - don't over-mix.

Pour the batter into the prepared pan and spread until evenly distributed. I used my hands and patted it down. Bake the bars about 16-18 minutes, until golden brown.

For the glaze, place the 1/4 cup butterscotch chips, brown sugar, butter, water and salt in a small microwave-safe bowl. (Don't even think about omitting the salt - it makes the glaze!) Microwave the mixture until melted and smooth, about 2 minutes on 50% power. Whisk to combine well. The glaze is a bit stiff. If needed, microwave it for a further 10 seconds to loose it. Drizzle the glaze over the bars while they're still warm. Let the bars cool completely in the pan. Remove the bars from the pan using the foil overhang and cut into squares. 

Wednesday, April 20, 2011

Caramel Filled Brownies

Yeah, sorry about these. As if any of us needed another vice. Especially in the brownie department. The thing is, I've been having a bit of a love affair with caramels lately. And I don't mean those lovely homemade Fleur de Sel ones that are elegant and perfect and all the rage. I love those too but they're just too much damn work. No. I'm talking about those Kraft caramels that we used to get for Halloween when we were kids. 
I loved them as a kid but then I forgot about them for the past 20 something years. Needless to say, we've become reacquainted. The "Brown Butter Salted Caramel Rice Krispie Treats" were a product of this aforementioned love affair. They're a sort of 'love child', if you will. And the Homemade Twix Bars. Those were super yummy too.
Now there's these. I saw them on Fake Ginger, intrigued I mosied on over to get the recipe from Powdered Plum. I made a number of changes to the original recipe and I've posted the recipe as I made it.
These brownies are killer. Dense, moist and extra chewy (because of the layer of caramel baked inside). What more can you ask for from a brownie? 


Caramel-Filled Brownies

(Adapted from The Pastry Queen by Rebecca Rather)
1 cup (2 sticks) butter
12 oz. semisweet chocolate, coarsely chopped
1 1/2 cup sugar
4 large eggs
1 Tbsp. vanilla extract
1 1/4 cup flour
1/4 tsp. salt
19 oz. caramel candies, unwrapped
1/3 cup plus 2 Tbsp. heavy whipping cream
Preheat the oven to 350°F.
Line a 9" x 13" baking pan with foil, leaving several inches hanging over the short ends of the pan. Spray the foil with cooking spray generously.
Melt the butter and chocolate in a large measuring cup at 50% power in the microwave for 2 minutes. Stir, then continue in 30 second intervals, stirring after each time until melted and smooth. Transfer the chocolate mixture to the bowl of your stand mixer. Add the sugar, eggs, and vanilla mixing on medium speed with paddle attachment for 1 minute until thick and glossy. Stop the mixer, add the flour and salt, mix on lowest speed just until combined. 
Pour half the batter (about 2 1/2 cups) to the baking pan and spread evenly. Bake for 20 minutes. Let the brownies cool about 20 minutes.

The edges of my brownies rose quite a bit, making it slightly uneven:
I trimmed the higher edges off to level it, otherwise the caramel would pool in the centre and the edges would dry out or burn.
 
Melt the caramels and cream in a large measuring cup or a small glass bowl. (Start in 1 minute intervals, checking each minute and stirring. Once caramels start to melt, check after 30 second intervals, making sure not to overcook.) Pour hot caramel mixture over the brownies.
Spread the remaining brownie batter evenly over the caramel mixture
and spread gently, swirling the chocolate with the caramel. (But don't over mix or the caramel will become too incorporated with the brownie mix, and you won't have a thick caramel layer in the centre.)
Bake for additional 20 minutes. Cool the brownies completely in the pan, chill in fridge to speed up process if desired. Lift the brownies out of the pan by pulling out the foil. Cut into squares. (I found them easier to cut once chilled in the fridge.)

Friday, April 15, 2011

Brown Butter - Salted Caramel - Rice Krispie Treats

Recently I've been seeing a lot of pimped-up recipes for Rice Krispie Treats. Hmmm... I thought. It's about time somebody shook things up in the Rice Krispie Treats department. I mean they're good, but let's face it, they can definitely be improved upon. Brown Butter Rice Krispie Squares is definitely a step in the right direction. I even saw vanilla beans in place of extract in these treats. Sure, why not. Count me in. But still...

What if I browned the butter and then added caramel? I could throw in some good salt too - just a little bit - that might be fun!
These Rice Krispie Squares are amazing. I would even go so far as to say that I like them better than the ordinary run of the mill treats we grew up eating. They have more flavor, and they're not as sweet. They're still sweet, of course, but that hint of salt seems to tone it down a bit. The texture is slightly chewier than the original, they seem a bit more sturdy without being too hard. Next time you're looking for a crowd pleaser but want something a little more original - try these. They're like the Rice Krispie Square's sexier, more sophisticated cousin.

Recipe for Brown Butter - Salted Caramel - Rice Krispie Treats
1 stick (1/2 cup) butter
5 ounces (approximately 3 cups or 1/2 bag) marshmallows 
6 cups Rice Krispies
1 340 gram bag of Kraft caramels, unwrapped
1 Tbsp. milk
1/4 tsp. kosher salt


Unwrap all the caramels and put in a microwave-safe bowl with 1 Tbsp. of milk.
 
Microwave the caramels and milk for 1 minute on full power. Stir. Cook for 30 second intervals stirring in between each, until the caramels are melted and smooth. Do no over-cook or they will make the squares hard.
Meanwhile, place your butter in a large pot and melt over medium heat, allowing it to cook until it reaches a medium brown color. (I didn't go as dark as I could have - because I didn't want the butter to overcook after I added the marshmallows and caramel.)  
Pull the butter off the heat, add the marshmallows. 
Stir quickly until most of the marshmallows have melted, then add your warm caramel sauce. Stir vigorously. If it appears as though the mixture isn't completely melting, put back on the heat for a couple of seconds, stirring constantly. Add salt.
 Once smooth, add rice krispies and mix until evenly coated. 
 Press into a greased 9 inch square pan and allow to cool. Cut and serve.

Friday, November 12, 2010

THE Baked Brownie

I've never been above jumping on a bandwagon, whether it's misguided fashion trends, reading a book that's generated a lot of "buzz" or trying out the latest recipe that's got everyone talking. 


For those of you who don't waste copious amounts of time reading food blogs, I'm talking about the new cook book out there: "Baked New Frontiers in Baking". Their brownies have gotten a lot of attention, they were featured in Oprah's magazine "O" as a 'favorite thing' and awarded 'best brownie' by America's Test Kitchen. 


Being a very loyal fan of "America's Test Kitchen", I ran out and bought the book. There are a lot of recipes in there I'm dying to try, but I knew the first one had to be the "Baked Brownies". This recipe is killer. It calls for 11 ounces of chocolate, a whole cup of butter, 5 eggs. Yikes. These better be good.


I broke out the good stuff - threw 11 ounces of my highest quality chocolate, butter and instant espresso powder in a bowl over simmering water and waited...
Once everything is melted and smooth, you add your sugars and stir, leaving the bowl over the simmering water with the heat turned off.
Then you remove the bowl from the water and add the eggs. First 3 then the remaining 2, being careful not to over-mix.
Sprinkle your dry ingredients over the mixture, and gently 'fold' with a large rubber spatula.
Again, you want to be careful not to over-mix it - in fact, the recipe says to stop when you still have streaks of flour remaining in your batter otherwise your brownies will be cakey. 
Pour into a greased 13x9 inch pan (I foiled mine to make it easier to remove them),
and bake for approximately 30 minutes, checking frequently. If your toothpick comes out clean, you've over-baked them. You want there to be a few moist crumbs sticking to it. (I started checking mine at 25 minutes, and then every 2 minutes thereafter...)
Then you allow to cool before cutting. *Note: If you have a large dog who loves brownies and does not hesitate to sample anything and everything left on your counters, block your dog's access with a large cutting board. It works.
Nice glossy crust on top of the brownies? Check. Fudgey, moist and dense texture? Check.
I like to take pictures from 'above' standing on my dining room chair with the brownies on the table. Here's the view from up there. Damn, she's relentless.

The verdict? These brownies are a-m-a-z-i-n-g! Worth every ounce of chocolate and every fat gram. Their chocolate flavor is intense, but not overly-so, they are delicious. Dress them up and serve them for dessert with ice cream at your next dinner party. They're decadent enough.

Recipe for The Baked Brownie
(Source: Baked New Frontiers in Baking)
1 1/4 cup all-purpose flour
1 tsp. salt
2 Tbsp. dark unsweetened cocoa powder
11 ounces dark chocolate (60% to 72% cacao), coarsely chopped
1 cup butter, cut into 1 inch pieces
1 tsp. instant espresso powder
1 1/2 cups granulated sugar
1/2 cup packed light brown sugar
5 large eggs, at room temperature
2 tsp. pure vanilla extract

Preheat oven to 350 degrees F. Butter a 9x13 inch glass or light colored metal baking pan.

In a medium bowl, whisk the flour, cocoa and salt together.

Put the chocolate, butter and instant espresso powder in a large bowl and set it over saucepan of simmering water, stirring occasionally, until the chocolate and butter are completely melted and smooth. Burn off the heat, but keep the bowl over the water and add the sugars. Whisk until completely combined, then remove the bowl from the pan. The mixture should be room temperature.

Add 3 eggs to the chocolate mixture and whisk until combined. Add the remaining 2 eggs and whisk until combined. Add the vanilla and stir until combined. Do not overbeat at this stage or the brownies will be cakey.

Sprinkle the flour mixture over the chocolate mixture. Using a large rubber spatula (not a whisk), fold the flour into the chocolate until just a bit of flour mixture is visible.

Pour the batter into the prepared pan and smooth the top. Bake in the centre of the oven for about 30 minutes, rotating the pan halfway through baking time, until a toothpick inserted in the centre comes out with a few moist crumbs. Let brownies cool completely, then cut into squares. 
Related Posts with Thumbnails