A mom's journal of the sweet things in her life...

Wednesday, August 31, 2011

Banana Espresso Chocolate Chip Muffins (or Mini Bundt Cakes)

These muffins were adapted from the Baked cookbook. I've been curious about them for a while but I worried that the espresso flavor, as much as I love it, may have been too strong for my kids. So every time I had ripe bananas on my counter, I'd eye this recipe but then end up going back to  my old faithful banana bread recipe. Today I threw caution to the wind (and the incessant rain that has us stuck in the house looking for something to do). I kept the ingredients pretty true to the recipe but, instead of adding the instant coffee to the dry ingredients, I added it to the wet so that it would dissolve and ensure that no bits of the coffee granules made into the final product.
I was very happy with the results. The coffee flavor is very subtle - and unless you know it's in there, you may not even pick it up. These muffins are delicious and so moist and flavorful. Another great recipe to add to the list when looking for something to do with ripe bananas. I still have more bananas to use up so don't be surprised if you see a new Banana Bread recipe soon. But then again, don't be surprised if you don't either, you know what they say about the best of intentions. : )
Happy 'back to school' to all you moms out there. May tomorrow's new-found-freedom bring you much joy. 
Recipe for Banana Espresso Chocolate Chip Muffins
(adapted from Baked - New Frontiers with Baking by Matt Lewis and Renato Poliafito)
1 1/2 cups mashed, very ripe bananas (about 4 medium)
1/2 cup sugar
1/4 cup firmly packed light brown sugar
1/2 cup butter, melted
1/4 cup whole milk
1 large egg
1 1/2 cups all-purpose flour
1 tsp. instant coffee granules
1 1/2 tsp. baking soda
3/4 tsp. salt
2/3 cup mini chocolate chips (recipe calls for 1 cup of regular chips)
Preheat oven to 350 degrees F. Spray a 12-cup muffin pan (or mini bundt pan) with nonstick spray.
In medium bowl whisk stir together bananas, sugars, butter, milk, egg and instant coffee.
In another medium bowl, whisk flour, baking soda and salt together until combined. Make a well in the center and add the banana mixture. Stir until just combined. Fold in the chocolate chips. Fill each muffin cup until 3/4's full. Bake in center of the oven for 20 to 25 minutes until a toothpick inserted into centre comes out clean. (For me this was 23 minutes). Move muffins to cooling rack and allow to cool in the pan for 15 minutes. Remove from pan and finish cooling on cooling rack.
Can be stored in airtight container for up to 2 days. 

Tuesday, August 30, 2011

Dessert Cheese Ball

It's not the most beautiful dessert to offer up at say a bridal shower where everything is expected to be pretty and girly. But I brought it anyway. I tried a version of this at a party once and was very pleasantly surprised. When my sister, girlfriend and I recreated it last summer while on holidays, we nailed it. Except we didn't have the right crackers to accompany this dessert. We pilfered the sparse pantry and settled for the only crackers we could find - vegetable thins or something along those lines. We were desperate. The onion and garlic flavor we were hoping to ignore completely over-powered the sweetness of the chocolate bar. In a nutshell, it was disgusting. Please don't do that. 
But when I saw Renee's pita chips flavored with sugar and cinnamon at the grocery store recently, I grabbed them knowing they were the perfect accompaniment. And it was high time to resurrect this cheese-ball. So I whipped it up, to go alongside a prettier more appropriate dessert that I also took to the bridal shower. More than anything, I was curious to see how people would react. Would they like it? Would it just sit there, untouched? Had I romanticized my memory of how delicious it was when I first encountered it a couple years ago?
It was a hit. So I guess I can rest assured that my sugar-loving-palette isn't completely warped. 
Recipe:
12 ounces of cream cheese, room temperature
1/2 cup confectioners sugar
4 regular sized Crispy Crunch chocolate bars (Skor would be great too)
Chop candy bars into small pieces, set aside. Mix the cream cheese and sugar in a bowl with a spoon until smooth. Add approximately 1/4 of the crushed bars to the cream cheese mixture. Form into a ball, wrap with plastic wrap and refrigerate until slightly firm. Just before serving, remove from fridge and roll into the remaining chopped chocolate bars. Serve with plain or cinnamon-sugar flavored pita chips. (Or some other plain cracker).

Monday, August 29, 2011

Two-Bite Brownies

We just got home a couple of weeks ago from our summer holiday, which consisted of 30 glorious, rain-free days in beautiful San Diego. We rented a house that had a swimming pool, a hot tub, an outdoor jungle gym, a trampoline and a sports court. We visited Disneyland, Seaworld, Legoland, the Wild Animal Safari Park and the beach. Our days were full of sunshine, and the perfect balance of activity and poolside relaxation. And when we got home, I asked my three-year-old son what his favorite part of our holiday was, and do you know what he said? Target! True story.
I'm not sure what that says about him. Moreover, I'm not sure what that says about me, as his mother, and what I've taught him in his 3 short years on this planet.
But I digress. This post is long-overdue. Well, not this post in particular, I just made these brownies like 5 minutes ago - but a post in general. My blog has been collecting dust as I'm just finding my way back to the kitchen after a 2 month hiatus.
These brownies are brought to you courtesy of the mother of my son's first crush. We were invited over for a play date last week and my friend served us these delicious Two-Bite Brownies. Of course I asked for the recipe, they were delicious and adorable. Perfect for portion control - if you can stop yourself from eating more than one - which, unfortunately, was not the case with me. But for those of you who may or may not be sporting a post-summer-holiday-muffin-top (like me) these are relatively harmless, as far as brownies go at 85 calories and 2.3 grams of fat per serving. But that's not the only reason you should make them. They're delicious and so very fast and easy to throw together. (I didn't even bother pulling out my mixer!!)


Two-Bite Brownies
1/4 cup butter, softened
1 1/4 cup sugar
2 large eggs
1 tsp. vanilla
1 tsp. instant espresso
1 cup flour
1/2 cup cocoa
1/4 tsp. baking powder
1/4 tsp. salt


Preheat oven to 350 degrees F. In a large bowl, cream the butter and sugar until well-mixed. Add eggs, vanilla and instant coffee and stir until well-blended. In a separate bowl combine flour, cocoa, baking powder and salt. Add to egg mixture and stir by hand until just combined. Spray mini muffin tin with non-stick cooking spray. Spoon batter into muffin pan. Bake for about 12 minutes or until just puffed but still soft to touch. Do not over-bake! Cool in pan on wire rack for 5 minutes before removing brownies from pan and allowing to cool completely on wire rack. Yield: 24 brownies.

Friday, July 8, 2011

Lemon Poppy Seed Loaf (Starbuck's Copycat)

The other day, while ordering my regular coffee drink at Starbuck's, I buckled. I decided to blow my calorie intake for the day and indulge in a slice of Lemon Poppyseed Loaf. And it was good. It made me want to try replicating it at home. As luck would have it, the very next day I stumbled upon this recipe. And while it was not a lemon loaf, nor did it have a lemon glaze, I knew it would be a good foundation upon which to adapt to my liking. Now I know that most bakers prefer to use butter in their baking for the flavor factor, and most of the time I would agree. But the fact that this recipe uses oil instead of butter caught my attention. There are certain instances in which oil can really help to deliver the moistness that so many loaves lack. And the fact that the recipe yields 2 loaves instead of one? Well, that was the final straw. I knew I had to give it a go.

The verdict?  These lemon loaves are delicious. Moist and tender, similar to a pound cake with just enough of the lemon flavor that I was craving. And easy too. You can't really go wrong here. Perfect for a weeknight dessert, or an afternoon snack. Can you guess what I'll be eating for breakfast tomorrow? And the next day...

Recipe for Starbuck's Copycat Lemon Poppy Seed Loaf
Adapted from: A Farm Girl's Dabbles

For the Lemon Loaf:
3 cups AP flour
2 1/2 cups sugar
1 1/2 tsp. salt
1 1/2 tsp. baking soda
1 1/2 Tbsp. poppy seeds
1 1/2 cups milk
1 cup + 2 Tbsp. canola oil
3 large eggs
3 tsp. lemon extract (or you could use vanilla and add lemon zest if you don't have lemon extract)

For the Glaze:
3/4 cup sugar
1/4 cup freshly squeezed lemon juice
1/4 tsp. vanilla
1 Tbsp. melted butter

Preheat the oven to 350 degrees F. Generously spray two 8 1/2 inch x 4 1/2 inch loaf pans with non-stick cooking spray.

In the bowl of a stand mixer, combine flour, sugar, salt, baking soda, and poppy seeds. Mix on lowest speed until combined.

In a separate medium sized bowl, combine milk, oil eggs and lemon extract (or vanilla and lemon zest, if using). Slowly pour the wet ingredients into the dry with the mixer on lowest setting. Mix until combined. Beat on medium speed for 1 minute. Pour into prepared pans and bake for approximately 1 hour and 5 minutes; or until toothpick inserted into the loaves comes out clean.

While the loaves are baking, make the glaze by combining the sugar, lemon juice, vanilla and melted butter and whisking until smooth. Once loaves are finished baking, remove from oven and brush the glaze on both loaves until all the glaze is gone. Allow the loaves to cool for 20 minutes in the pans. After 20 minutes, loosen the loaves by running a knife along the perimeter. Turn the pans upside down and release the loaves. Turn right side up onto a cooling rack and allow to cool completely, and for the glaze to harden. 

Sunday, July 3, 2011

Bacon Jam

The stars aligned, the weather cooperated, the kids played happily (and quietly enough to dodge bed time several times). Even the dogs got along. And in the midst of all this, a dinner party was enjoyed. Outside. On a deck. Cold beers, plenty of wine, Raspberry Vodka infused girly drinks. Animated conversations amongst friends, lots of laughing, but the best part? Bacon jam, served on crostinis with brie. Yeah. Bacon. In jam form. Enough said.
Recipe for Bacon Jam
Source: adapted from Dinner with Julie
1 lb good-quality bacon
1 small onion, chopped
4-5 garlic cloves, chopped
1/2 cup packed brown sugar
1/2 cup coffee
1/4 cup maple syrup
1 Tbsp. balsamic vinegar 
1 Tbsp. dijon mustard

Chop the bacon and cook it in a heavy pot until nicely browned and crisp (or to your liking). Transfer to a paper towel lined plate and drain, set aside. Pour off all but about one tablespoon of the rendered bacon fat. Saute the onion and garlic in the remaining fat for about 5 minutes, until softened and golden brown. Return the bacon to the pot, add the brown sugar, coffee, maple syrup, vinegar and mustard and cook over medium heat until thickened to the consistency of sticky jam (about 10 to 15 minutes). Refrigerate until ready to use. The jam will stiffen once chilled, and is best served at room temperature.

Friday, June 10, 2011

Cheesecake Brownies

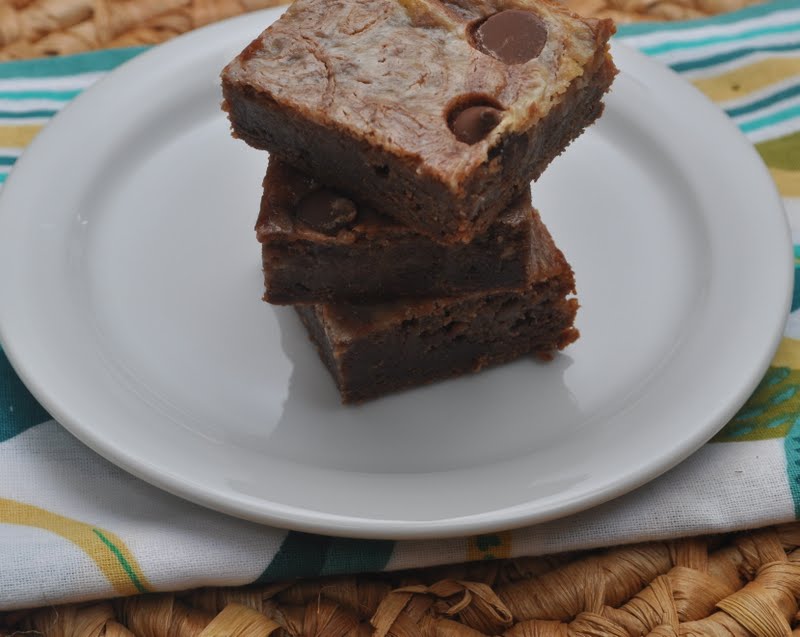
You know how some recipes you see get bookmarked, and you wait for the perfect day to make them, and then others get made within the hour of seeing the recipe? This one was one of the latter. I saw the picture, I read the ingredients, I rejoiced because I knew I already had everything required in my house, and then I got started immediately. 
It could be argued that I "over-swirled" the two batters before baking, resulting in a less marbled appearance. I tried to use use a light hand while swirling, but I couldn't help myself. I just kept going and going. Thankfully, the resulting 'less than marbled effect' does not seem to affect the flavor. These brownies are delicious! The perfect balance of rich chocolate brownie and cheesecake. Kind of like a chocolate cheesecake bar. And, they're so easy to make. I found I preferred mine slightly chilled, as opposed to room temperature. For some reason any kind of cheese-cake related baking tastes better cold. 
Recipe for Cheesecake Brownies
(adapted from What's Gaby Cooking)
1/2 cup unsalted butter
3 oz semi-sweet chocolate, chopped
1 cup sugar
2 large eggs
2 tsp. vanilla extract
2/3 cup all-purpose flour
8 oz cream cheese, at room temperature
1/3 cup sugar
1 large egg yolk
1 tsp. pure vanilla extract
1/2 cup milk chocolate chips (optional)
Preheat oven to 350 degrees. Line a 9×9 baking pan with foil, leaving a 2 inch overhang on 2 sides. Spray with non-stick baking spray. Set aside.
Melt the butter and chocolate in a small saucepan over medium low heat, constantly stirring until completely melted. Remove from the heat and whisk in the sugar. Add the eggs and vanilla. Add the flour and gently fold just until  incorporated. Pour into the prepared foil lined baking pan and set aside.
For the Cheesecake layer: In a small bowl, combine the cream cheese, sugar, egg yolk, and vanilla and whisk together until smooth. Drop spoon-fulls of the cheesecake batter on top of the brownie batter. Then using a knife, swirl the two batters together until you have a marbled effect. Top with the milk chocolate chips, if using.
Bake for 30 minutes. Remove from oven and allow to cool. Chill in the refrigerator. Cut into squares.

Thursday, June 9, 2011

Roasted Tomato and Jalapeno Salsa AND Roasted Tomato and Jalapeno Salsa With Baked Goat Cheese


There's something so much more special about a salsa made with roasted tomatoes, jalapenos, onions and garlic. I love the black flecks of the charred skins from the vegetables in this salsa. Just seems so rustic. It also adds another layer of flavor - a smokiness that sets this apart from regular salsa. 
If you're not careful, this salsa could knock your socks off. I de-seed two of the jalapenos and leave the seeds in the third. As you know, the seeds are where the 'venom' from the jalapeno hides, the heat that you either love or hate. If you're a hater, you could either de-seed all of the jalapenos, or leave them out altogether. Substitute a different, milder pepper if you like. But we like it hot, and even with only one of the three jalapenos left with the seeds, this salsa has a good amount of heat. The noticeable kind - but it's not overwhelming. 
This salsa is definitely good enough to stand alone. It doesn't need anything more. Make this for your guests and you're sure to impress. But if you want to take it one step further and 'wow' them, you can bake your salsa with a goat cheese center. It's heaven. And the creaminess of the cheese helps to balance out the heat, so there's that. Whichever way you go, you must try this one. It's not nearly as labour-intensive as it sounds. And it's worth every second of it.  Plus, it holds longer than a regular salsa, you can make it the day before and it's only going to get better.
Recipe for Roasted Salsa 
Adapted from: Chaos in the Kitchen

1 1/2 pounds tomatoes (about 10 medium roma tomatoes, or 6 vine-ripened tomatoes)
1 to 3 fresh jalapeño peppers (1 to 1 1/2 ounces), stemmed
Half of a small white onion, sliced into 1/4 inch thick rings
6 garlic cloves, peeled
juice of 2 limes (or to taste)
1/3 cup chopped fresh cilantro, loosely packed
1 to 1 1/2 generous teaspoons kosher salt (or to taste)


Heat the broiler. Cut your tomatoes in half and core them. Cut your jalapenos in half, leaving the seeds in as many as you like, depending on your tolerance for heat. Place cut tomatoes and jalapeños on a broiler pan or baking sheet, cut side down.

Broil for about 6 to 8 minutes, until skins have blistered and have blackened spots. Allow to cool.
Set the oven to 425 degrees F. On a separate pan or baking sheet, combine the onions and garlic.
Roast in the oven, stirring occasionally, until browned and soft, about 15 to 20 minutes. Allow to cool.
Add jalapeños, onions, and garlic to a food processor and pulse to desired consistency. Scoop out into a bowl. Add tomatoes to the processor and pulse to a rough puree.
Pour tomatoes into the bowl with jalapeño mixture and stir. Add lime juice, cilantro and salt to taste.
Now, are you still with me? Cause it only gets better from here.

Recipe for Roasted Salsa with Baked Goat Cheese
Adapted from: Chaos in the Kitchen
4 oz goat cheese, softened
8 oz cream cheese, softened
salt, to taste
2 cups Roasted Tomato and Jalapeno Salsa (recipe above)
Preheat oven to 350°F.
In the bowl of your food processor, pulse the goat cheese and cream cheese until combined. Add salt to taste. Scrape the cheese out of the bowl and form a disk. Place the disk of cheese into the center of a baking dish. Scoop the salsa around the cheese. Bake until warmed through, 10 to 15 minutes. Serve with tortilla chips.

Thursday, June 2, 2011

Lion House Dinner Rolls


To simply call these rolls "good" would be a gross understatement. They are so good. They're soft and tender and ridiculously delicious. They're made with white flour so you won't be getting any points from the fiber fairy but who cares? These are the rolls you make when you just want something indulgent. Eat them on their own, or serve them with dinner. They won't last, that I can promise. I made them earlier this week and will be making them again tomorrow. 
The instant yeast speeds things up, which means making them is not an all day project. In fact, I made them mid morning and they were ready for lunch. These here are a new favorite in my house. They're the kind of thing that will save you when you make soup for dinner. Your husband won't be able to give you dirty looks if these are served along-side. Honest.
Recipe for Lion House Dinner Rolls
(Recipe Source: Mel's Kitchen Cafe)


1 1/2 Tbsp. Instant Yeast
2 cups warm (not hot) water
1/3 cup sugar
1/3 cup butter, softened
1 egg
2 1/2 tsp. salt
2/3 cup nonfat dry milk
5-6 cups flour
In the bowl of your stand-mixer, combine the yeast, water, sugar, butter, salt, dry milk, 2 cups flour and egg. Beat together with the paddle attachment until very smooth. Add remaining flour gradually (about 1/2 cup at a time) until a soft but not sticky dough is formed. At this point, if you haven't already done so, switch to your dough hook. (I switched to mine when I had about a cup of flour left to add. Knead the dough for at least five minutes, adding additional flour if the dough is too sticky about 1 Tbsp. at a time. When the dough is smooth, supple and elastic, place it in a lightly greased large bowl, flip the dough over so the top side is greased, and cover with plastic wrap until doubled in size, about 45 minutes. 
Punch the dough down and then separate into two equal portions. Roll the first dough mass out to an 11x14-inch rectangle. Brush the top with melted butter. Using a pizza cutter, cut the dough into two pieces lengthwise. Then slice the dough into five or six strips across so you end up with 10 to 12 small rectangles. 
Roll each small rectangle up and place on a silpat or parchment lined baking sheet with the roll resting on its seam. Repeat with the second portion of dough.


Cover the rolls with lightly greased plastic wrap and let them rise until doubled, approximately 1 hour. 
Bake at 350 degrees F. for about 12-14 minutes or until they are nicely browned, rotating your pan halfway through the baking time.

These freeze nicely.

Wednesday, June 1, 2011

Oatmeal Butterscotch Bars

Browned butter, dark brown sugar, oatmeal, butterscotch chips...that's what these bars are made of. Pure yumminess. And the best part? They're different. Something new to throw into your repertoire. And? No peanut butter. Not that I don't love the stuff, but when do you find a recipe that has all that good stuff and no peanut butter? Never, at least I haven't. And with my son's nut allergy, I find it torture to see all the great recipes out there for squares that unfailingly contain peanut butter.
And don't even get me started on peanut butter substitutes. I've tried them all. They smell good, they look just like peanut butter, but then you taste it. Gross. Bitter with a weird aftertaste that it's impossible to describe.
Anyways. I digress. These bars are a great nut free solution for a different kind of bar that isn't chocolate. And while chocolate will always reign supreme in my view, these are a nice alternative. Delicate and buttery, and speaking of butter, the browning of it adds a hint of nuttiness sans nuts. Win-win.

Recipe for Oatmeal Butterscotch Bars
(Adapted slightly from:  Mel's Kitchen Cafe)
For the bars:
1 1/4 cups all-purpose flour
2 cups oatmeal
1/2 tsp. baking soda
1/2 tsp. salt
3/4 cup butterscotch chips
1 cup (227 grams) butter
1 cup packed dark brown sugar
1 large egg
2 tsp. vanilla
For the glaze:
1/4 cup butterscotch chips
2 Tbsp. dark brown sugar
1 Tbsp. butter
1 Tbsp. water
1/4 tsp. kosher salt (if using regular table salt, decrease to 1/8 tsp.)

Preheat the oven to 350 degrees F. and adjust an oven rack to the middle position. Line a 9x13-inch baking pan with foil, leaving an overhang for handles on the shorter sides of the pan. Spray with non-stick cooking spray. 

In a medium bowl, whisk together the flour, oats, baking soda, and salt, set aside. Place the 3/4 cup butterscotch chips in a large bowl, set aside. In a small saucepan, melt the butter over medium heat and allow butter to brown to a medium golden color. Watch it closely so it doesn't burn. Pour the hot butter over the butterscotch chips and whisk together until melted and smooth. Whisk in the brown sugar until incorporated. Then whisk in the egg and vanilla. Stir in the flour mixture, just until completely moistened - don't over-mix.

Pour the batter into the prepared pan and spread until evenly distributed. I used my hands and patted it down. Bake the bars about 16-18 minutes, until golden brown.

For the glaze, place the 1/4 cup butterscotch chips, brown sugar, butter, water and salt in a small microwave-safe bowl. (Don't even think about omitting the salt - it makes the glaze!) Microwave the mixture until melted and smooth, about 2 minutes on 50% power. Whisk to combine well. The glaze is a bit stiff. If needed, microwave it for a further 10 seconds to loose it. Drizzle the glaze over the bars while they're still warm. Let the bars cool completely in the pan. Remove the bars from the pan using the foil overhang and cut into squares. 

Monday, May 30, 2011

Fluffy Yellow Cake with Foolproof Chocolate Frosting (Revisited)

If you're looking for a great homemade yellow cake recipe, your search ends here. My first attempt was a recipe I found in Saveur, and it was 'good' but not great. The texture of the cake was a little heavy and had more of a spongy texture. This version, however, is amazing. No surprise the recipe is from Cook's Illustrated.
This cake has a soft, moist and tender crumb. It's a lot like the texture you get from a boxed cake mix, except it's missing that boxed cake taste. Hallelujah! I don't mind a boxed cake from time to time, and until now, I've always preferred it to any homemade versions of yellow cake. So many of the recipes out there just don't manage to get that moist and tender crumb that you get from the box. Why is that? There's hundreds of great chocolate cake recipes out there that beat the boxed chocolate cakes but when it comes to white or yellow cakes, they never seem to measure up.
And let's face it, while chocolate is great, sometimes it's nice to take a break from it. When you tire of chocolate and want something different, try this one. Honest. It's not the quickest recipe in the world and you'll dirty a lot of bowls, but that's the trade-off. This one is worth the sink full of dirty dishes. Trust. 
And the frosting? It's Cook's Illustrated "Fool Proof Chocolate Frosting" and it is a-mazing. Super soft and silky, perfect for swirling on your new favorite yellow cake. 
Fluffy Yellow Layer Cake
(adapted from 'Spring Entertaining' by Cook's Illustrated | 2011)
2 1/2 cups (10 ounces) cake flour, plus extra for dusting pans
1 1/4 tsp. baking powder
1/4 tsp. baking soda
3/4 tsp. table salt
1 3/4 cups (12 1/4 ounces) sugar
10 Tbsp.(1 1/4 sticks) butter, melted and cooled slightly
1 cup buttermilk, room temperature
3 Tbsp. vegetable or canola oil
2 tsp. vanilla
6 large egg yolks, plus 3 large egg whites, room temperature
Adjust oven rack to middle position and heat oven to 350 degrees F. Grease two 9 inch wide by 2 inch deep round cake pans and line bottom with parchment paper. Grease paper rounds, dust pans with flour, knock out excess. Whisk flour, baking soda, baking powder, salt and 1 1/2 cups sugar together in a large bowl. In a 4 cup liquid measuring cup or medium bowl, whisk together melted butter, buttermilk, oil, vanilla and yolks.
In a clean bowl of stand mixer fitted with the whisk attachment, beat egg whites at medium-high speed until foamy, about 30 seconds. With machine running, gradually add remaining 1/4 cup sugar; continue to beat until stiff peaks just form, 30 to 60 seconds (whites should hold peak but mixture should appear moist). Transfer to bowl and set aside.
Add flour mixture to now-empty mixing bowl fitted with whisk attachment. With mixer running at low speed, gradually pour in butter mixture and mix until almost incorporated (a few streaks of dry flour will remain), about 15 seconds. Stop mixer and scrape whisk and sides of the bowl. Return mixer to medium-low speed and beat until smooth and fully incorporated, 10 to 15 seconds. 
Using rubber spatula, stir 1/3 of whites into batter to lighten, then add remaining whites and gently fold into batter until no white streaks remain. Divide batter between prepared cake pans. Lightly tap pans against counter 2 or 3 times to dislodge any large air bubbles.
Bake until cake layers begin to pull away from sides of pans and toothpick inserted into center comes out clean, 20 to 22 minutes.
Cool cake in pans on rack for 10 minutes. Loosen cake from sides of pans with small knife, then invert onto greased wire rack and peel off parchment. Invert cakes again and cool completely on rack, about 90 minutes.
Foolproof Chocolate Frosting
(adapted from: Spring Entertaining' by Cook's Illustrated | 2011)
Yield: 3 cups - enough to frost one 9 inch 2 layer cake)
20 Tbsp. (2 1/2 sticks) butter, softened (60 to 65 degrees)
1 cup (4 ounces) confectioner's sugar
3/4 cup Dutch-processed cocoa powder
pinch of table salt
3/4 cup light corn syrup
1 tsp. vanilla 
8 ounces chocolate, melted and cooled slightly
In food processor, process butter, sugar, cocoa and salt until smooth, about 30 seconds, scraping sides of bowl as needed. Add corn syrup and vanilla and process until just combined, 5 to 10 seconds. Scrape sides of bowl, then add chocolate and pulse until smooth and creamy, 10 to 15 seconds. Frosting can be used immediately or held for up to 3 hours at room temperature. If making further ahead than 3 hours, cover and refrigerate, then let it stand at room temperature for 1 hour before using.

Related Posts with Thumbnails